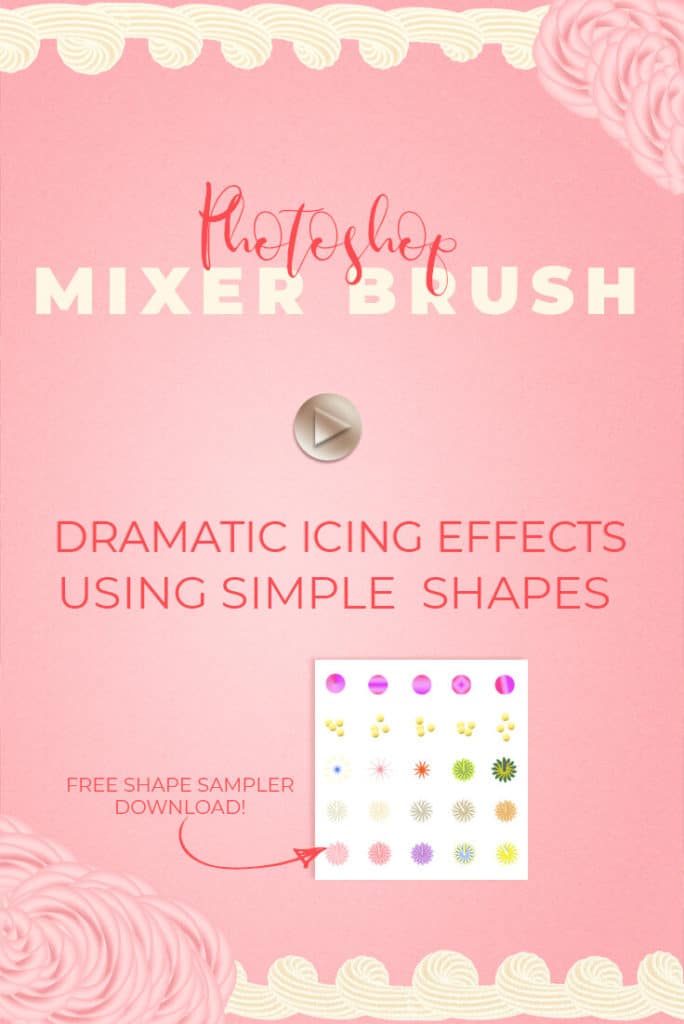
Photoshop Mixer Brush Sampling
In this week’s video, I’m going to show you how to use the Photoshop mixer brush in a unique way. Using an image sampling technique in the Photoshop mixer brush tool to create 3D effects. This technique produces interesting and unique shapes and brushes. You can do this without touching your brush settings or changing your brush.
Photoshop Mixer Brush: The Sampling Technique
If you’ve never worked with the mixer brush in this way, you are in for a game-changing experience.
What is the mixer brush used for in Photoshop?
Before we get into how we will use the mixer brush, let’s talk about how the mixer brush is traditionally used. The mixer brush has always been a powerful tool for painters and illustrators. The tool simulates real-life painting with some very convincing results.
The mixer brush creates realistic paint blending and effects in a digital environment. The mixer brush does such an amazing job at blending color and simulating brush strokes. That’s why it’s so popular for digital are media, used for illustration and art pieces.
The Mixer Brush as a Creative Outlet
I am not an artist still, I love the creative expression I get from painting. The part I don’t like is pulling out all the materials, covering the floor and furniture and then there’s the clean-up. Ugg.
The mixer brush tool allows you to get the realistic experience of painting with a bonus. You don’t have to cover all the furniture! Realistic painting in Photoshop is only the beginning. There is so much you can do with this tool.
Once you have the basic functions of Photoshop mixer brush down, the sky is the limit. Your mind is going to burst at the seams with creative flow.
More Posts on this Topic
Besides painting, what else can the mixer brush do?
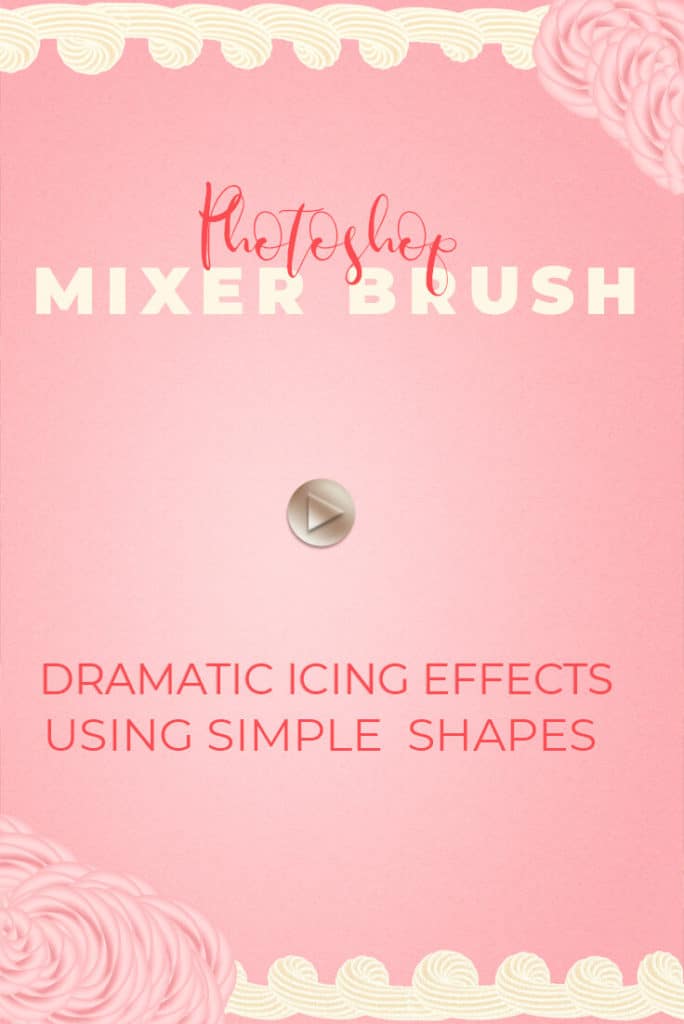
There are so many other applications for this amazing tool. In today’s video, we’re going to talk about using shapes and color gradients to create amazing 3-D brushes. I’m going to walk you through some examples of how to make samples for the mixer brush.
You can use a variety of different shapes and color gradient combinations. Use these shapes and colors to make icing, licorice, spaghetti, and tube effects. Using shape sampling is an easy way to create 3-D typography outside of the 3-D environment.
Where is the mixer brush tool in Photoshop?
Inside of Photoshop, you will find the mixer brush tool in the flyout menu under the brush tool.
Once the mixer brush is selected you will get several new options on the tool panel at the top of the screen. Read this post for a more in-depth overview of the mixer brush tool settings. In this post, I will explain all the various settings for the mixer brush and how this tool functions.
What is the mixer brush sampling technique?
Just as you can move the color around and pick up textures and patterns. The mixer brush allows you to pick up shapes and color.
Video One – Mixer Brush Shape Sampling
- Learn how to make shapes and turn them into custom brushes
- How to work with gradients to get the perfect color combination
- How to make shape clusters for even more interesting brushes
- Learn how to sample sections of brushes to create new effects from existing shapes
Here are a few guidelines for sampling with the Photoshop Mixer Brush
- Hold down the alt or option key and click on an area of your canvas. By doing this you are essentially sampling that particular area. The area sampled is loaded into your paint reservoir and can be used for painting.
- Certain shapes create interesting effects with the mixer brush. Shapes like stars and circles are especially interesting.
- Shapes do not lose their “shape” when sampled with the mixer brush. So you can use the mixer brush as a virtual pastry bag to push out colors in specific shapes.
Guidelines for Sampling with the Photoshop Mixer Brush
- When sampling, if sample all layers is checked off, you will not get a clean sample of a shape. The shape will mix with the background color and will not work properly. Make sure to turn your background layer off, when working with Sample all Layers.
- If Sample all layers is off, you must be on the layer you want to sample from or the brush will not load. Or it will whatever is on the current layer.
Painting Guidelines for Painting with the Photoshop Mixer Brush
- When painting with a loaded brush, if sample all layers is on, make sure your background layer is off. Otherwise, you will pick up paint from the background. This will leave a border the color of your background on your paint strokes. The stroke is not visible with the current backdrop. However, if you decide to change the color, it will be very noticeable.
Using Clustered Shapes for More Variation
You can sample a single shape or multiple shapes to create interesting brush strokes. In the video demonstration, I make a clustered brush made to resemble noodles. You can take the sampling technique and use it to cluster shapes. Put stars and circles together. Paint uniform strokes by clustering in a straight line and so much more.
There are tons of interesting effects you can make from clustered shapes. Use shapes in various sizes for even more options. In this demonstration, I’m showing you the most popular ways I’ve seen shapes and cluster sampling. Use these samples to get your creativity flowing. Then play with layout and size to produce even more mixer brush samples.
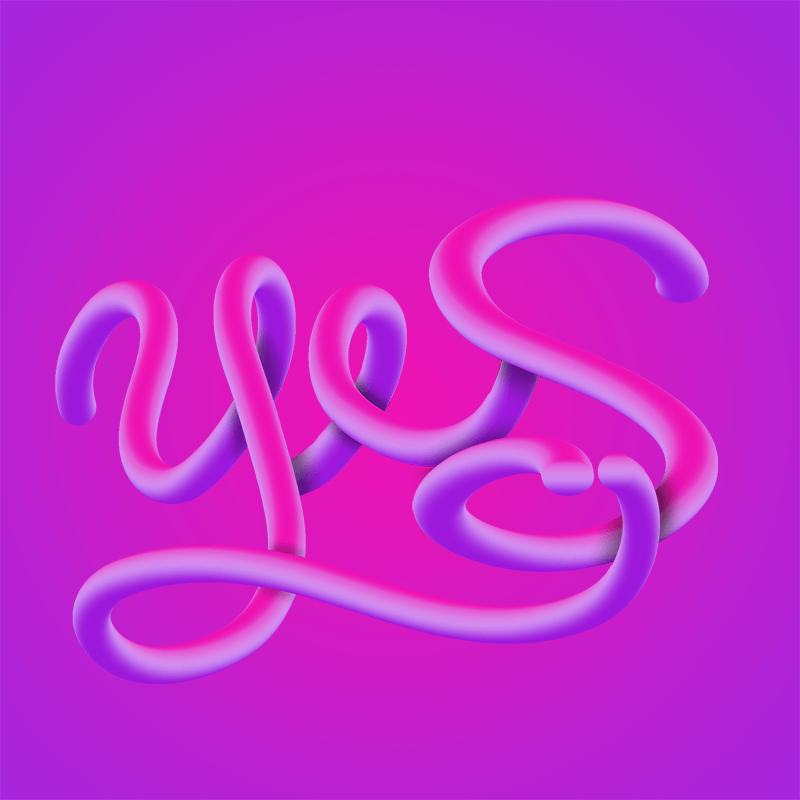
Mixer Brush Typography Examples
Learning how to make these mixer brushes is about finding your own creativity. Knowing how to use a tool will help you apply it to your design focus area. Still, it doesn’t hurt to see some examples. So I’ve included a few examples of cool custom typography that looks like it took hours to make.
FYI: I made both of these in a matter of minutes! I may follow up here with a tutorial on how I made these so make sure to come back for an update.

How to create a 3-D effect in Photoshop?
The mixer brush tool allows you to create amazing multi-dimensional effects. 3D, outside of the 3-D environment. There are no special settings to work with.
All you have to do is follow these two pre-requisites:
- A shape to sample – The brush shape will be defined by the exterior shape of your sample. You can sample portions of a shape or the entire area and get two different results.
- Color variation – The image needs multiple colors to create multi-dimensional effects. It’s best to use shadows and highlights (light and dark color) to get a three-dimensional look. A gradient is the best way to control color in the sampled image.
Video Two – Application
Video one is learning to create the brushes, this video is all about the application of the brushes in typographic design. In this tutorial, I’ll show you a typography design that will take minutes and look like it took hours to make!
- Learn three ways to add shadows to create multi-dimensional 3D text photoshop effect using the mixer brush and simple gradients
- Learn how to mask an image to create the illusion of dimension
- How to create custom shadows
- How to control shadows with masks and opacity settings
Gradients used in the tutorial

I used a few different gradients in the video you can download the Photoshop gradient file here. If you want to use these colors to make your own gradients here are the hex codes used for each example.
Gradient Hex Codes
Icing: Left: 2989cc Center Left: ffffff Center Right: d99f00 Right: 906a00
Spaghetti: Left: 8e600b Right: fde8a7 Center: fabc67
Purple Tubes: Left: 9c18da Right: ed13b2 Center: d38bee
Licorice: Left: fe0302 Right: fe0302 Center: 7e0404
Shape settings used in this tutorial
I used the ellipse and polygon shapes to make the sampler brushes for this tutorial. You can find these in the shapes tools in the left side panel in Photoshop. Here are the settings I used.
Rose/ribbon icing tip: Polygon
On the main shape panel
· 10 sides
In the drop-down menu settings:
Thickness: .5px
Check “smooth corners”
Check “Star”
Indent sides by: 95%
Licorice Tip: Polygon
On the main shape panel
10 sides
In the drop-down menu settings:
Thickness: .5px
Check “smooth corners”
Check “Star”
Indent sides by: 80%
Border Icing Tip: Ellipse
Height: 250 px
Width: 80 px
Duplicate and rotate by 25 degrees to complete a circle shape
All other shapes used the ellipse toolset equal height and width.
Premium products for the mixer brush
There is always a way to take all of the tools you learn here to the next level. The best way to enhance your creativity is to let someone else do all the hard work of testing and creating the brushes so you can play with them! Check out some of these amazing mixer brush packs to get you started.

Other Posts You Might Like
Slide Deck Animation & Design 
Font Pairing Resources 
Watercolor Brushes in Photoshop 
Copper Texture in Photoshop
What Next?
If you like the tutorial videos that we share here on Prettywebz, then make sure to subscribe to our newsletter to receive notifications when we send out a new video or a blog post. Subscribers also get exclusive downloads that you won’t find anywhere else on the web. You can sign up in the footer of any page on the website.
Watch my Tutorials on Youtube!
Also join me on Youtube as well to check out the playlists I’ve set up for Photoshop, PowerPoint and other software you can use to design your online graphics.
Did you like this Photoshop brush settings post? Share it with a friend or save it for later by pinning this image!