Dripping Text Effect Photoshop Tutorial
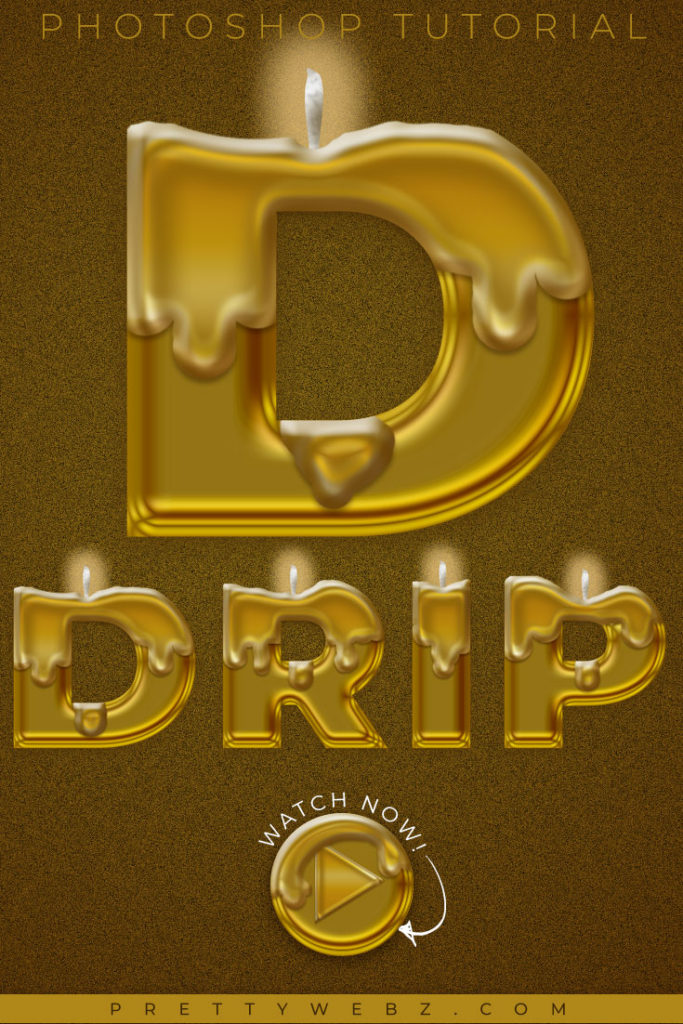
Learn how to make a multi-layer dripping text effect in this Photoshop tutorial! I’ll show you how to make a basic dripping text effect and how to add other elements to create a melting candle text effect with a glowing wick. This dripping text is perfect for the holiday season and for creating beautiful candlelit messages for social media, holiday cards, event posters, and advertising.
LEARN DESIGN TOOLS ONE STEP AT A TIME
Learn and master the most frustrating aspects of overwhelming programs like Photoshop and Illustrator in a fun and entertaining way with PrettyWebz design tutorials.
Tutorial projects like the ones we share here on the blog are meant to help you grasp the use of the most powerful aspects of design software one step at a time. In the process, you will build your design assets so that you can create a stunning marketing design for your business. So, don’t forget to sign up below in the footer to become part of the Prettywebz family and never miss another tutorial.
RESOURCES USED IN the Dripping Text TUTORIAL:
Gold gradients: http://bit.ly/324JXVx
High Gloss Contour: http://bit.ly/328TIlR
Font used in this Photoshop tutorial: Montserrat Black from Google fonts
Other Posts You Might Like

Also join me on YouTube as well to check out the playlists I’ve set up for Photoshop, PowerPoint and other software you can use to design your online graphics.
Video #1 Free Layer Styles Pack (Supplemental Video)
This Photoshop layer styles pack download comes with the three styles you will need to create a melting or dripping text effect. This amazing style can be used for all sorts of different themes from Halloween right into the holiday season. A candle text effect is a perfect effect for the holidays. The video will demonstrate how to use the Photoshop styles pack download with layer masks to get the look in seconds. You will also get a PSD file with a pre-made wick that you can easily copy onto your own text.
Last and most importantly, I’ll show you how to scale the layer styles up or down to accommodate different document and text styles and sizes. Watch to learn how to create and scale Photoshop layer styles and download the Butter Gold Photoshop Styles pack here: http://bit.ly/2WMlpzG
Video #2 Dripping Text Full Tutorial
Watch the video or read the transcript below. Also, check out other tutorials you might like from my Photoshop tutorial collection, branding, social media design, and design principles.
Start of Dripping Text Effect Transcript
Today I’m going to show you how to make a dripping text effect inside of Photoshop. Later, I’ll show you how to modify this text effect to create a candle dripping text effect as well. So, with that let’s go ahead and get started.
All right, we’re starting here in a new document. Our new document size is 2,000 pixels wide by 1200 pixels. This is a 72 PPI document.
I’m going to go ahead and unlock the background layer. I have a couple of colors here that I’m going to use. You can use any color if you’re following along with me my foreground color is B00056. My background color is #701e94.
Go over to the gradient tool and choose the linear gradient. I’m using the foreground/background gradient, this is a default gradient inside of Photoshop. You will get a little cross cursor. Click just outside of the canvas, then drag it over to the other side of the canvas.
Set Up the Base Text Layer
Go over to the text tool and type out the word “DRIP” or this can be any word that you want. Make the text much bigger. Our text is 685 pixels and we’re going to leave our tracking at 25. Change the text color to III b85 You should have a yellow color. Rename this layer “Base.”
Layer Styles for Base Font
Double click on the far-right side of the layer to bring up my layer styles. Now we will start working with our layer styles.
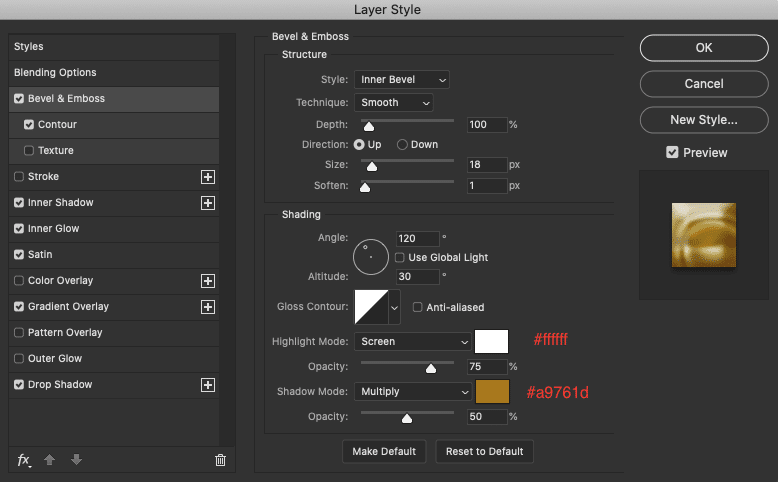
Bevel and Emboss Settings
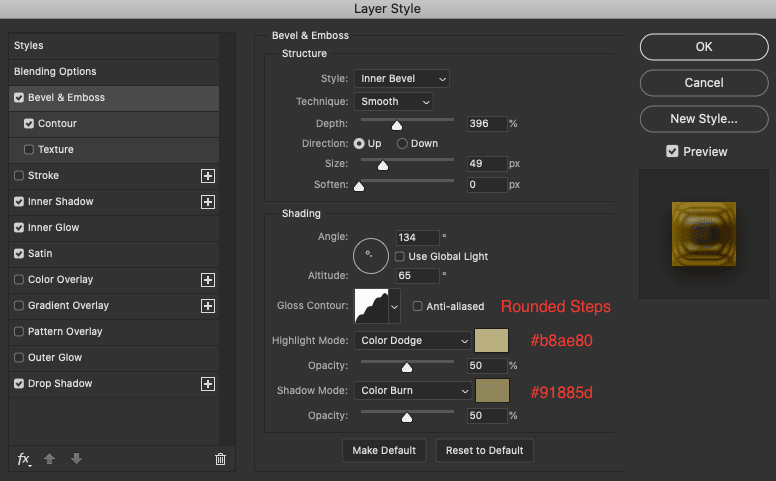
For the bevel and emboss we’re going to use a style of inner bevel
technique is smooth
depth is 396
the direction is up
our size is 49
We’re not softening it at all so that will be zero pixels
For Shading
Leave the angle at 134
Altitude is going to be 65
for the gloss contour: rounded steps
Important Note
You may not have all of these contours if you’re at the drop-down menu and you come over to the little gear icon you can click on contours in the menu. This will give you all of the additional contours that you need.
For the highlight mode, we’re going to choose color dodge and we’re using the color #b8ae80 click okay. The shadow mode we’re using color burn and that color is going to be #91885d
At this point, you should have something that looks like yellow neon.
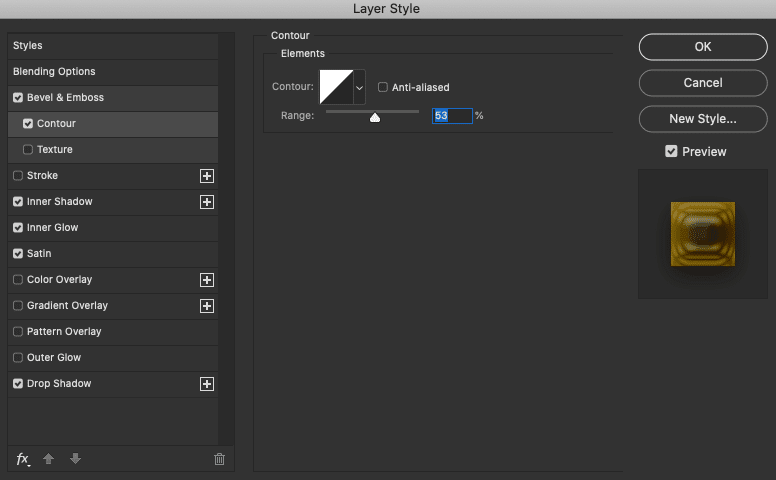
Click on contour and adjust it up to about 53%
Inner shadow
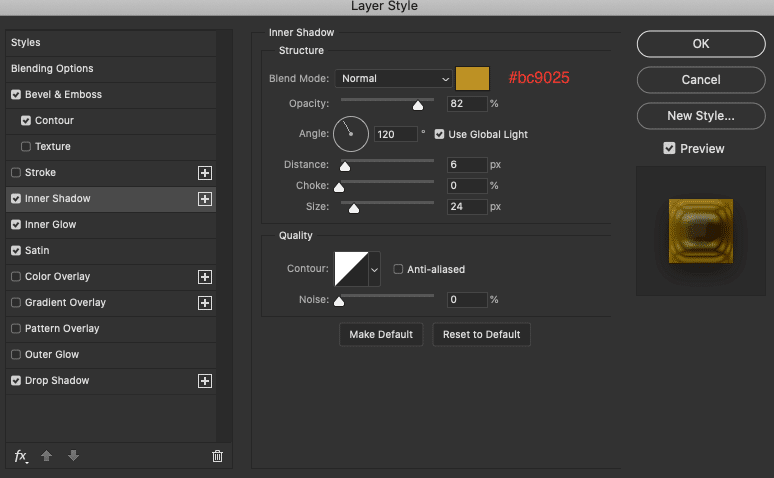
The settings for inner shadow are:
Blend mode is going to be normal
The color here is going to be BC 9 0 to 5
Opacity is 82%
Uncheck global light and make it 120 degrees for the angle
Our distance is six
Choke is zero
size is 24
Everything else is fine
Inner Glow
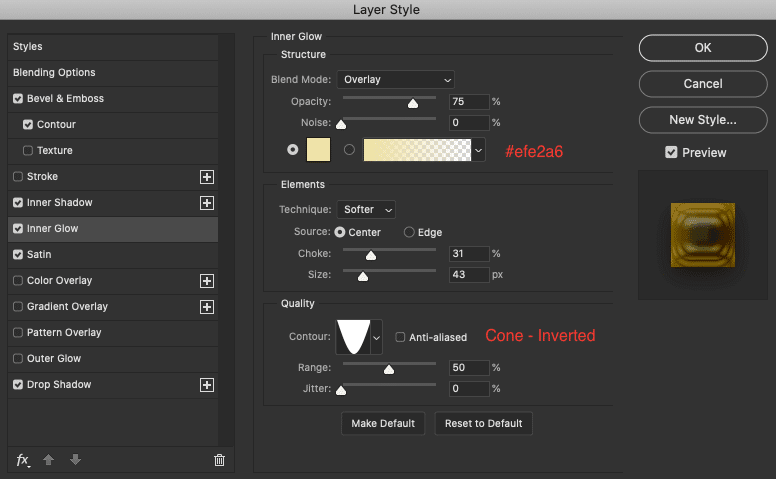
Now we’ll move on to inner glow so go ahead and check that off. Okay, the settings for inner glow are:
Blend mode overlay
Opacity is 75%
Noises zero
The color is EF e to a six
Technique is softer
Source is Center
Choke is 31%
Size is 43 pixels
Contour is going to be cone inverted
Important Note
One more thing I forgot to mention earlier. Because I have these set up where you can actually see the name of the contour. If you go back to the gear icon you can choose how you want to view the contours. That way if you want to see the actual name rather than a thumbnail you can either choose small lists or large lists to give you this type of view.
Range stays at 50%
Jitter zero
Satin Settings
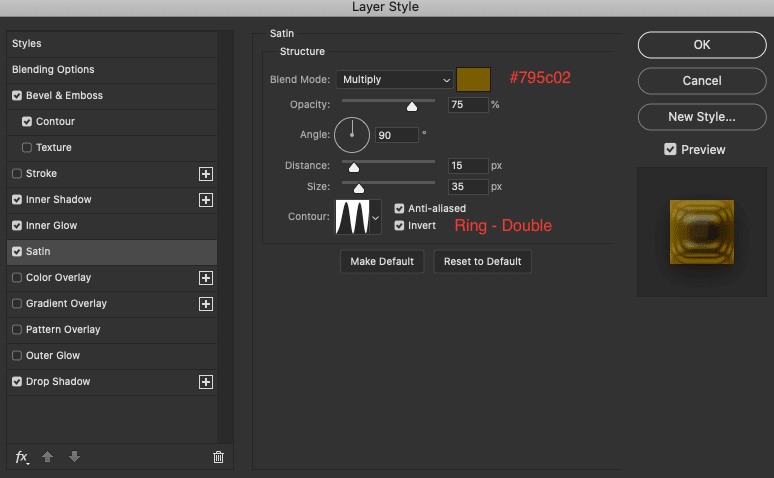
Choose satin, our settings for the satin layer style are going to be
Blend mode multiply
Color 795 see zero-two
Opacity is 75%
Angle is 90 degrees
distance is 15 pixels
size is 35 pixels
Contour Ring – Double
Drop Shadow Settings
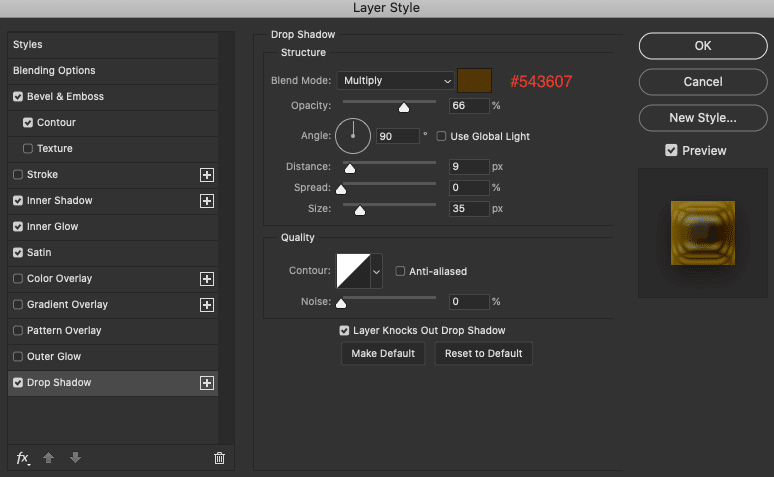
Blend mode multiply
Color is going to be five four three six zero seven
Opacity is 66%
Angle is 90 degrees
uncheck global light
Distance is nine pixels
Spread is zero
Size is 35 pixels
Contour is linear
Drip Layer Style Settings
Duplicate the base layer to start working on the drip layer. Right-click on the base layer and choose duplicate layer. Rename the new layer “Drip” Double click the far right of this layer to bring up the layer effects panel
Bevel and Emboss
Inner bevel smooth
Depth is 100%
Size is going to be 18
Soften one pixel
The angle is going to be 120 degrees
Altitude will be 30
Contour is linear
Highlight is screen
Color #ffffff
Highlight opacity is 75%
Shadow mode is multiply
Color: #A9761D
Opacity for the shadow 50%
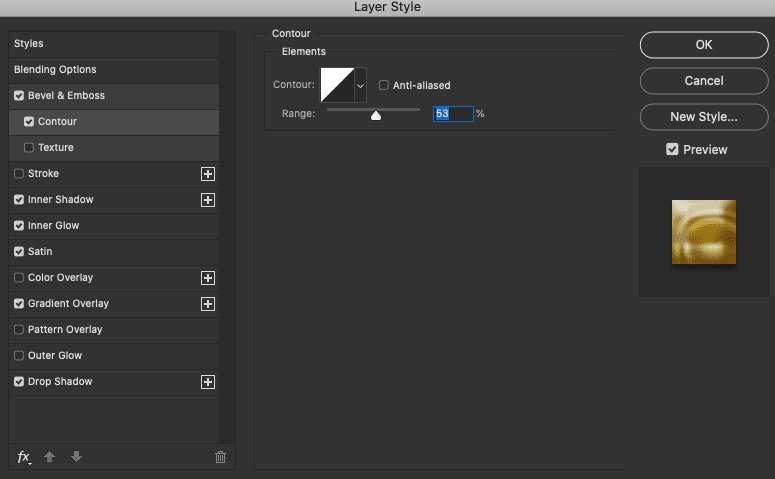
Under bevel and emboss check off contour and that’s going to stay at 53%
Inner shadow settings
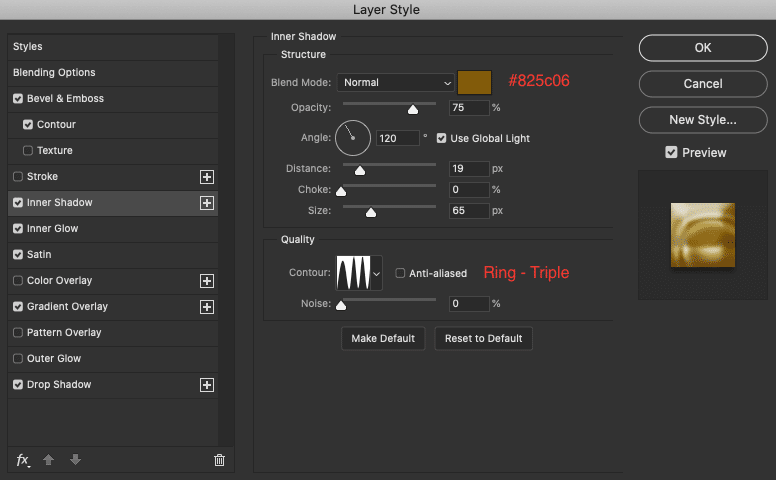
Blend mode normal
Color #825c06
Opacity is 75%
Angle 120 degrees
Distance is 19
Size is going to be 65
Choke is 0
Contour is Ring – triple
Noise is going to be 0%
Inner glow

Blend mode is: Overlay
Opacity 75%
Noise zero
Color #FBBA0B
Technique is softer
Source is Center
Choke is 31
Size is 43
Contour is rolling slopes – ascending
Range is 50
Jitter zero
Satin Settings
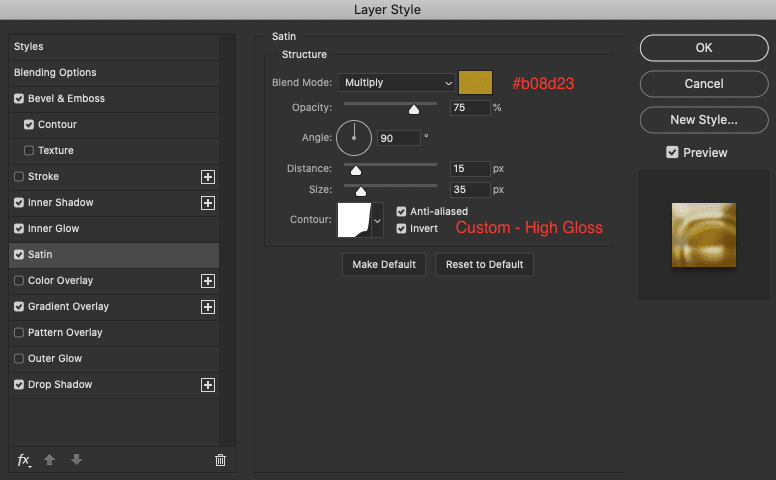
Blend mode multiply
Color #B08D23
Opacity 75%
Angle 90 percent
Distance 15
Size 35
Contour is going to be a custom high gloss
Important Note
This is a custom-made contour you can download it here. If you would rather make it on your own here are the settings:
Node 1: input is 49% output zero
Node 2: input 81 output 17%
Node 3: Input 92% output 53%
Node 4: Input 95% output 85%
Node 5: Input 100% output 100%
Gradient Overlay
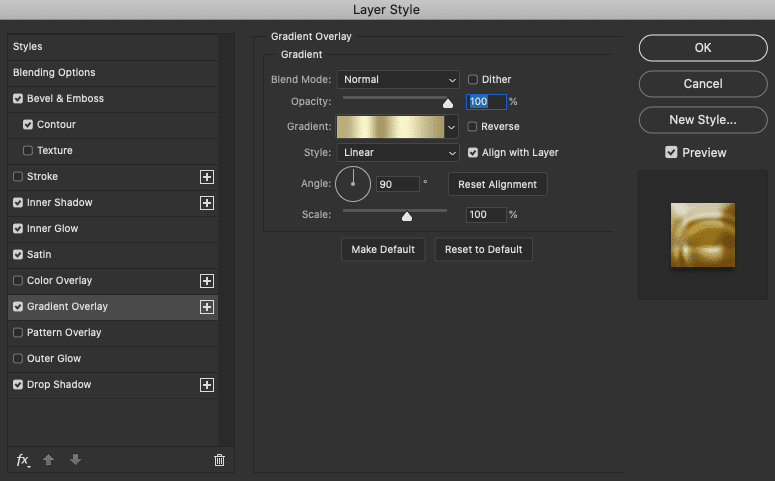
Blend mode normal
Opacity 100%
Style is linear
Angle is 90 degrees
Scale is 100%
Click on the gradient that will bring up the gradient editor, for this tutorial we are using gold 12 from my gold gradients set.
Important note
I’m going to be using one of the gold gradients I have available for free, you can download them here.
To install the gradients
Download and unzip the file then come back to the gradient editor. Choose load and then navigate to where you’ve saved the file and Photoshop will load it right in there. For this tutorial we are using gold 12.
To make the gradient on your own
Color Stop 1 #a89563 Location 0%
Stop 2 Color: #d0b262 Location 18%
Color Stop 3 Color #f7f4d4 Location 36%
Stop 4 Color d5bf79 Location 49%
Color Stop 5 #a89563 Location 67%
CoStop 6 Color #f7f4d4 location 85%
Color Stop 8 Color #b79545 location 99%
Click OK
Drop Shadow Settings
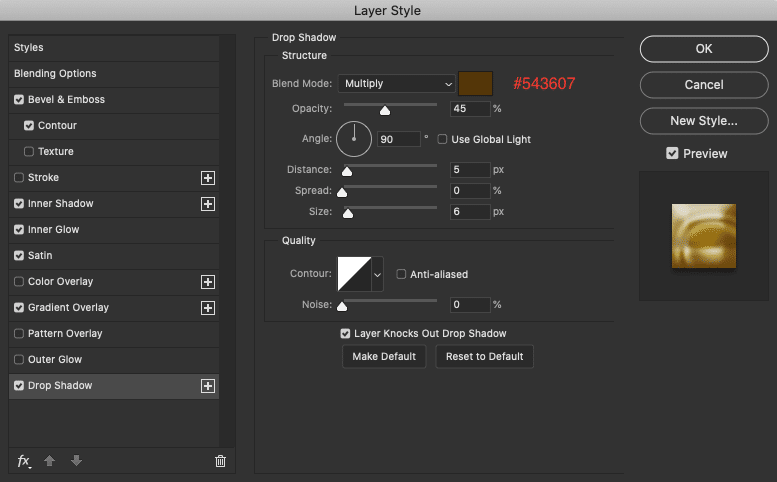
Blend mode multiply
Color #543607
Opacity is a 45%
Distance is 5
Size is 6
Spread is 0
Everything else will stay the same and click OK
Creating the Drip Portion of the Dripping Text
Now we’re going to create the drip part of the dripping text effect. With the drip layer selected come down to the bottom of the layers panel and select the mask icon to add a mask to that layer. We’re going to come into the brushes and choose a hard round brush from Photoshop default brushes. Make sure that you have the mask selected. The foreground/background is set to default black and white.
Press the letter X to get the black. Remember, black hides and white reveals. We want to hide some of the drip layer. I’m going to make this brush really big and take off the whole lower half of the drip layer.
So, I’m just coming in and making a straight line across to reveal the base. I’m going to take it up pretty high.
Okay, now I’m going to lower the size of the brush and base the brush size on the size of the lettering. Press the letter X to get that white on the top. The white is going to reveal, so we’re going to start dragging the drip layer down with the brush just to make it look like a drip.
Do this with the entire word. You can change the size of the drip just by changing the size of the brush.
The Candle Effect
We’re going to take this dripping text effect one step further by adding a candle style effect to it. Okay, so I’m going to come back up to the drip layer mask and take get off the top as well. So we’re going to click on X. Make sure that black color is on top. Make this brush really big and push the top of each letter down so it looks like a dip.
What that’s going to do is reveal the base layer. We don’t want to do that so we’re going to come back to the base and we’re going to add a mask to the base. Make sure you have that mask selected and you are on the base layer and brush over it to hide where it’s revealed on top.
Come back and smooth out some of these peaks.
The Candle Wick
Add a rounded rectangle shape. Change the color to white and add a pattern overlay to it. Move the candlewick layer under all other layers and above the background layer. On the keyboard, press command+t to get into the transform tool. Select the warp tool to shape the candlewick.
Inner Shadow
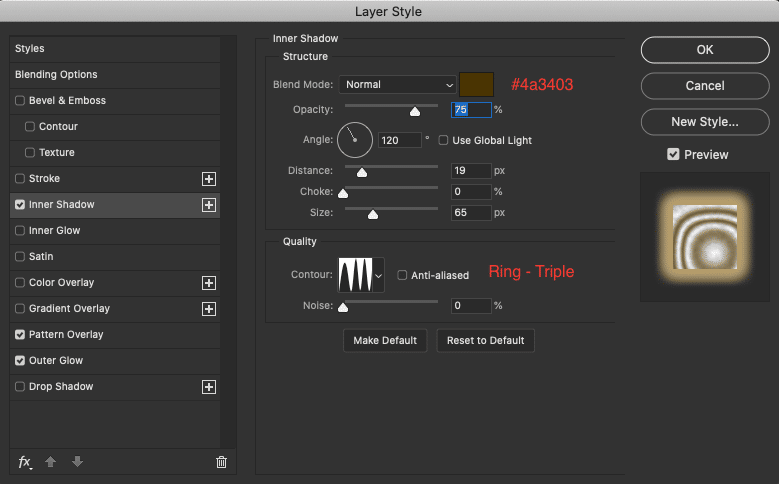
Color #4a3403
Opacity 75%
Distance 19
Size 65 pixels
Contour: triple ring
Pattern Overlay
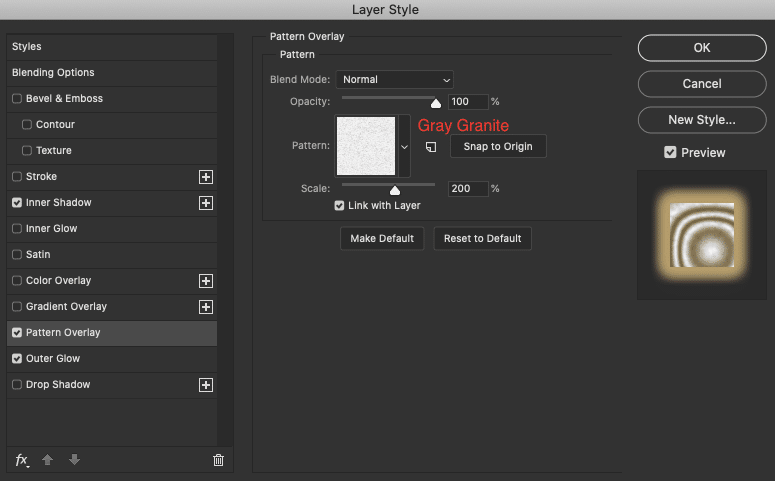
Blend Mode: Normal
Opacity: 100%
Pattern: Gray Granite (From Erodible Textures set inside of Photoshop)
Scale is 200%
Outer Glow
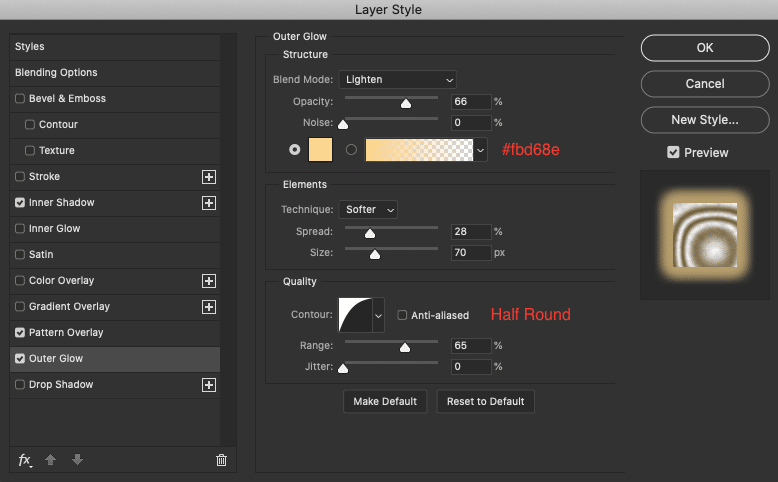
Blend mode: lighten
Opacity: 66%
Noise: 0%
Color: #fbd68e
Technique: softer
Spread 28%
Size 70 pixels
Contour: half-round
Range is going to be 65%
Jitter 0
Click OK
Duplicate the wick for each letter
Press and hold the option/alt key and drag the wick over to each one of the letters so we can have a whole set of candles. You’re done! You should now have a dripping text effect.