

Abstract Background & Photo Overlays in Photoshop
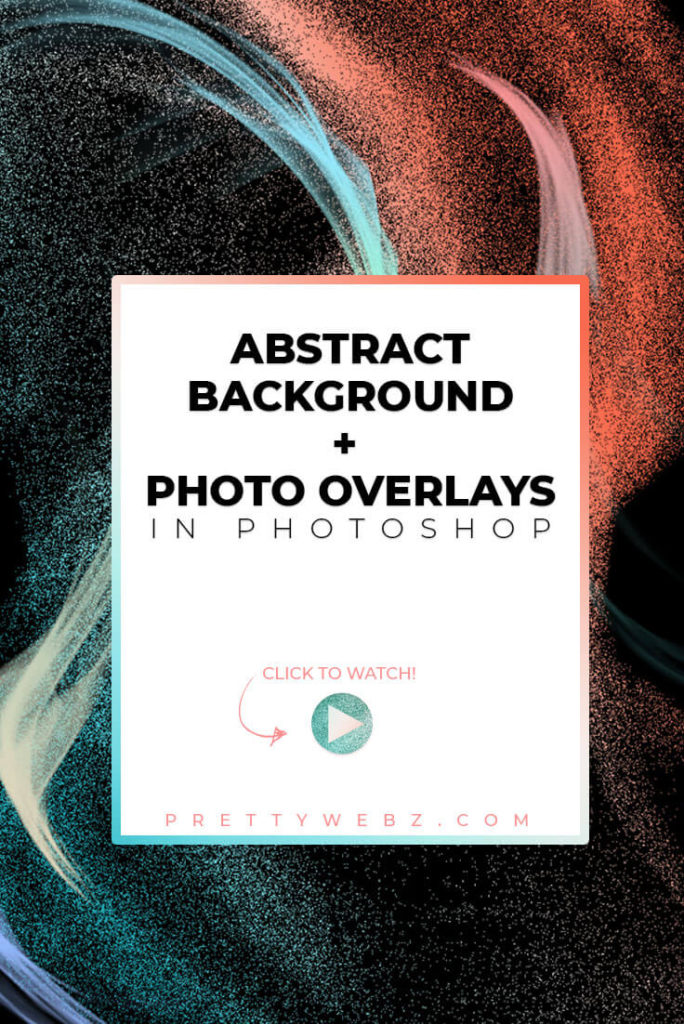
In this video, learn how to create an abstract background and abstract photo overlays using the flame filter in Photoshop. We’ll start with the abstract background and creating individual photo overlays.
Then we’ll put these graphics to work in a simple photo enhancement project to accent motion in Photography. All of this using these abstract photo overlays.
Finally, I’ll show you how to extract all of your custom overlays to use in PowerPoint, Word and online graphics editors like Canva and Fotor.
LEARN DESIGN TOOLS ONE STEP AT A TIME
PrettyWebz tutorial can help you learn and master the most frustrating aspects of overwhelming programs like Photoshop and Illustrator in a fun and entertaining way.
Tutorial projects like the ones we share here on the blog are meant to help you grasp the use of the most powerful aspects of design software one step at a time. In the process, you will build your design assets so that you can create a stunning marketing design for your business. So, don’t forget to sign up below in the footer to become part of the Prettywebz family and never miss another tutorial.
Other Tutorials in this Series
For other tutorials in the Photography Overlay series, watch last week’s video on how to add a graphic overlay as a mask or face paint. In this video, we used a Sugar skull example but you can use any graphic. From mascots and sports teams to butterflies.
In next week’s tutorial, I will show you how to make sparkler overlays to enhance your photography. Give your photos more impact and emotion with beautiful overlays that will enhance the mood you want to achieve.
RESOURCES USED IN THIS TUTORIAL:
No outside resources, it’s all Photoshop!
Other Posts You Might Like
Rainbow Foil Photoshop Tutorial 
Copper Texture Photoshop Tutorial 
Wood Grain Texture Photoshop Tutorial
Also join me on YouTube as well to check out the playlists I’ve set up for Photoshop, PowerPoint and other software you can use to design your online graphics.
Watch the video or read the transcript below. Also, check out other tutorials you might like from my Photoshop tutorial collection, branding, social media design, and design principles.
Video Transcript
Today, I’m going to show you how to use the fire filter inside of Photoshop to create abstract backgrounds and graphics.
Alright, so I have a couple of goals for this video. The first one is I want to show you how to actually create these abstract graphics that you’re looking at up on the screen. So that you can export them use them outside of Photoshop. Integrate them with other graphics and photographs as well.
In the second part, I want to go over how to use this flame filter in a very simple project. Just to demonstrate how you could use something like this to accentuate motion.
Because these flame accents have this nice natural flowing movement to them, they lend really well to these types of photographs. I want to go through a really quick demonstration of how you could integrate something like this with a photograph.
Making an Abstract Background
Before we get to the photo demonstration I want to show you how you could use the flames to make backgrounds and other graphics. Graphics that work together to create something even bigger. So with that let’s go ahead and get started.
I’m going to show you how to make a background with the flame filter really quickly. I want to show you just how easy it can be. I know some times people have trouble working with this pen tool.
What we’re going to do on this one is use this right here, the free form pen tool. What this does is allow you to make your design without having to work with any of the anchors or any of that. So, it’s much easier to work with. If you have a tablet that also makes it a lot easier, but you can do it easily with the mouse as well.
I’m just going to come in and make a simple swirl design like that. This [path] is just giving the flame filter something to work with. I’m going to come up [to the layers panel] make sure I have a clear layer. Then I’m going to come up to filter, then render and then flame.
Okay, so this is what we’ve got [demo of flame]. Now you can make some adjustments to this [showing flame filter settings panel] if you want it to be bigger. Keep in mind we are making a background.
Flame Filter Settings Detail Coming Later
I’m not going to show you all of the features that you have here [in the filter settings panel] just yet I’m going to show you how to make this background first.
My intention is to show you what you can do with something like this first. Then when we go into our second project I’ll go into a little more detail about some of the features that you have available to you here [flame filter settings panel].
So for now, we’re just going to go ahead and make the design. You can skip ahead if you want to see just how to make that flame. For everyone else, stick with me and I’ll get to all of this in a little bit.
Adding Color Effects
When you’re happy with it [the design] you can click okay. Now you’re going to have something like this [showing white light flare design] I’m going to go ahead and get rid of that work path [blue line showing on the canvas]. This is basically what it’s given me. Because I want to make this into a background I’m going to make it a little bit bigger.
Go ahead and add a gradient fill to this. I’ll come down here [layers panel adjustment layers] I’m going to click on gradient I’m going to click OK. For now, I just want to pin this [gradient fill layer] or clip this to the layer underneath.
I’ll open that [gradient fill settings] back up [double click the layer] and I’m going to just choose something [gradient]. I went ahead and added this [demo gradient] gradient to it. I’m going to click OK and this is what my background is going to look like [demo design].
Creating Particles
Now that I have this set up with the gradient and everything the way I like it I’m going to change the blend mode of this [the light flare] layer. I’m going to change that [blend mode] to dissolve. I really like the idea of this flowing look that also looks like it’s coming apart. Just one idea of how you can use this flame filter to create a nice background.
Single Light Flare Graphics
What I like about these are there are two separate images here [showing two light flare graphics layered together]. Two separate graphics but I can layer them and turn them into something completely different.
As you can see here, it [the canvas] kind of looks like one abstract background. You can get a lot of interesting effects with just layering these like this. If I take that background away [solid color background] you can see that they are completely transparent.
Using Light Flares as Photo Overlays
All right so I’m going to start off with this image right here [demo image]. I chose this because he’s obviously in motion. The idea here is to accentuate the motion in the image.
I’m going to come over to the pen tool. The fire filter is going to use this shape [shape I will create on the canvas using the pen tool] to dictate the way it [the flame filter] renders out the flames.
I’m going to start up here [the top of the head, I made the first point]. Then I’m going to end it down here [the bottom of his feet]. I’m going to actually zoom out a little. Okay, so I want to end it down here [bottom of his feet] but I’ll have to bend it quite a bit.
[Making the curve with the pen tool: Make the first point then when you make the endpoint click and drag in the opposite direction you want the curve. Keep dragging until you get the desired roundness.]So, I’m going to leave it right about there [curved with the body]. That’s going to be the shape of our flame, the motion that we’re going to create.
Preparing for the Flame Filter
Now that we’ve got this shape, we can go into the flame filter. Before I do that, I’m going to add another layer here [the layers panel] so that my flame is not on the same layer as my image. With this layer selected I’m going to come up to filter then render and I’m going to choose flame.
Now, this is what it’s automatically come up with based on this line that I gave it. I usually add the custom color [showing flame with white overlay] but normally this is what it’s going to look like [showing natural flame] so you have this it looks like real fire.
Flame Filter Setting Panel Review
You have some options here. The flame type, so we want one flame along a path, just something simple like this. You can have multiple flames and really a whole bunch of different things here that you can choose from.
I’m just going to choose this, multiple flames along a path, just to give you an idea. I’m going to make that thicker so you can kind of see it. We can see what it’s done there, so it’s just made it [the flame] wider.
You can see that we have some areas of this [the settings panel] are grayed out. That’s just because of the style that I’ve chosen. When I come back to this one flame along a pack you’ll see that most of this stuff is going to be grayed out for me. So, I’m not going to have very many options. That’s the one I’m going to choose though.
I’m going to bring it [filter settings] down to about 160 for the width and I am going to use a custom color. We’ll keep it white.
You can click on this right here [color swatch at the bottom to open the color settings] and change the color to anything that you want. You can change the color after the fact and use gradients and all of that. which is what I’ll show you here in a minute.
Advanced Settings
For now, let’s go ahead and take a look at these Advanced Settings now. In here you can make changes to the opacity, the complexity of the flame, alignment and all of those things.
You also have other options here for the style shape this is just going to change the style of the flame. If you have it on every time you make a change here [in other settings] it’s going to randomly change that as well.
I’m going to work with this a little bit, try to get what I had back. We’re just going to go ahead and keep this shape right here [shape showing in preview window]. I’m going to click okay. Now it’s added that here [onto my canvas].
Positioning the Graphic Overlay
I don’t need that path anymore [blue line showing on the canvas] so I’m going to go ahead and come over here to the path option and just delete that.
I’m going to zoom in to this image and I’m going to position this [the light flare graphic] maybe about right there [barely over the photo subject]. All I’m going to do is come in [add a layer mask to the graphic] and with the layer mask [selected] press the letter B on the keyboard to get your brush tool. Make sure you are on the mask.
This [foreground/background colors] should be set to black and white. We’re going to use a hard-round brush for this [default brushes] and I’m going to just zoom in pretty close. Lower that brush [size] a little bit. Then just remove it [mask the graphic] from his arm.
I like to take most of it [mask the graphic further than necessary] away just so I can see where [the masking area] ends then X on the keyboard to add that white back. I can add this [part of the graphic] back in there. I’ll remove this [part of the graphic] from the knee area as well.
Adding Gradients
I can also take this a little bit further by coming over to the adjustment layers. I’m going to choose a gradient layer and I’m going to pin this layer and click OK. Pin [add a clipping mask] this [gradient adjustment layer] to the flame itself. [Right-click on the gradient adjustment layer and choose create clipping mask on the pop-up menu. The layer will be clipped to the layer beneath it.]
Double click to open that gradient fill dialog box back up. I’m going to choose some colors so I think I’ll choose this right here [gradient preset]. Of course, you can adjust the scale and all of that.
Preparing Graphics for Export
Before I leave you, I want to quickly go ahead and show you how to flatten these graphics and export them to use them in other programs outside of Photoshop. So, with this first one, we’re going to grab these first two layers [gradient + graphic layer] because this gradient is actually clipped into this layer right here [layer beneath it].
We’re just going to grab that first layer hold the shift key on your keyboard grab the second layer command or command/ctrl + the letter e on your keyboard. That’s just going to merge it into one layer. I’m going to go ahead and do the same thing with the rest of the graphics. So now we have four objects.
This right here is just a background [solid color layer] I used so that you could see what we were working on. These right here you can either delete or just hide them [solid color layers]. What we want to do is save them as PNG images.
If you’re working inside of PowerPoint or if you’re going to use them for a presentation make sure that they are PNG 24. Otherwise, you’re going to get a white outline they will be transparent images but for some reason PNG 8 doesn’t show up very well inside of programs like Word and PowerPoint. Just keep that in mind. If you’re saving these for Word or PowerPoint make sure that they’re PNG 24.
Exporting Individual Finished Graphics
Okay, from here once you have all of these [graphics flattened] together, you can come up to file then go to export we’re going to choose layers to files. Because we want to export each one of these layers as a separate file, we’re going to go ahead and choose browse. I’m going to save it to my downloads, click open. That’s where it’s going to be saved. I’m just going to name this “sample” so right here’s [save window] where you’re going to choose your file type.
File Format Options
Remember, for programs like PowerPoint and Word we’re choosing PNG24. If you’re using this for web PNG 8 would be a better option because it’s a smaller file. A jpg is going to add a background so you don’t want to go there.
Know PNG 8, web use, png-24 higher quality. Now down here [save settings window] we’re going to choose transparency and we want to trim the layers. Then right here I have visible layers only selected which means that only these four that are with the little eyeball turned on are going to be saved out. So, the rest of these will not be saved. I’m going to go ahead and click run.
Okay, once you see export layers to file that was successful you’re pretty much done. This one went really fast because we only had four layers that we were exporting. I’ve exported using this method and taken up to an hour sometimes. Just be mindful of how many layers you’re trying to export at one time. I’m going to click OK.
We have those four graphics ready to go. They’re all in PNG format so you’ll be able to use them wherever you need to.
If you liked this video make sure to like share and subscribe to this channel. If you want more Photoshop tutorials and make sure to click on one of the links up on the screen right now until next time.
Thanks for watching!