Granite Texture + Text Effect Photoshop Tutorial
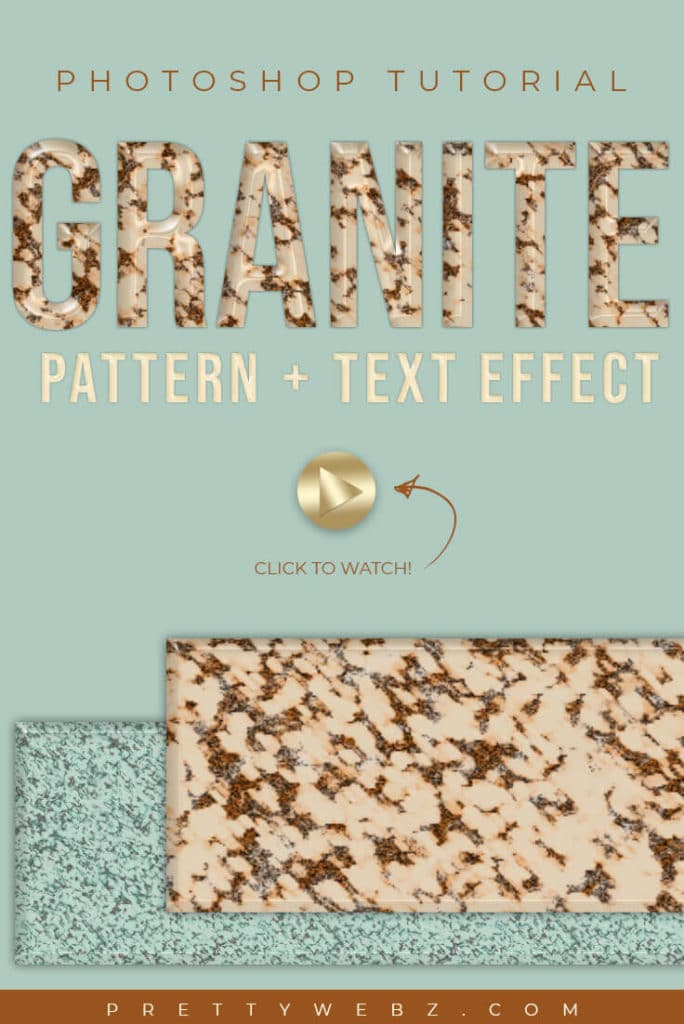
In this granite texture Photoshop tutorial, I’ll show you how to make a granite Photoshop pattern from scratch. Learn how to create a custom pattern in Photoshop and save the pattern to use in other projects. This granite texture can be adjusted to any colors you like. Perfect for kitchen and appliance websites, advertising and social media promotions but also is a good fit for law and corporate branding.
I’ll show you what adjustments you need to make to do this. I’ll also show you how to make a seamless pattern for use with larger works. We will also go through how to create a granite text effect. You can use these settings to create a Photoshop style to apply to any shape you need.
LEARN DESIGN TOOLS ONE STEP AT A TIME
Learn and master the most frustrating aspects of overwhelming programs like Photoshop and Illustrator in a fun and entertaining way with PrettyWebz design tutorials.
Tutorial projects like the ones we share here on the blog are meant to help you grasp the use of the most powerful aspects of design software one step at a time. In the process, you will build your design assets so that you can create a stunning marketing design for your business. So, don’t forget to sign up below in the footer to become part of the Prettywebz family and never miss another tutorial.
RESOURCES USED IN THE GRANITE TEXTURE TUTORIAL:
Other Posts You Might Like

Also join me on YouTube as well to check out the playlists I’ve set up for Photoshop, PowerPoint and other software you can use to design your online graphics.
Tutorial
Today I’m going to show you how to make a granite texture inside a Photoshop. Later in the video, I’m going to show you how to use that granite texture to create a polished stone text effect as well. Let’s go ahead and get started.
Creating the Granite Texture
We are starting off with a 500 by 500-pixel document we’re going to use this to create our texture.
Setting Colors
These colors will dictate the finished color of the granite.
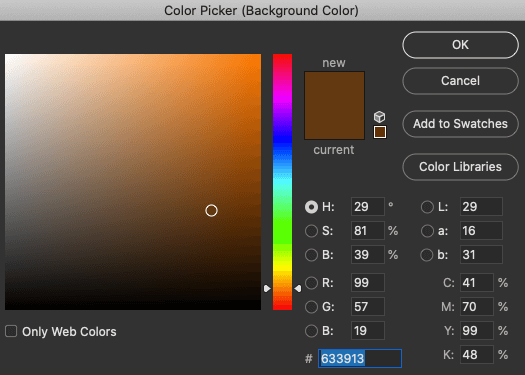
For this demonstration, the background color is going to be 633913
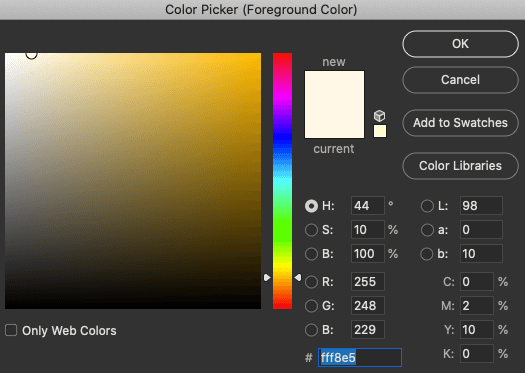
The Foreground color: FFF8E5
Note: You can also change these colors to anything that you need to create this effect with different colors.
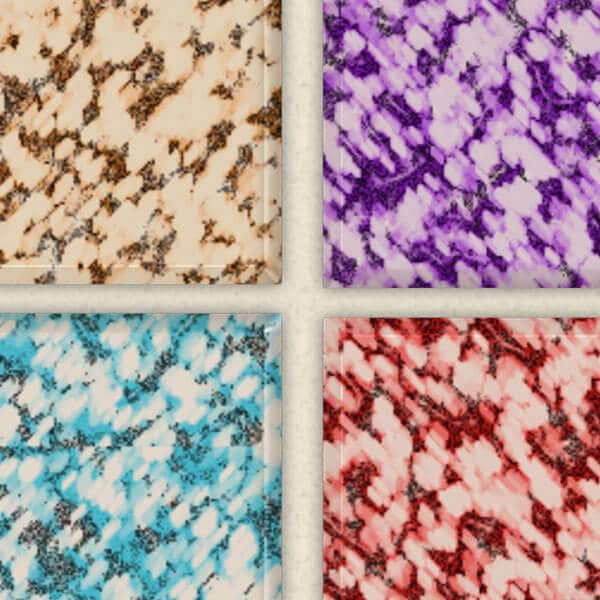
Here are a few I created before so I have this blue stone texture that I used with just a darker blue color and a very light, almost white blue. Starting with these two colors you’ll just change up your colors.
In the layers panel, select the first layer (make sure to unlock the layer)
Click Command + Delete on a Mac or ctrl + backspace on a PC to fill that with that background color.
Right-click and choose convert to smart object. Turning the layer into a smart object will allow you to change settings on your filters as needed.
The Filters
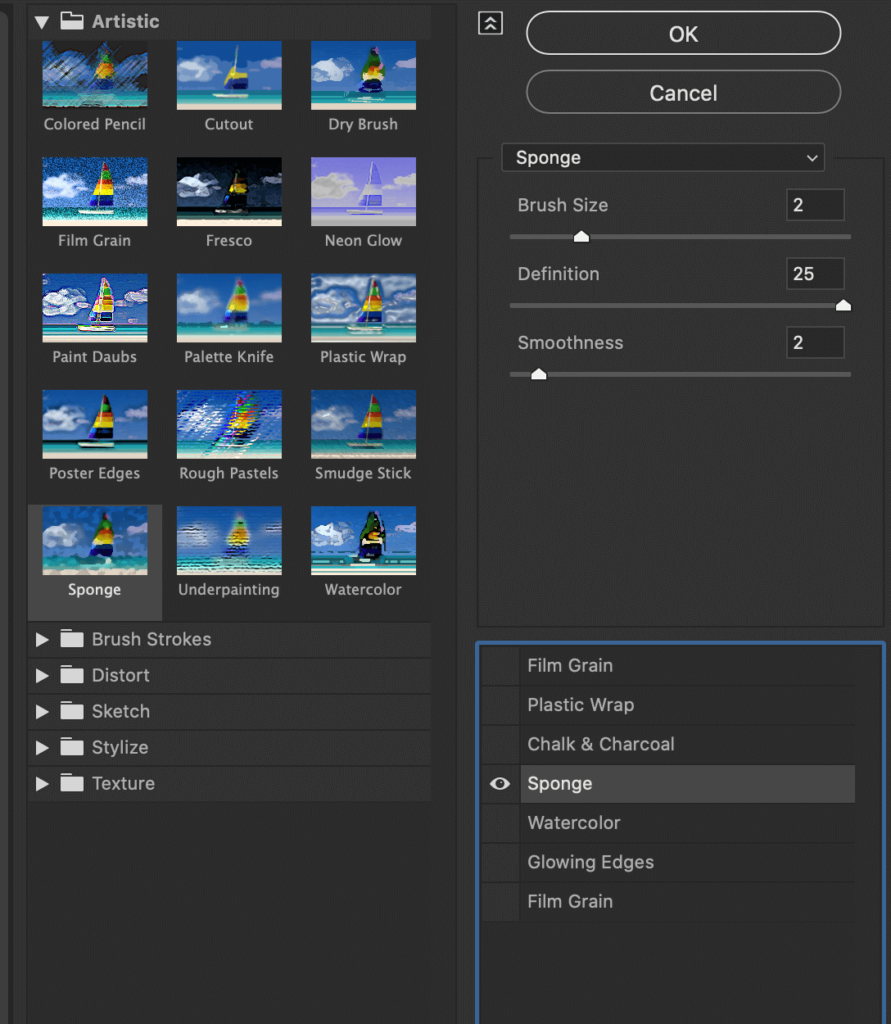
Now we’re going to start working with the filters. At the top menu choose filter then filter gallery.
Filter #1
For the first filter, we’re going to be working inside of this artistic folder. Choose Sponge with the following settings: Brush size 2
Definition 25
Smoothness 2
Filter #2
Add another texture by clicking on the paper icon at the bottom of the filter gallery panel.
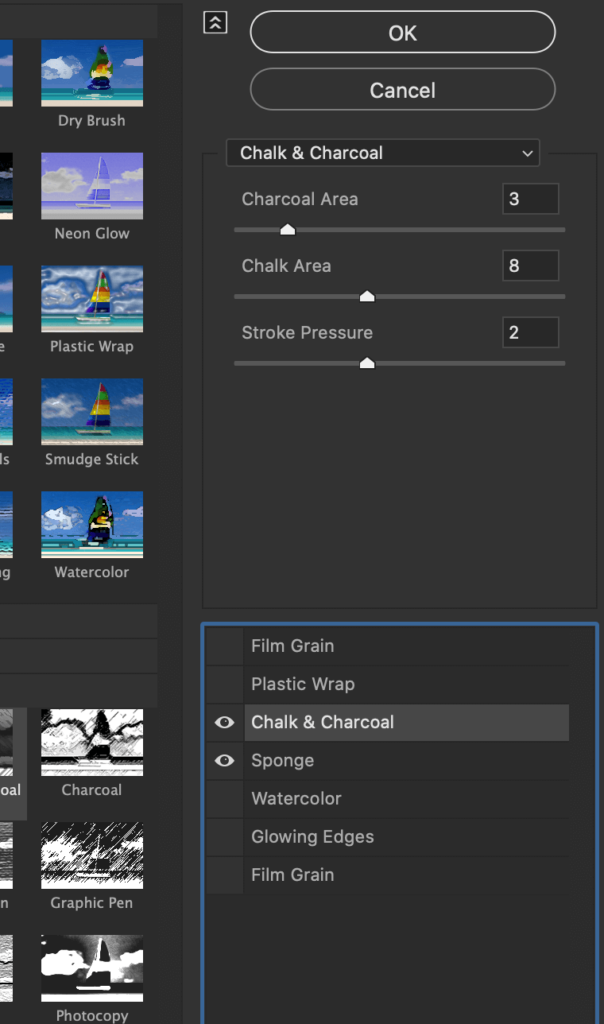
For our second texture choose the sketch folder then choose chalk and charcoal. The settings for this are as follows: Charcoal area 3
Chalk area 8
Stroke pressure 2
Filter #3
Add another filter by clicking the paper icon at the bottom of the filter gallery screen.
For our third texture choose the artistic folder then plastic wrap. The settings for the plastic wrap filter are as follows:
Detail 10
Smoothing 5

Filter #4
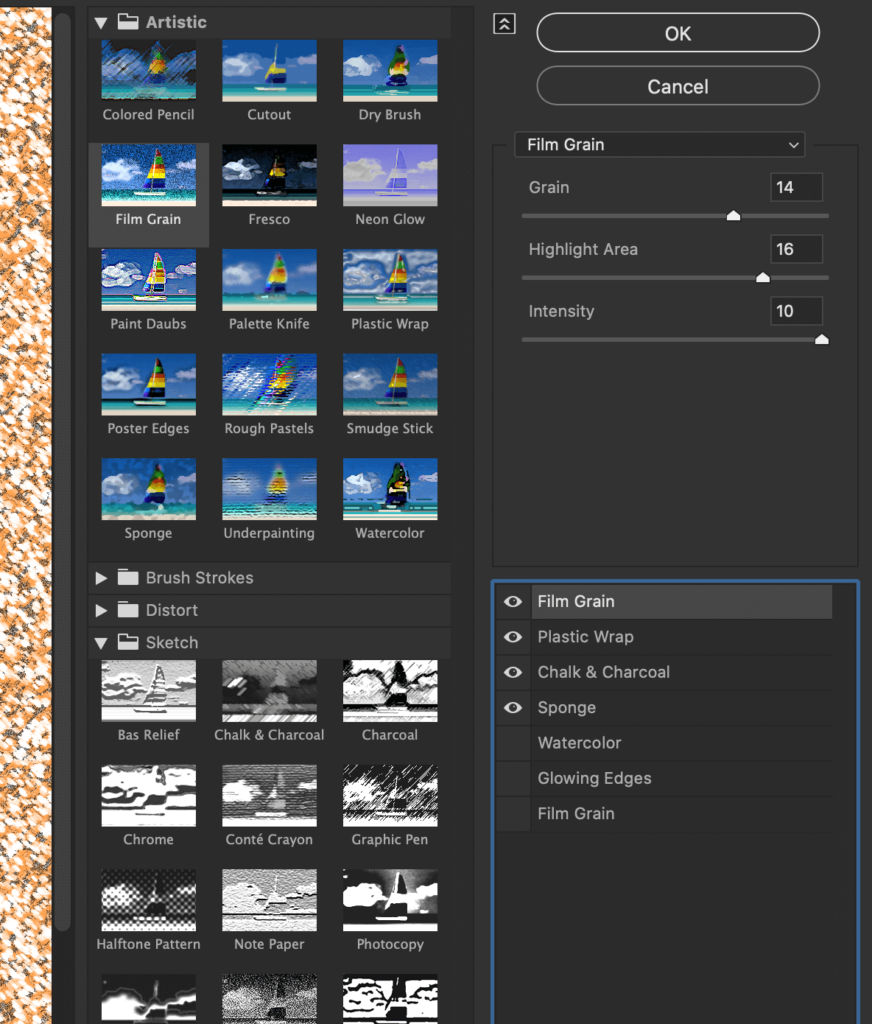
Add another filter. For this last filter choose the Artistic folder then film grain
The settings for this are as follows:
Grain 14
Highlights 16
Intensity 10
That’s it, that’s all the filters now you can click OK
Creating a Seamless Granite Texture
Choose Filter from the menu at the top of the screen then go down to other and offset
In the offset popup menu, set the offset to half of the document size. For our demonstration, the settings will be 250 horizontal and 250 vertical, check off wraparound then click OK.
If you are happy with all of your filter’s settings right-click on the layer and choose the Rasterize layer option.
Choose the Spot Healing Brush tool and brush over those center areas where you can see the hard lines and if you see too much of one color or another you can just come in and click around to blend it in.
Saving the Granite Texture
Choose Edit from the top menu then Define Pattern. When the popup menu comes up name your texture in the demo we’ll call this granite.
Polished Granite Text Effect
Open up a new file and we’ll make this 2,000 by 1000 pixel, click create. I’m going to go ahead and fill the background with this color that we have set up so it’s like a light yellowish-brown color FFF8E5.
Unlock the layer, double click on the far right of the layer to open the layer options.
Adding Background Texture
Inside of the layer options, click on pattern overlay choose a subtle pattern to give some texture to the background. For the demonstration, I used a leather pattern. If you want to learn how to make a leather pattern I have a video that will show you the process step by step. Otherwise, just a plain color background is fine.
The Text
Type out the word “Stone”
The font settings are as follows:
Font: Bebas Neue Regular
Font size 575 pixels
Tracking 0
Everything else will be set to default
Applying Layer Effects
Come back over here to our layers double-click on the far right-hand side of the layer to bring up the layer styles.
Bevel and Emboss Settings
Choose bevel and emboss with the following settings:
Style: inner bevel
Technique: smooth
Depth: 420
Direction is up
Size: 32
Soften: 0
Under shading set the following settings:
Angle:90 degrees
Check off global light
Altitude: 30 degrees
Gloss Contour: Valley-Low
Note: If you don’t see Valley-Low in the list of contours it’s because you have not loaded it. A lot of these are not loaded by default. Click on the gear icon in the contours menu and choose contours. This will load all remaining contours, including V
Highlight Settings
mode is screen
Color is basic white ffffff
Opacity is 86%
Shadow Settings
Mode is multiply
Color: D9D6D1
Opacity: 100%
Check off contour directly under bevel and emboss and the contour is a default linear contour at 50%
Inner Shadow Settings
Choose inner shadow with the following settings:
Blend mode: Multiply
Color: beb1b0
Opacity: 75%
Check off Global light
Angle:120 degrees
Distance: 32
Contour: Linear
Noise: 0
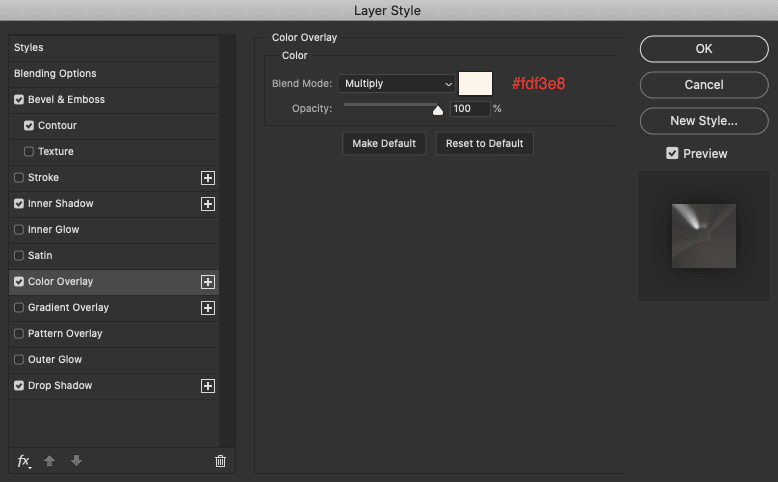
Color Overlay Settings
Choose color overlay from the side menu and set the following settings:
Blend Mode: Multiply
Color: FDF3E8
Opacity: 100%
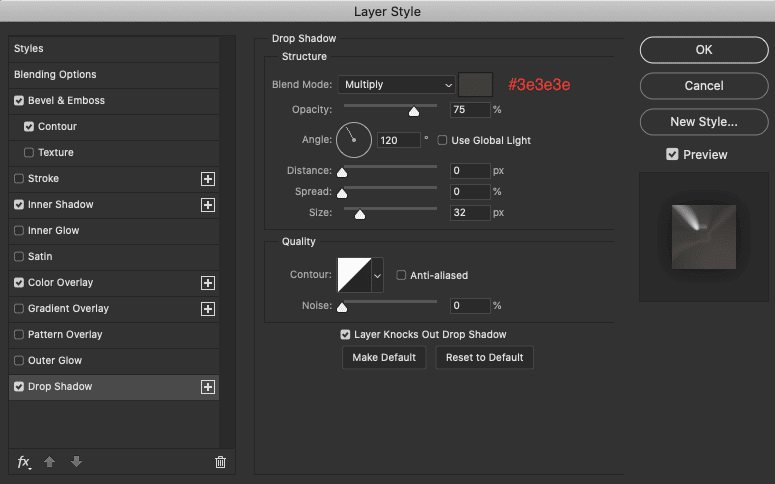
Drop Shadow Settings
Choose drop shadow from the side menu and set the following settings:
Blend Mode: Multiply
Color 3E3E3E
Opacity: 75%
Angle: 120 Degrees
Distance: 0
Spread: 0
Size: 32
Contour: Linear
Noise: 0
Pattern Settings
Choose pattern from the side menu with the following settings:
In the pattern drop-down choose the granite pattern you just created
Scale: 200% (or as desired)
White Polished Stone Text Effect
Select the text tool and type out the word “Polished” in the character panel set the following settings:
Font: Any script font for the demo I used Boom & Farrow
Size: 145
Tracking: 0
Color: FFFF8E
Double click on the far right of the text layer to bring up the layer options menu.
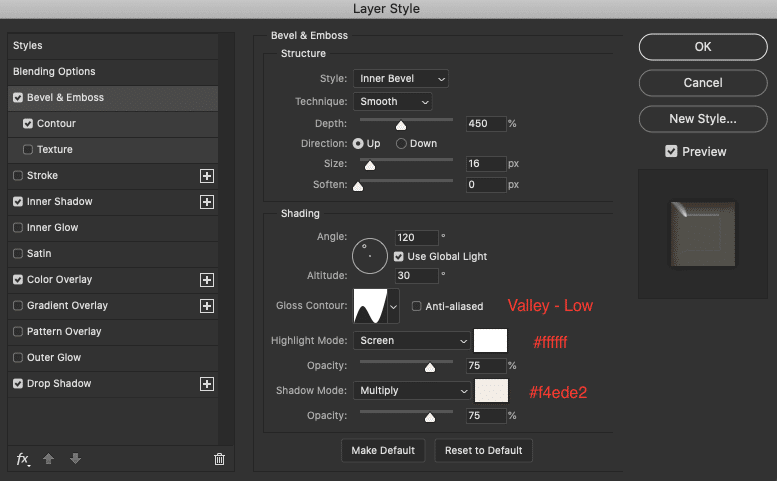
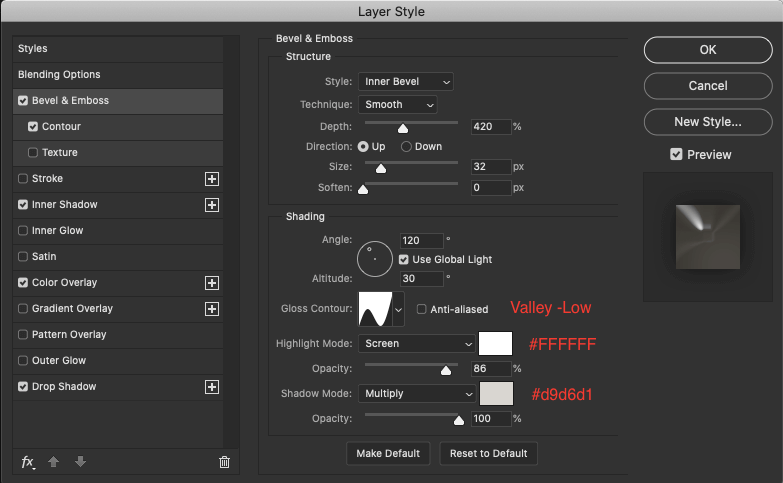
Bevel and Emboss Settings
Choose Bevel and Emboss and set the following settings:
Type: Inner Bevel
Technique: Smooth
Depth: 450
Direction: Up
Size: 16
Soften: 0
Angle: 120 degrees
Altitude: 30 degrees
Contour: Valley-Low
Highlight Settings:
Mode: Screen
Color: FFFFFF
Opacity: 75%
Shadow Settings
Mode: Multiply
Color: F4EDE2
Opacity: 75%
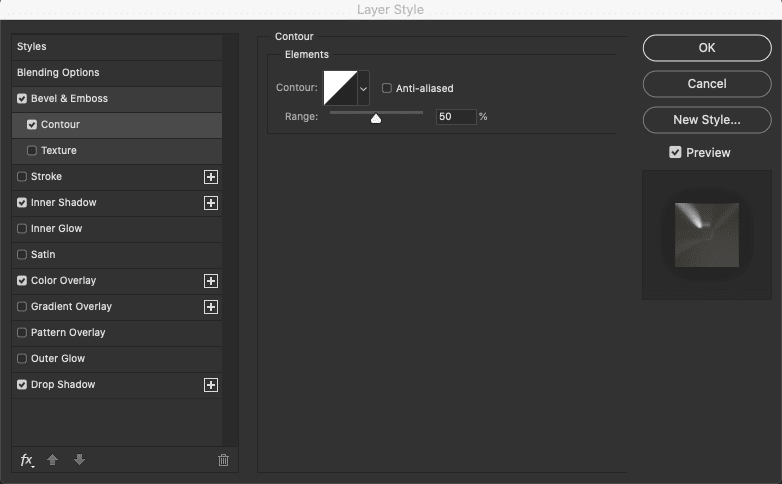
Click the Contour option directly under the Bevel and Emboss option
Contour: Linear at 50% opacity
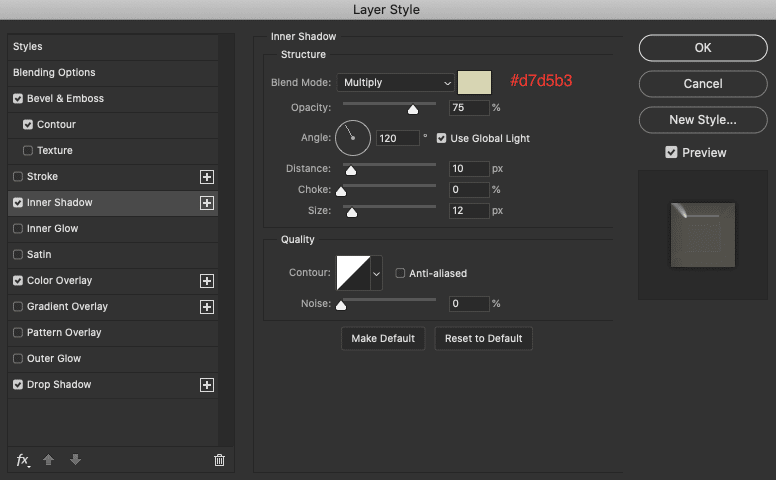
Inner Shadow Settings
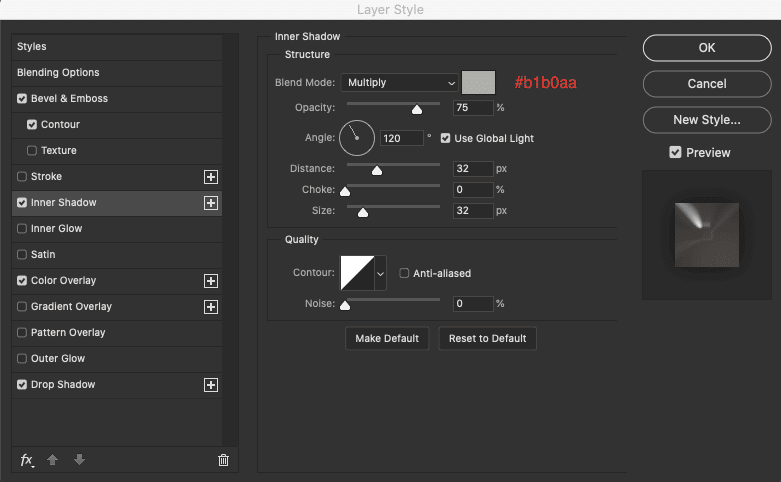
Choose Inner Shadow from the side menu with the following settings:
Mode: Multiply
Color: D7DVB3
Opacity: 75%
Angle: 120 degrees
Distance: 10
Size: 12 pixels
Contour: Linear
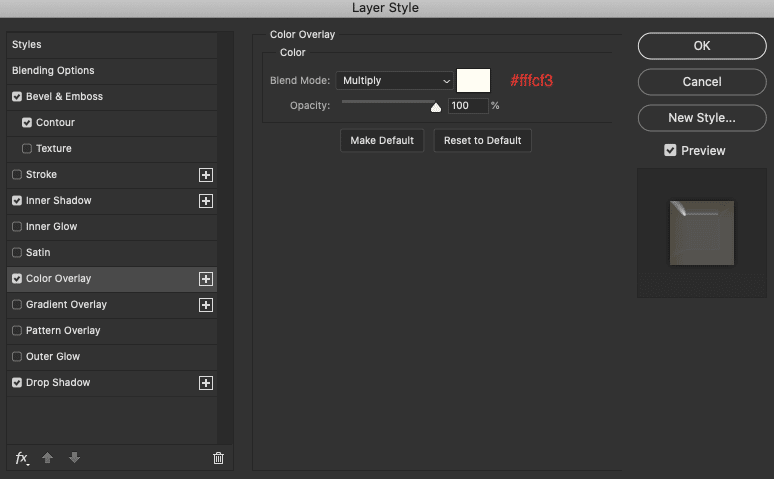
Color Overlay Settings
Choose Color overlay from the side menu with the following settings:
Blend Mode: Multiply
Color: FFFCF3
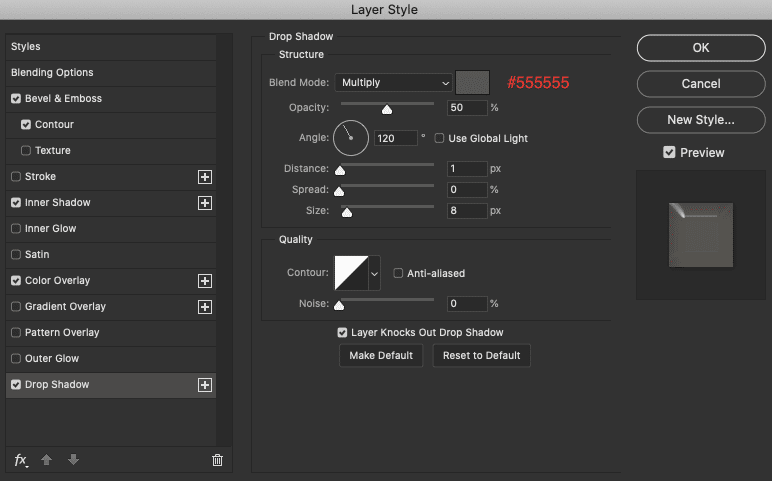
Drop Shadow Settings
Choose Drop Shadow from the side menu with the following settings:
Blend Mode: Multiply
Color: 555555
Opacity: 50%
Angle: 120 degrees
Distance: 1
Size: 8 pixels
Contour: Linear