

Sugar Skull Tutorial in Photoshop
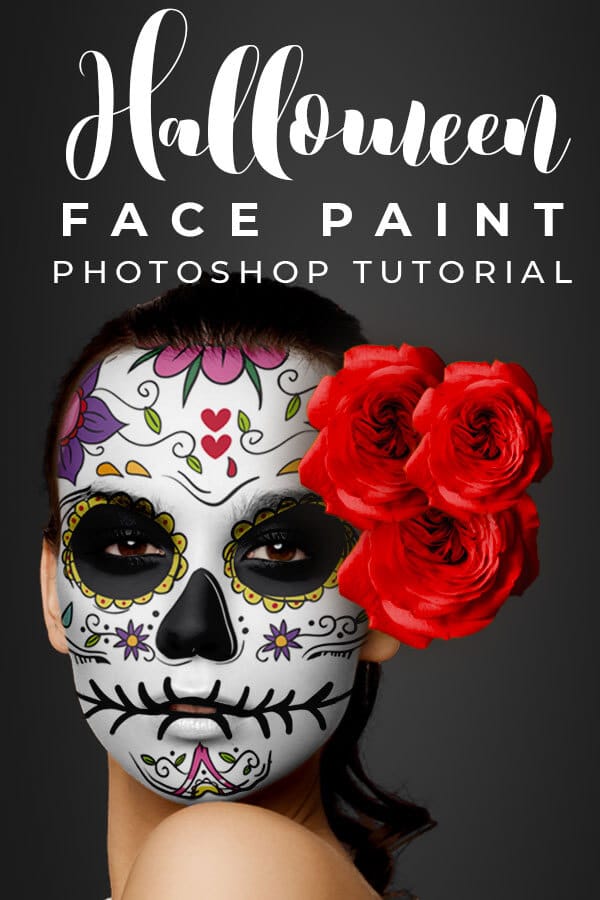
This Sugar Skull photography treatment is perfect for Halloween posters, even announcements, online advertising and so much more. This video is the beginning of a series of videos working with Photography and graphics as overlays to create art from your photographs. In this first tutorial, you will learn how to use graphics to “paint” your subjects face using masking techniques and a displacement filter.
For coming tutorials in this series, I will show you how to make motion accents and sparkler overlays to enhance your photography. Give your photos more impact and emotion with beautiful overlays that will enhance the mood you want to achieve.
Resources used in this tutorial:
- Sugar Skull Graphic
- Photo by Hywel Jones from Pexels
- Flower Boom from Pixel Buddha on Creative Market
LEARN DESIGN TOOLS ONE STEP AT A TIME
PrettyWebz tutorial can help you learn and master the most frustrating aspects of overwhelming programs like Photoshop and Illustrator in a fun and entertaining way.
Tutorial projects like the ones we share here on the blog are meant to help you grasp the use of the most powerful aspects of design software one step at a time. In the process, you will build your design assets so that you can create stunning marketing design for your business. So don’t forget to sign up below in the footer to become part of the Prettywebz family and never miss another tutorial.
Also join me on Youtube as well to check out the playlists I’ve set up for Photoshop, PowerPoint and other software you can use to design your online graphics.
Other Posts You Might Like

Watch the video or read the transcript below. Also, check out other tutorials you might like from my Photoshop tutorial collection, branding, social media design, and design principles.
Video Transcript
I’m bringing you a special Halloween tutorial for the month of October. Today we’re going to learn how to make a painted candy skull perfect for Halloween using graphics and a photograph.
We’re going to start out with this [basic photo] and we’re going to end up with something that looks like this [finished sugar skull].
Okay, the first thing I want to show you is the actual candy skull that I chose to create this with. I got it from freepik. “Sugar skull” is what I searched for and this is pretty much what you get.
This is the one that I chose because I like the colors and the flowers and all of that. I did make a couple of changes to it because usually, the girl candy skulls have this Chelsea smile look.
You see it on this one right here. If we come down, you’ll see she also has that. Here’s another one. So, I wanted to get that same look for the one that we’re going to be doing.
This is a vector file. I went ahead and took it into illustrator removed this mouth area and I just drew on my own Chelsea smile. Just as a line with the bunch of lines through it, very simple. Of course, you can use any image to do this. You don’t have to make adjustments the way I did. I just wanted to show you just in case you wanted to recreate what I did. That’s what I had to end up doing to get this. Of course, you can always buy images that are exactly what you’re looking for.
Anyhow, let’s go ahead and get started with the tutorial. I just wanted to show you that quickly.
Paying Attention to Facial Contours
So you might be familiar with something like this if you’ve done a displacement type image before. I guess the only difference here is that it’s a mask. So, you’re having to fit it on her face based on her contours. Everyone has different contours to their face, so you have to be really careful with how this is going to be placed around her eye area and around her mouth.
We’re going to go ahead and open up the original image.
I got this from pixels com I just looked for… “face” actually is what I searched to grab this. I’ll go ahead and leave a link for that as well.
I’m going to unlock the layer and I’m coming over to the crop tool because I don’t want the entire image. I just want to keep it maybe about there [to top of the shoulder]. Hit return and that’s just going to crop everything out.
Okay, so this is the image that we’re going to be working with. I’ll zoom in so we can see the entire image. I’m going to go ahead and make some duplicates of this [image].
This one right here we’re just going to go ahead and leave down here and turn it off. That’s our original we don’t want to mess with that.

The Displacement PSD File
I’m going to turn this top one off, and we’re going to work with this one right here [middle layer]. We’re going to add a black and white adjustment layer. Come down here to the adjustments and choose black and white and change a few settings. That way our graphic will wrap around her face a little bit better.
I’m going to just bring this down to get a little bit of shadow and also bring down the yellows. Grab both of those command/Ctrl e on the keyboard to make that one [layer]. From here I’m going to go over to filter then blur and Gaussian blur. Blur the image somewhat. I’m going to blur it to about nine. Then I’m going to right-click on this layer. Choose to duplicate the layer and make a new file. I’m going to name the file “contour” click OK. Now I’m just going to close out that “contour” [document] click yes, I do want to save it. I’ll save it here [on my computer].
Now I’m just going to delete this black and white layer because I don’t need it here anymore. Click delete [on the keyboard]. I’m going to work with this top layer right here. With this one, we’ll remove the background.
Masking for the Background
I’m going to come over to my quick selection tool and grab her [image subject] as a selection. Okay, once I have her [selected] I’m going to come up here to select and mask. That’s going to open up another dialog box. If you don’t have this red showing, actually you don’t need this. This is just what I prefer, there are other options here that you can use. I prefer to use red so that’s what I’m going to be using.
I’m going to click here on smart radius and I’m going to bring this to one pixel I don’t want to take too much up. I’m going to remove this white from her hair and kind of around this area. Make sure you’re here in the refine edge brush tool that’s the second one down. Then we’re just going to go around her hair to remove some of this white from her hair.
You’re still going to have some white areas. Okay, so that’s good enough for me. I’m going to choose output layer mask. Click okay. So that’s going to give us something like this.
Adding a Background
Now I’m going to go ahead and add another layer. This one’s going to go underneath here [the base layer]. I’m going to do a gradient layer. I’m going to take it from black to maybe like a lighter gray color or something like maybe there [demo in the video].
I’m going to use this gradient tool, choose [click] somewhere from the middle of the image and then just bring it out. When I zoom back in, you’re going to see that we still have all of that white [around the image].
I’m going to choose this layer right here and apply this layer mask. Come up to layer then matting then remove the white matting. It’s just going to remove some of that white that we have around the edges. Once I have this layer I can duplicate it. Click and hold option/alt on the keyboard, drag it [the layer you want to duplicate] up and that’s going to give you a duplicate of that layer.
Preparing the Face for “Paint”
Add another black and white adjustment layer. Come in here [adjustment layers icon at the bottom of the Layers panel]. Choose black and white. Actually let me back up a little bit, I’m going to turn that off.
I’m going to come here [to the actual layer] and make a few adjustments to this. Because I want this to be, her face anyway, to be as white as possible. I’m going to come up to filter then Camera Raw and just make a few adjustments to the image itself.
Because her eye area is going to stay a pink color and I don’t want that. I’m going to try to get this as white as I can. I’m going to take my temperature down, take up my highlights, take my whites way up, bring down my blacks. I’m mainly just looking at the eye area right here. It doesn’t really matter what the rest of their face looks like because it’s all going to be covered in white anyway. We’ll take the vibrance down. I don’t want to lose too much of the color. I’ll take the saturation down just a touch as well.
I’ve still got some color in the image. There you can still see the contour [in her face] really well and you can tell that her eyes are brown. That’s pretty much all I need. I’m going to click OK okay.
Masking for the “Paint” Layer
From here I’m going to go over to the quick selection tool and I’m going to choose her face area. Just the face. Maybe we can go a little deeper into the hairline and then if you press [and hold] option on the keyboard or alt for PC you can remove some of this [unwanted selected areas].
We’re going to remove the ear area because we wouldn’t normally paint the ear. We’re just going to remove those from the selection and I think that looks okay. Let me remove this little spot here and I’ll remember that this is her shoulder right here. I can come back and select and mask and you’ll see right here where you have that bump, just keep in mind that that is the shoulder area.
I’m going to click on smart radius bring it up just one just to touch make sure that you’re here in the smart radius brush and we’re going to brush over her hairline.
Now, if you get anything in here [the mask] that you don’t want to be here, you can just click on the little minus sign and brush over it again just to get rid of that. I’m just going to go ahead and leave it as it is. I’m going to come back here to output. Make sure layer mask is selected click OK.
Now we’ve masked out this area so you can see it’s much whiter than her actual skin is. Turn on that black and white layer. With the option/alt key held down on your keyboard option or Alt key and then hover right above that top layer so it’s that lighter-skinned layer and when you see that arrow just click. We’re just masking the black and white adjustment layer to this top layer with the mask on it.
Adding the Graphics
We are going to bring in that candy skull. I have the one that I created already here. You can see this is that candy skull and I just deleted that entire area [teeth] and added a pretty crude looking mouth there. But it does the job. “V” on the keyboard to get these anchors option/Alt key when you see the two double arrows drag it over [to the working document].
I don’t want this part to be black and white so I’m going to take that out of there [move from under black/white adjustment layer] and I’m going to release the clipping mask because it automatically added one.
Right now I’m just trying to see where it looks best. I’m going to take down my opacity to about 60% [opacity of sugar skull graphic layer] is fine. I just want to see where it sits on her face. Because this is a mask it’s going to be a little bit different than just face paint like a mascot or a logo or that type of thing.
We need this graphic to sit on her face perfectly, we don’t want her nose on this side of her actual nose and we don’t want this part [decorative part of the graphic] cutting into her eyes. We need to make sure that we have that positioned properly.
Positioning the Graphic to the Subjects Contours
I’m going to zoom in, I’m going to come into edit then transform and I’m going to choose the warp tool. I’m going to use this to get around her eye area so I want this positioned with her eyebrow. The same thing with this side. We’ll move this [Nose part of the sugar skull graphic] over make sure that the nose is positioned directly over her nose. Her mouth that area looks pretty good.
I’m going to bring this [top of the skull] down. Okay so that looks okay with these areas right here [overlapping part of the graphic], don’t worry too much about how this is overlapping. This stuff right here [overlapping part of the graphic] is actually going to be masked out anyway.
Go ahead and hit enter when you’re happy with the way it’s sitting on her face. With this layer selected [sugar skull graphic] press option on the keyboard or alt and then clip that layer as well to this white face layer.
Detail Masking
Now we need to come in and mask out her eye area. I’m going to zoom in and turn that [black/white layer] off for a second. Then I’m going to click on this [white face layer mask] hit the letter B on the keyboard. Make sure that I have just a white basic hard brush. Okay, make sure that I’m on the mask itself and then I can just come in and paint out these areas [masking speeded up here].
Okay, so now that we have that masked out I’m going to grab the mask. Hold down the Option or Alt key and then drag that up here into the black and white adjustment layer [copy the mask].
It’s going to ask me if I want to replace the layer mask. I’m going to hit yes, then I can come back up here [layer options for the skull graphic].
I’m going to change the mode here. You can do color burn [in our image] it looks kind of faded out. You can see a lot of the makeup that she was wearing underneath. Depending on the image that you’re working with you might want to either do color burn or linear burn. For this one, I’m going to use linear burn. I’m going to take that opacity way up because I want it to look like actual paint [took opacity to 100%]. You can take your opacity all the way up or leave it down if you want to show more of the skin area.
Adding the Displacement map
I’m going to take this layer right here [sugar skull graphic layer] and I’m going to come up to filter and then we’re going to go to distort and add that displacement the contour. [In the dialogue box] scale to about five, the vertical scale also about five. Stretch to fit and then we’re going to use repeat edge pixels, click OK.
Use this contour [psd file] that we made earlier and just add it there now. I’m going to undo that because I want you to see what it did [demo of displacement map]. It’s not a big change but it does make a difference. I’m going to click on displace, you can see how it’s kind of wrapped itself around her contours.
Final Touches
Okay, now I’m going to go ahead and grab some roses just to give it a finishing touch. So option on the keyboard and I’m going to drag it [roses graphic] over to this other image right here [main sugar skull image]. Press the letter “V” just to grab that [anchors] and I’m going to put it over here on the side [of the subjects face]. You always see these candy skulls with the flowers. Go ahead and add that finishing touch there.
If you liked this video make sure to like share and subscribe to this channel and visit prettywebz.com for more design resources for your blog in business. Until next time thanks for watching.