

Glitter Sticker Photoshop Tutorial
About the Glitter Sticker Photoshop Tutorial
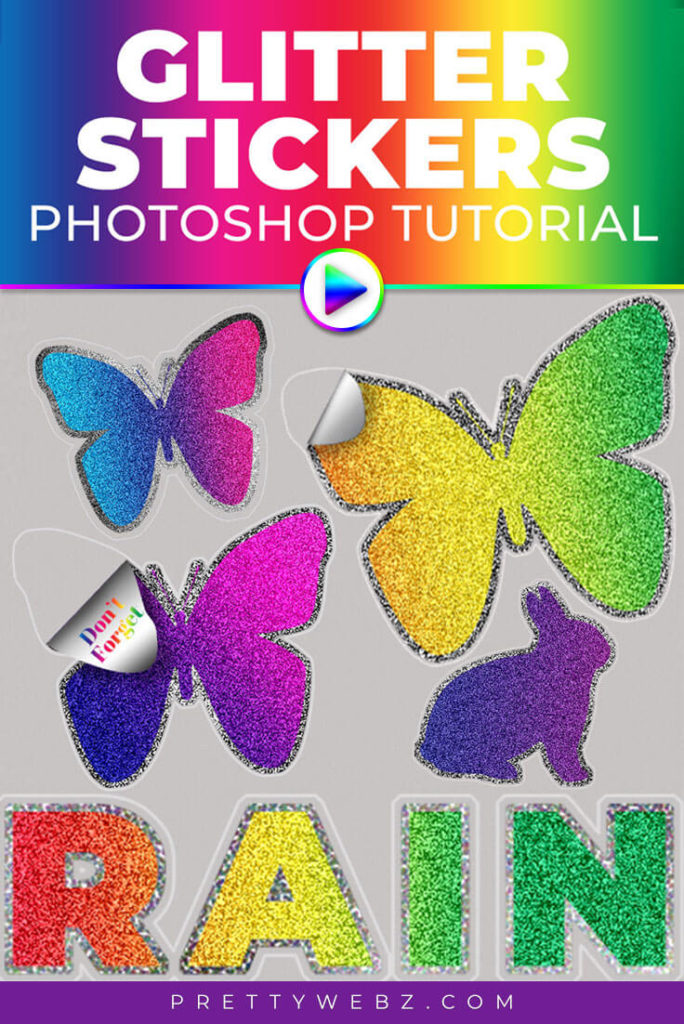
In this super easy and fun glitter effect Photoshop tutorial, I’ll teach you how to make realistic looking foil glitter sticker Photoshop tutorial and a sticker text effect. We’ll make a shimmery foil rainbow texture, and translucent glitter textures to apply to this glitter effect.
Adapted from the original tutorial by Texttuts. You can read the original tutorial here. The process is very different but the outcome is almost identical.
This tutorial focuses on selections and expanding selections in Photoshop.
You can use this glitter effect photoshop tutorial to create rainbow glitter stickers for digital scrapbooking, digital planners like Good Notes, custom Instagram story graphics or whatever you like!
LEARN DESIGN TOOLS ONE STEP AT A TIME
Learn and master the most frustrating aspects of overwhelming programs like Photoshop and Illustrator in a fun and entertaining way with PrettyWebz design tutorials.
Tutorial projects like the ones we share here on the blog are meant to help you grasp the use of the most powerful aspects of design software one step at a time. In the process, you will build your design assets so that you can create a stunning marketing design for your business. So, don’t forget to sign up below in the footer to become part of the Prettywebz family and never miss another tutorial.
RESOURCES USED IN THIS TUTORIAL:
No images or textures required, it’s all Photoshop!
Also join me on YouTube as well to check out the playlists I’ve set up for Photoshop, PowerPoint and other software you can use to design your online graphics.
Other Posts You Might Like

Watch the video or read the transcript below. Also, check out other tutorials you might like from my Photoshop tutorial collection, branding, social media design, and design principles.
Glitter Foil Sticker Tutorial Transcript
In today’s video, I’m going to show you how to make a rainbow glitter sticker effect inside of Photoshop. You can definitely use this in web design social media graphics and really anything. However, I specifically like this glitter effect for digital planners and for digital scrapbooking. Let’s go ahead and get started.
So, the first thing I’m going to do is show you how to incorporate this process to make shapes. Then I’ll show you how to do a text effect as well. I’ll show you how to make two border styles. The first one, the outside is much more of a foil. On the second one, it’s more a translucent shimmer. I’ll show you how to make both of those here.
Setting Up the Background
We’re creating this for digital use so we’re starting here with a 1000 pixel by 1000pixel document. It’s 72 PPI. I’m going to go ahead and unlock the background. Let’s go ahead and set up our background colors. The first color we’re going to be using is #b6 b7 b8. That’s going to be this mid-range gray. Then our background color is going to be #dedede. This is another gray color as well.
Come over to the gradient tool and make sure that you’re on radial gradient. The mode is normal. The opacity at 100%.
I want the lighter color on the inside so we’re going to start somewhere near the center of the canvas. Drag the line out to roughly the size of the canvas extending out past the canvas from the middle. You will get something that looks like a subtle gray spotlight. The background is very subtle.
Making the Rainbow Glitter Texture
Now we’re going to add another. Layer. Before we go any further we’re going to have to create the pattern that we’re going to use. Alright, I’m working with a new layer. We need to fill the layer so on the keyboard press command + delete or control+ back on a PC. You can fill the background with any color.
Now we’re going to double click on the far right of the layer to bring up our layer style. We’re going to add a gradient overlay. Okay for the gradient overlay options we’re going to go ahead and set the gradient to something like a rainbow.
Loading Gradients
You can get a lot of these gradients by clicking the small gear icon to the right of the gradients. I’m going to choose the Photoshop default gradient called spectrum.
Gradient Settings
Our gradient settings are going to be, a blend mode normal, opacity 100%, our gradient we’ve already set. The gradient style is going to be linear and our angle is 130 degrees. The angle is really up to you. The direction that you want your pattern to fall in. Scale to 100 percent. Now we’re going to right-click on the layer and choose rasterize layer style.
Adding Shimmer
Come up to filter then noise and add noise. Leave the noise at about 35 to 40. You’re going to get something that looks like fine glitter.
Saving the Pattern
Okay, now we’re going to come to edit then define pattern and we’re going to name this pattern” rainbow glitter” and click OK.
I’m going to just go ahead and bring this layer down to the bottom and turn it off. You can delete it at this point if you want. We already have it saved as a pattern so we don’t need it anymore.
The First Butterfly Shape
Okay, now I’m going to go ahead and add a shape.
The Shapes Tool
Go to the shape tool, you’ll have this one is called custom shape tool. I’m going to choose that and Photoshop has a whole bunch of default shapes including this butterfly. If you come over and you’ll see animals, arrows, artistic all of this stuff. The butterfly that we’re going to be using is in nature.
I’m going to select this butterfly and just drag out this shape on the canvas. Our fill is fine at black. I don’t want it to have a stroke so I’m just going to turn the stroke off.
Making A Selection
Now that we have our shape we’re going to go ahead and add two more blank layers. Bring the butterfly layer above those two blank layers. Name the layers glitter border and laser cut. The first one is going to be our glitter border. The second one is going to be a laser-cut thin line like you see on a sticker sheet.
Okay, we’re going to come back up to this butterfly shape layer and press command/Ctrl on the keyboard. When you see that little square come up as you hover over the layer, you can click. That will make a selection of the butterfly.
Expanding the Selection
We’re going to come over to glitter border. This is just a blank layer at this point. Now we’re going to come up to select at the top of the screen, then modify and we’re going to expand our selection about 10 pixels, click OK.
The Glitter Border (Foil)
We’re on the glitter border, come up to filter then render and then clouds.
Now go back up to filter then noise and add noise, amount at 35% is fine. Our distribution is uniform and make sure monochromatic checked off.
Now the amount of shine is just going to be based on preference. You can have a darker glitter like a finer glitter or you can do what I’m doing and just bring it up to have high shine glitter. I’m going to leave this one at 70. Click OK.
Expanding the Selection Again
Now we’re going to come back up to select then modify then expand. We’re going to expand by another 10 pixels. Click OK.
Making the Laster Cut Effect
Choose the laser cut layer. This is a blank layer at this point. We’re going to go ahead and press command + Delete on a Mac or ctrl + back on a PC. We’re filling our selection on the laser cut layer with this white color. Now we can press command + D to deselect the selection.
We’re going to double click on the far right of the laser cut layer to bring up layer styles for the laser-cut layer. Add a stroke to the layer, the stroke is going to be two pixels.
We want the stroke on the center. Leave the blend mode at soft light and the opacity at 100 percent. Our fill type is going to be color and our color is going to be #dedede. Something very light gray. Click OK and click OK again.
Now we’re going to come over to the fill slider for this layer and drop that down to 0% for this laser-cut layer. That’s going to leave us with a very thin outline.
Adding the Rainbow Glitter to the Butterfly
Now we’re coming back up to our original shape layer and we’re going to double click to the far right on the layer. Add a pattern overlay.
We’re going to choose the last pattern that we just created. While we still have patterns settings open, we’re going to adjust where the pattern shows up. I think I like this blue, purple and pink gradient, so we’re going to go with that click.
The Text Effect
I’m going to add the text right away. I am using Monserrate black. We have the size at 125. Our spacing between letters, bring that to 185 for this.
Now that we have our text laid out the way we want it I’m going to add two blank layers like we did before. I’m going to move this text layer over them again just like before. Name them “glitter border” and “laser-cut.”
Selecting and Expanding the Text Layer
We’re going to come back to the text layer and we’re going to go command + click to make a selection of the text. We’re going to come up to select at the top of the screen then modify then expand. This time we’re going to expand 5 pixels click okay.
Making the Translucent Text Border
We’re coming to the glitter border layer. I’m going to change the black to something a little bit lighter. Our top color is going to be #4a4a4a and our bottom color is going to be white (#ffffff).
Now we’re going to come to filter at the top of the screen then render then clouds. Now, this is where we’re going to get that translucent look.
Go to filter at the top of the screen then pixelate. Now we’re going to choose pointillize. Now you’re getting that translucent color in there. The cell size is going to be 3. Three is the very minimum cell size so we’re going to bring it all the way down and click OK.
Expanding the Selection Again
We still have our original selection active so we’re going to come back up to select at the top of the screen then modify then expand. We’re expanding the selection by 5 pixels. Click OK.
Adding the Laser Cut Stroke
We’re going to come to the laser-cut layer. Press command + delete or ctrl + back to fill the selection just like we did before. We’re going to add that same stroke here. The stroke will be one pixel for this one.
You can come back into the layer options and change it if it’s too thin or too thick. Don’t worry too much about the setting. We’ll just see what it looks like and then move on from there. Our color for the stroke is #dedede then click okay.
Adjust the Fill Settings for the Layer
Go to the fill slider for the laser cut layer. Our fill is going to come down to zero for this layer. Now we can deselect our selection (command + d).
Add the Rainbow Glitter Pattern to the Text Layer
We’re going to come over to the text layer and double click the far right of the layer to insert our pattern. Let’s go to the pattern and make sure that it fits the text properly. So, we’re going to get a little bit of that green in there we have some purple in there and click OK.
You can use these steps to create any type of sticker. The design doesn’t have to be a shape inside of Photoshop. It doesn’t have to be text. It could be pretty much anything.
I’m working with the butterfly shape here. I’m going select the butterfly layer and the glitter border and merge the layers. Press command/Ctrl + E to merge the layers.
Making the Sticker Peel Effect
With the new merged layer, I’m going to use the polygon lasso tool and make a selection of the bottom half of one of the wings. I’m going to press command X to remove that selection from that layer. Then command + v to paste it on its own layer.
Now we’re going to come to edit at the top of the screen then transform then rotate 180 degrees. Match this layer overlapping the original butterfly layer.
Silver Foil Effect
Once you have that matched up add a black and white gradient to the folded wing layer. Set the foreground & background colors to a darkish gray and a white color. Double click the far right of the folded wing layer to bring up the layer options. Click gradient overlay.
We’re going to come over to this gradient and choose foreground/ background gradient. This is the first default gradient. Figure out what the best angle is going to be. We want the dark color to lay flat on the bottom. For this one124 degrees is going to be okay.
The blend mode is normal. The opacity is 100%. The gradient is linear. Our angle is 124 and the scale is 100. I’m going to right-click and rasterize this layer.
Now I’m going to press command + click to select the wing piece. The letter “b” on my keyboard to get to my brush tool. I want to go with a soft brush. and change the opacity of the brush to about 50% and our flow to about 50% as well.
Brush lightly on the wing piece layer. Just kind of get around this top section. We want to make the edges a little bit darker.
Under Shadow
Click on the butterfly shape now. I’m going to add a new layer and then put it right under the wing piece but above the butterfly layer. Reset the foreground and background to black and white.
With the black color use the brush to add shadow underneath the wing piece to create dimension.