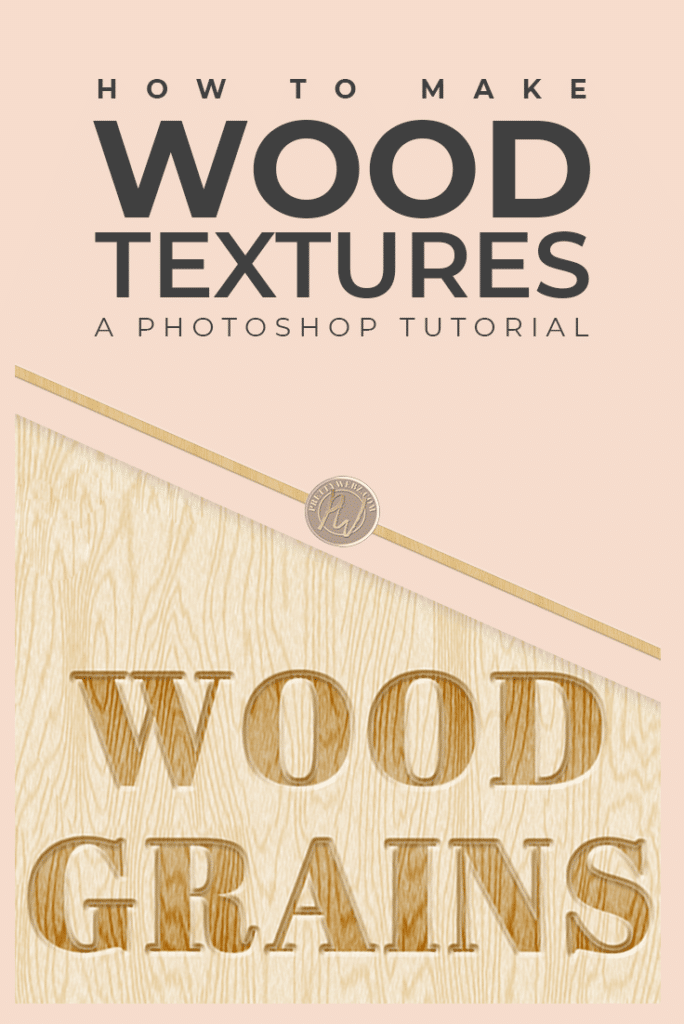
Wood Texture Photoshop Tutorial
In today’s video, I’m going to show you how to create beautiful and realistic birchwood and mahogany wood. This wood texture Photoshop tutorial will guide you step by step from scratch in creating realistic textures inside of Photoshop using filters.
Mahogany Texture
In the first
Birchwood Texture
The second part of the wood texture Photoshop tutorial will be a little more complicated but I’m confident that you can get it if you follow closely. On this one, I will guide you with a little detail. It is a bit more complex but the results are worth the effort. This wood grain is a lighter wood similar to Birchwood. Birchwood is typically used for canvases and many other craft style projects. This means it would look perfect as a backdrop for craft art and other similar themes.
Both of these designs are seamless textures. You can create a pattern from them out and use them on a larger canvas as well. I’ll show you how that works later in the tutorial but first, let’s go ahead and get started with making the textures themselves.
Other Tutorials You Might Like
We have a collection of tutorials all focused on creating background textures in Photoshop just like this one.
I encourage you to follow along with any of these tutorials to build your design asset collection and your skill inside of Photoshop. You can also visit the shop to grab some free textures created using the same process used in the tutorials.
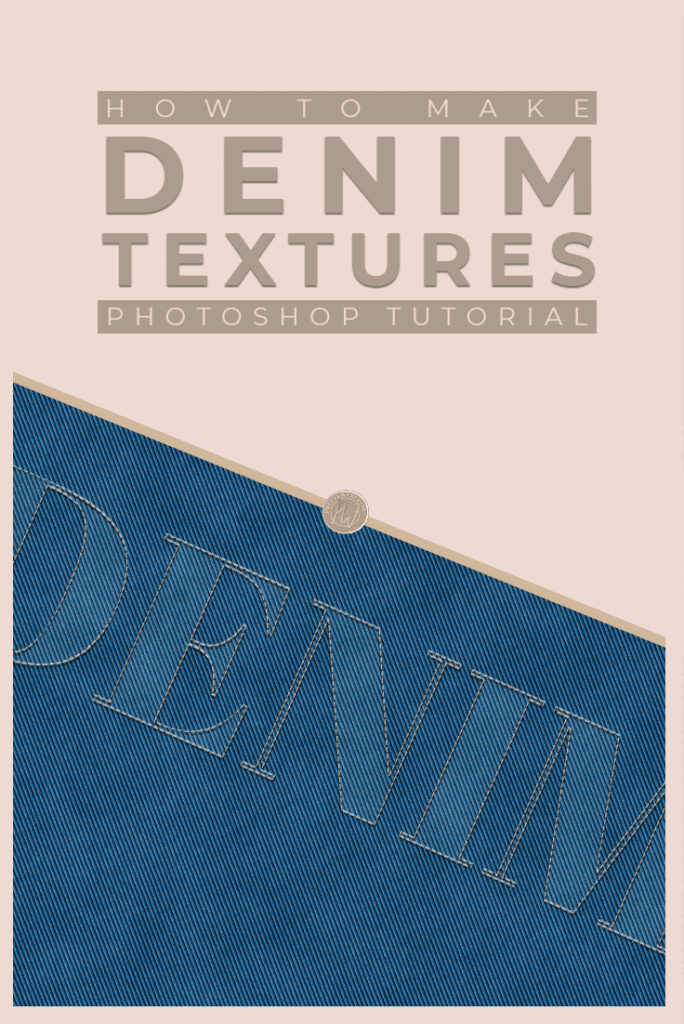
- Denim
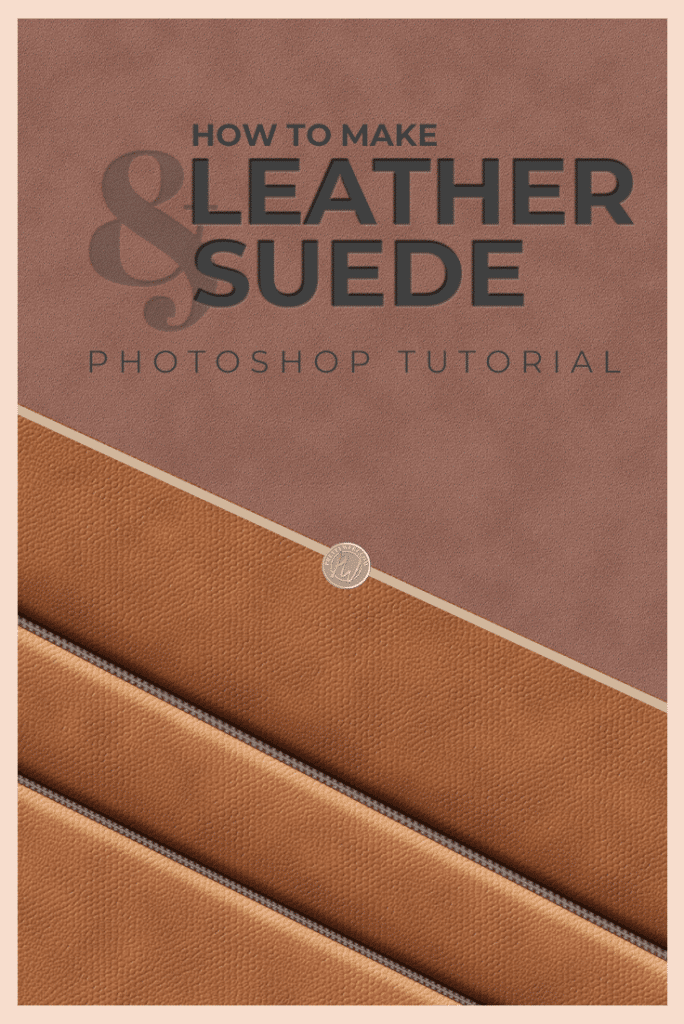
- Leather and Suede Textures
- Gold, Rose Gold and Silver Textures
- Marble Textures
- Liquid Marble / Agate Textures
- Silk / Satin Textures
- Crushed Foil
- Diamond Plate
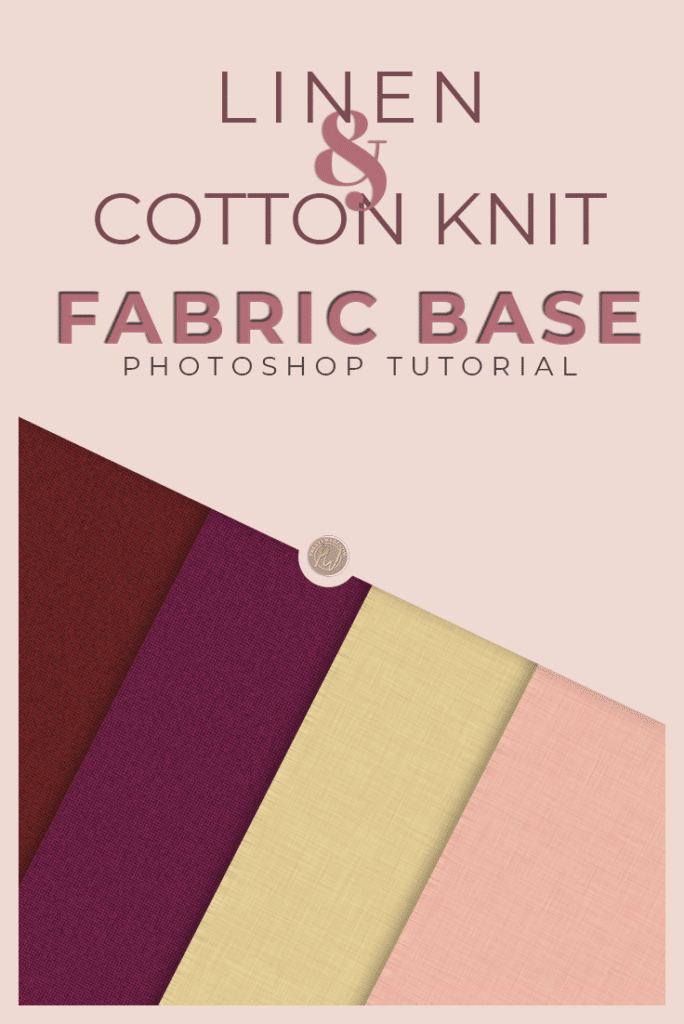
- Linen and Cotton Fabric


Let’s Get Started!
Wood Texture Photoshop Tutorial Part 1 – Mahogany
We are going to start the wood textures Photoshop tutorial with the dark Mahogany finish.
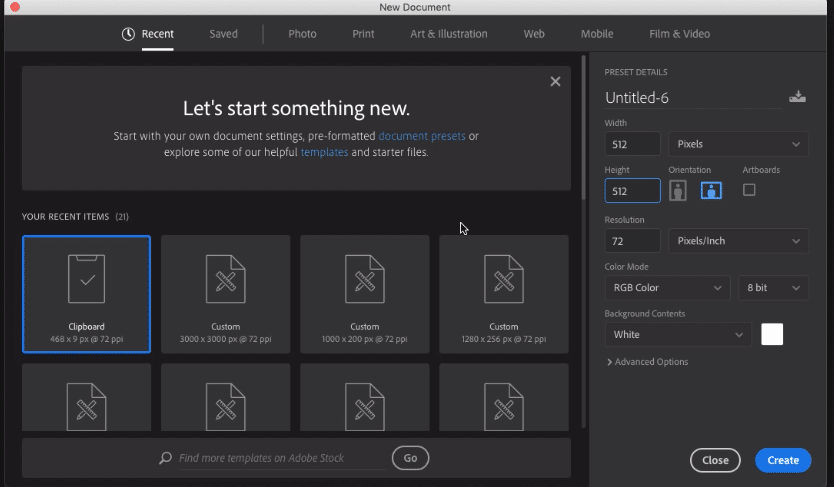
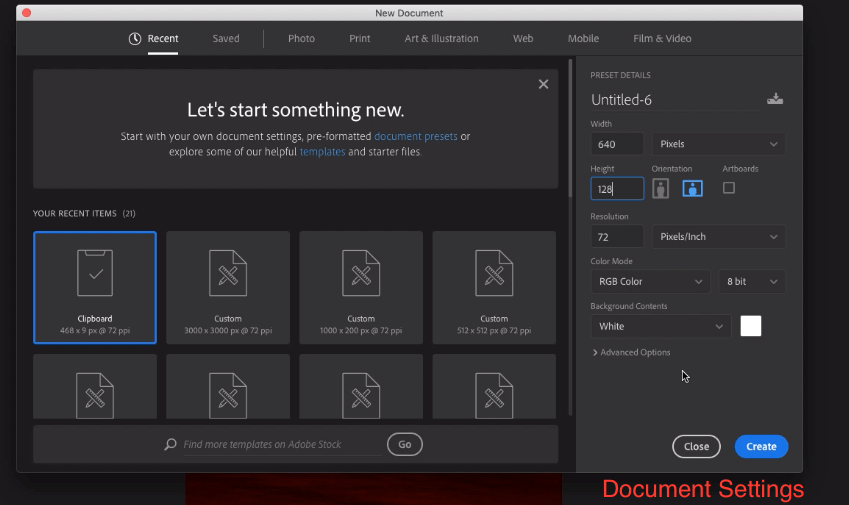
Create a new file
512 pixels by 512 Pixels
72 pixel resolution
RGB Color 8 bit
White background
Click Create
Choose Colors
Background color 471c08
Forground color 712d0c
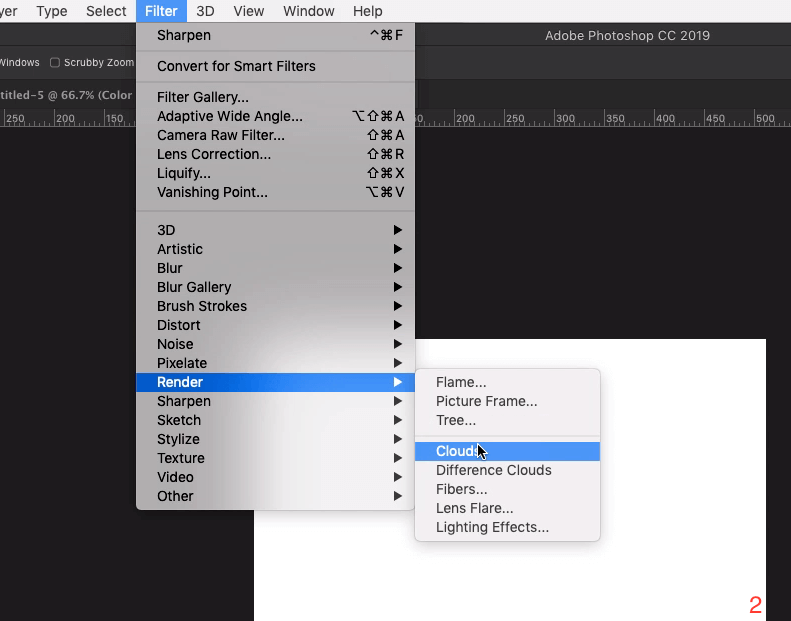
Go back to the filter menu at the top of the screen then Render then Clouds (2)
For stronger clouds
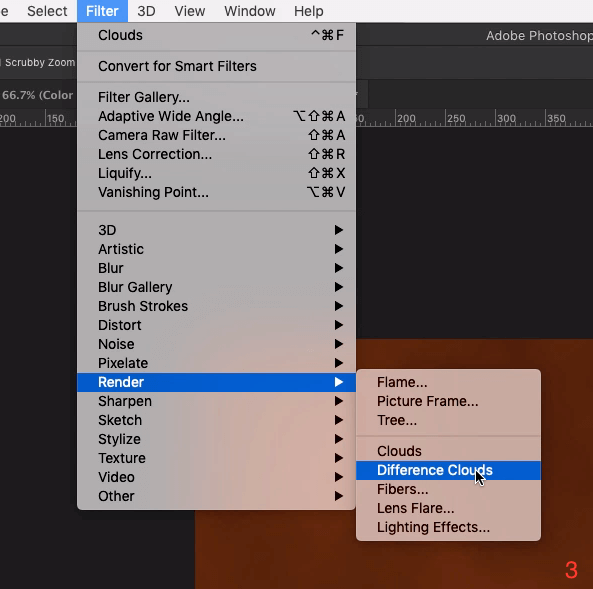
Go back to the filter menu at the top of the screen then Render then Difference Clouds (3)
We are using Difference Clouds to get a little more definition in the design. You can add Difference Clouds as many times as needed to get a more defined veining in your image by going back to the history option at the top of the Filters menu options
(See image for example)
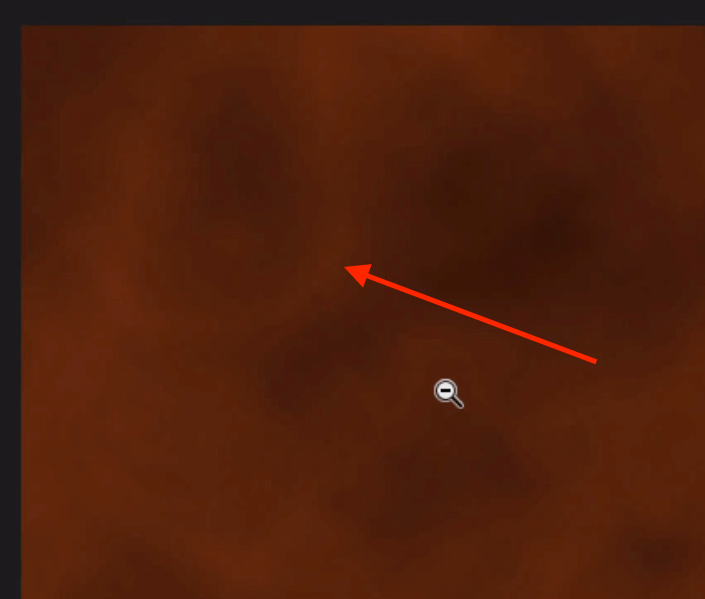
To use history to add more Difference Clouds
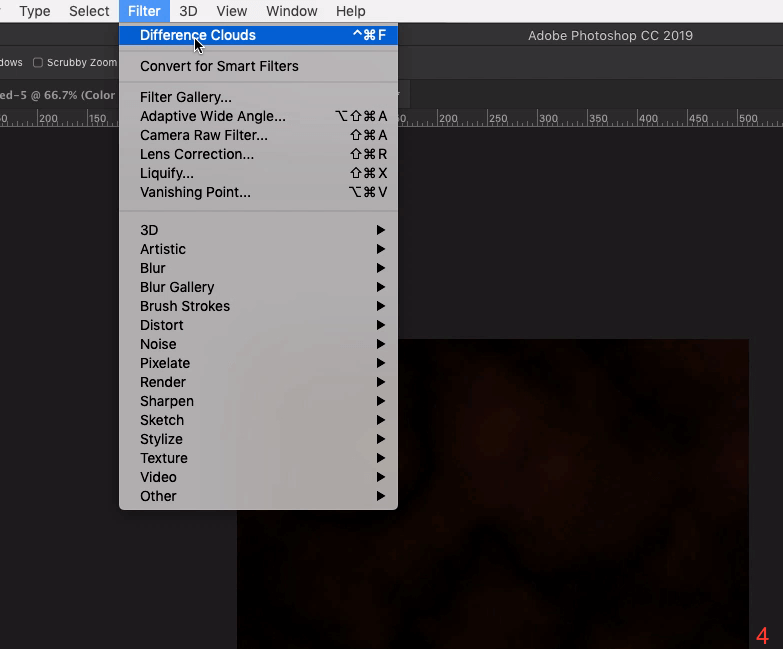
Go back to the filter menu at the top of the screen then Difference Clouds
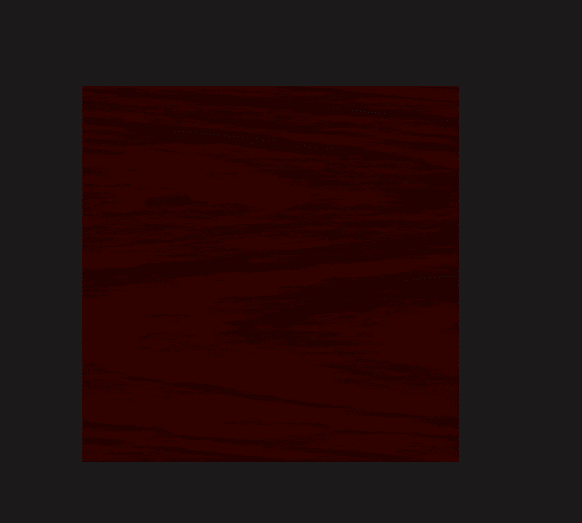
Repeat as many times as needed to achieve the veining shown in the example above (4).
Go back to the filter menu at the top of the screen then Distort then Shear (5)
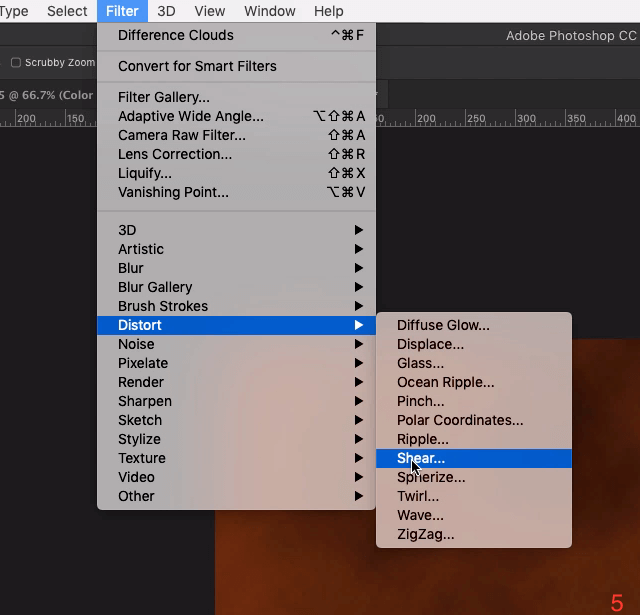
When the pop up menu comes up set the curves to an “S” shape (6). To set the line shape grab any part of the line to add the anchors.
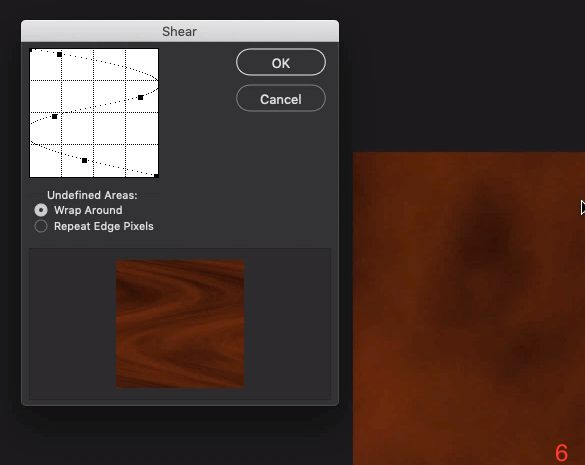
When you’re happy with the shape of your wood texture click ok
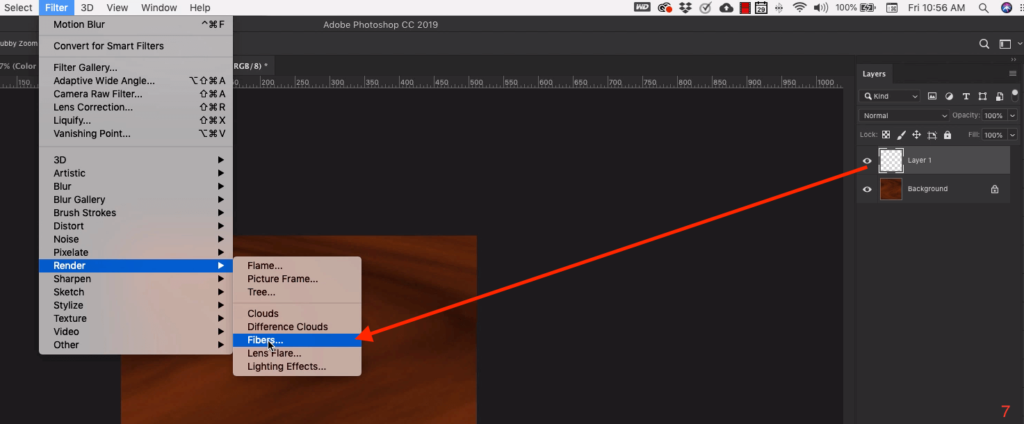
Create a new layer
Go back to the filter menu at the top of the screen then Render then Fibers (7)
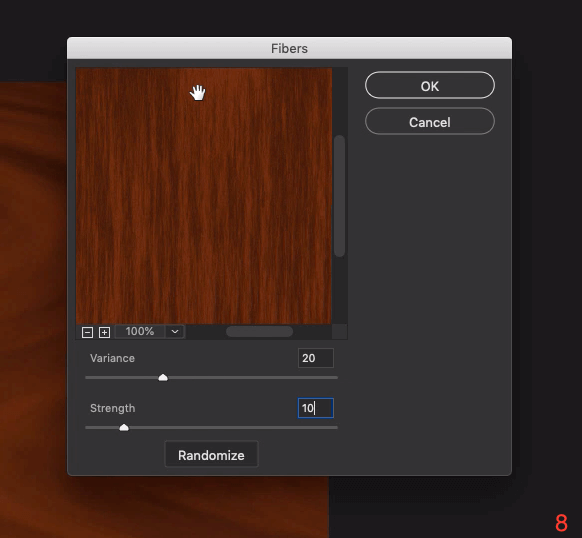
When the pop up menu comes up set the following (8):
Variance 20
Strength 10
Click Ok
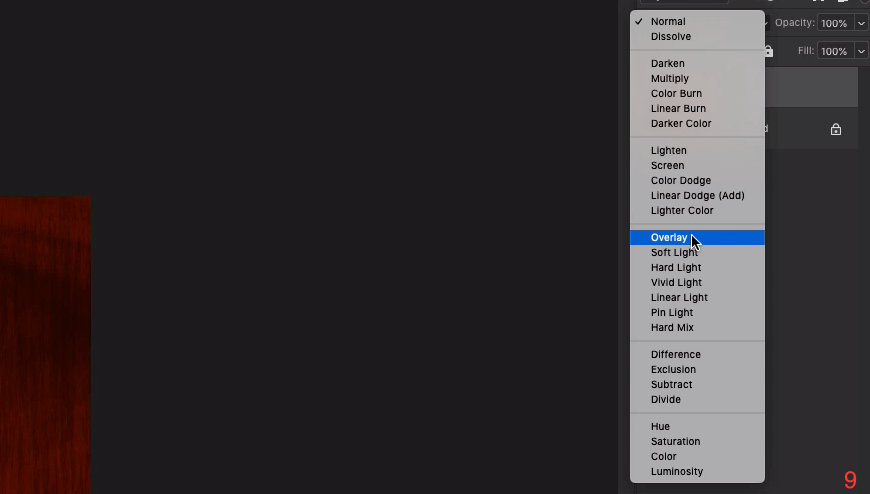
Set the layer mode to Overlay (9)
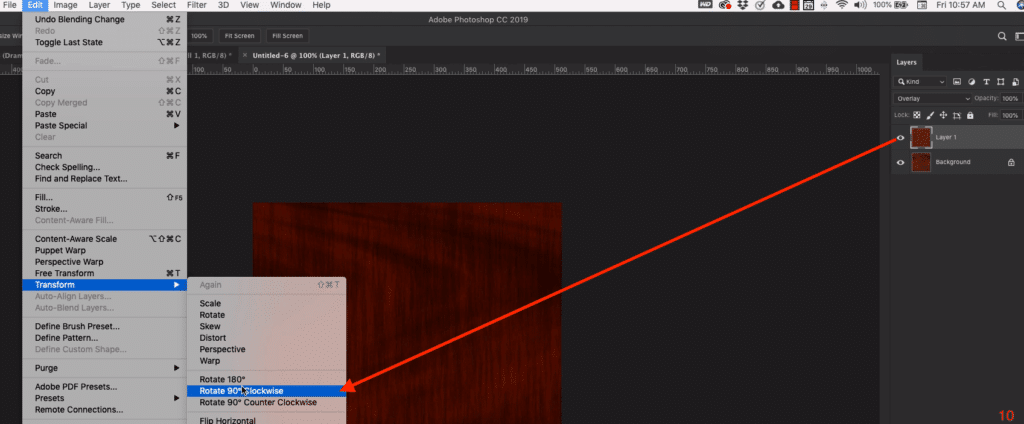
Go to the Edit menu at the top of the screen then to Transform then to Rotate 90 Degrees Clockwise (10)
Wood Texture Photoshop Tutorial Part 2 – Birchwood
Set the document settings as follows
640 pixels width
128 pixels height
RGB color 8 Bit
White Background
Click Create
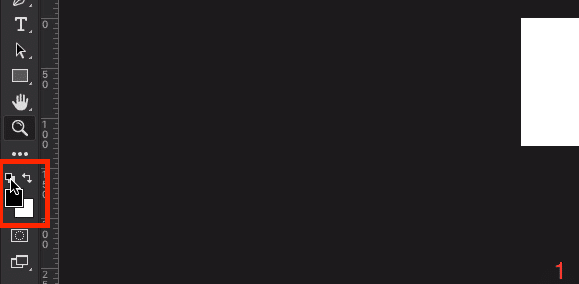
Reset your foreground and Background colors to black and white (1)
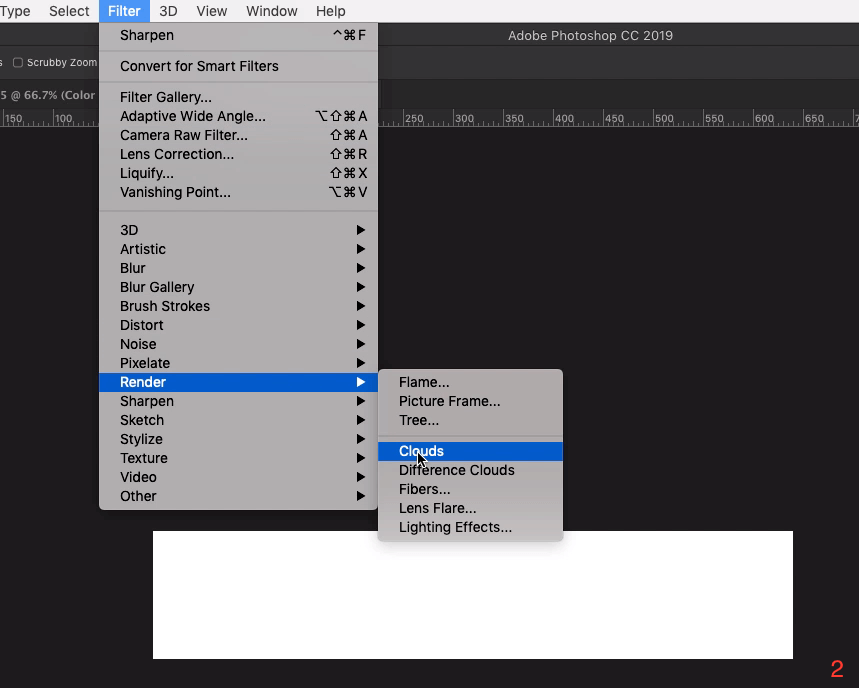
Go to the filter menu at the top of the screen then to Render then to Clouds(2)
Unlock your layer by clicking on the lock icon to

Change the Canvas Size
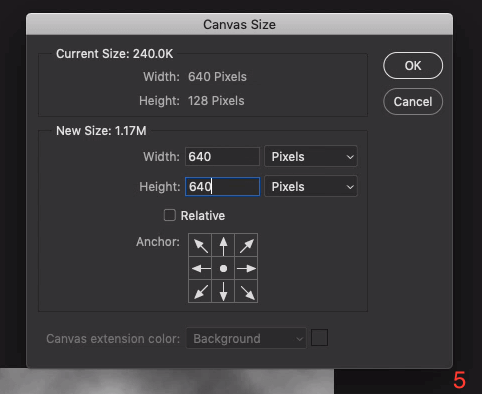
Go to Image menu at the top of the screen then Canvas Size (4)

When the pop up dialogue box opens up set the width to 640 and the height to 640 then click OK
Press the letter V on the keyboard to bring the anchors up around the image. Then stretch the image vertical.
Note: Do not allow the layer to stretch horizontally. We want to achieve long strands.
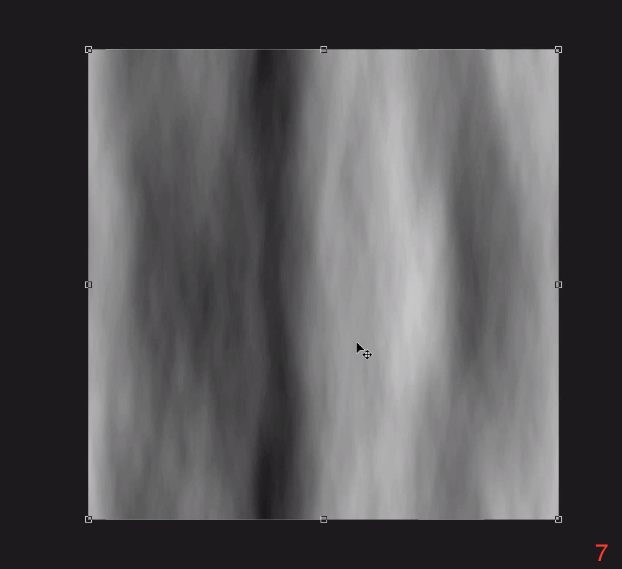
Stretch vertically all the way to the top and bottom to fill the canvas completely.
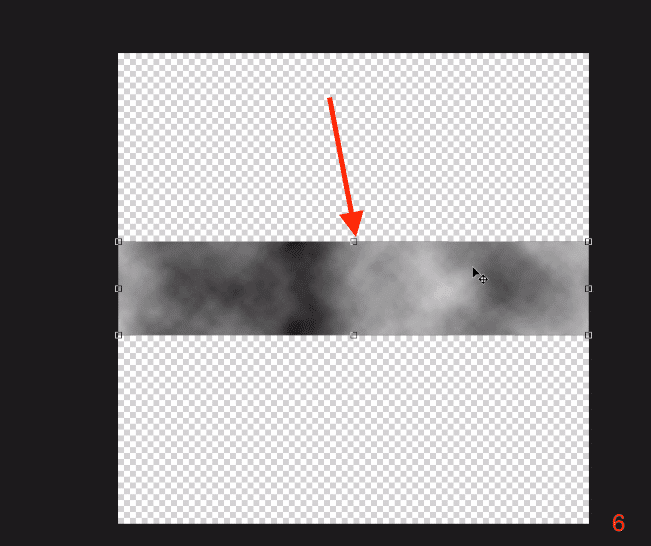
At this point in the wood texture Photoshop tutorial, you should have something that looks like the image below. (7)
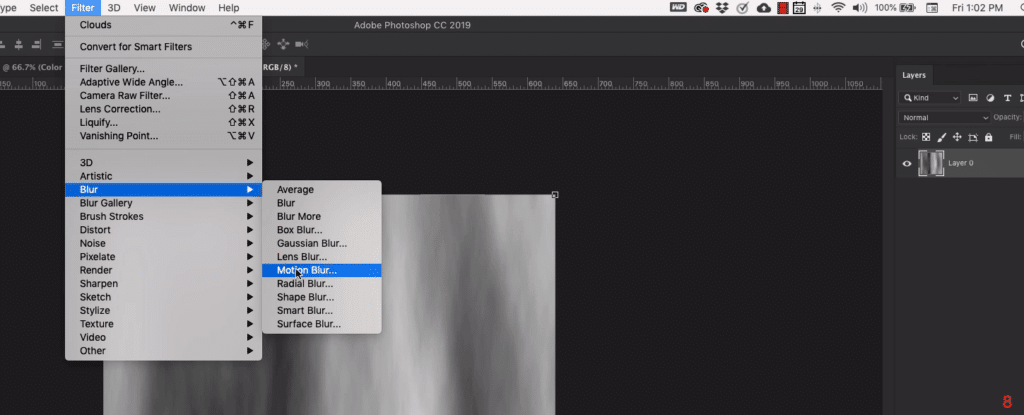
Go back to the filter menu at the top of the screen then Blur then Motion Blur (8)
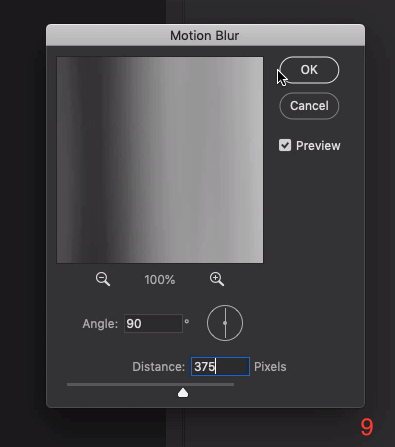
In the pop up dialogue box set the Angle to 90 degrees and the Distance to 375 pixels, click OK (9)
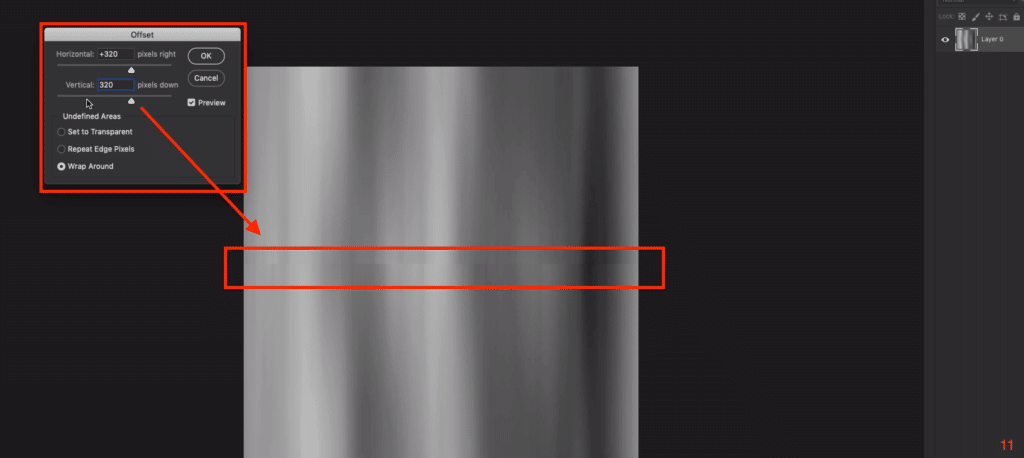
Go back to the filter menu at the top of the screen then to Other
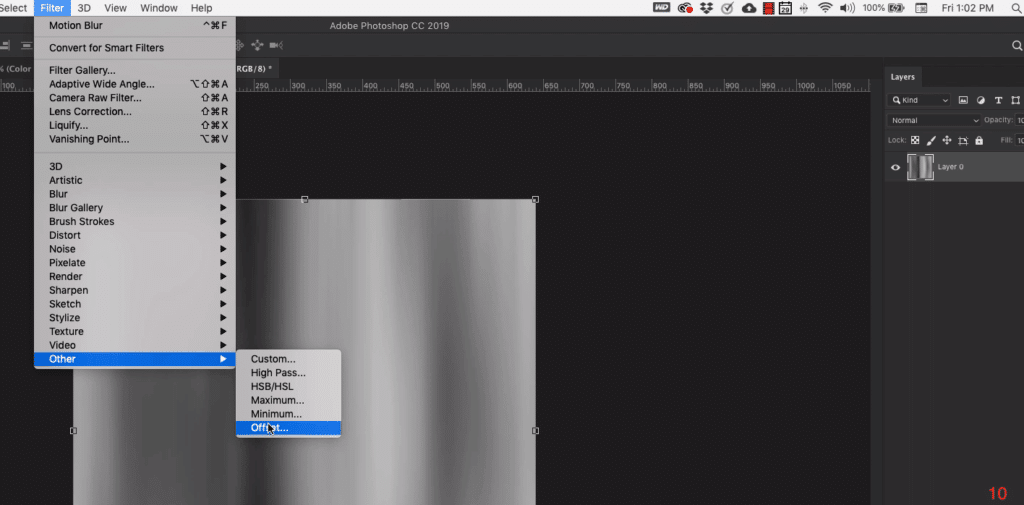
When the dialogue box comes up set the following (11):
Horizontal 320 Pixels right
Vertical 320 Pixels down
Check off Wrap Around
Click OK
You will now have a seam on your image.
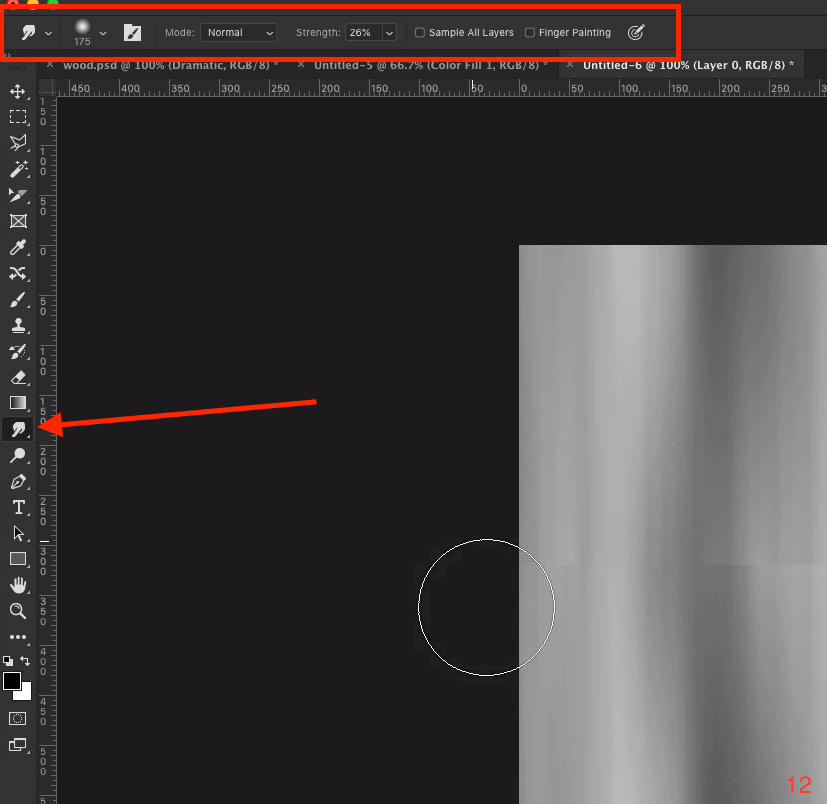
To remove the seam take the following steps.
Choose the Smudge tool from the side menu with the following settings:
Brush: soft round
175 pixels (or smaller)
Mode: Normal
Strength: 26 percent
Drag the smudge tool over the seam in an up and down (vertical) motion until the crease blends with the rest of the image. (12)
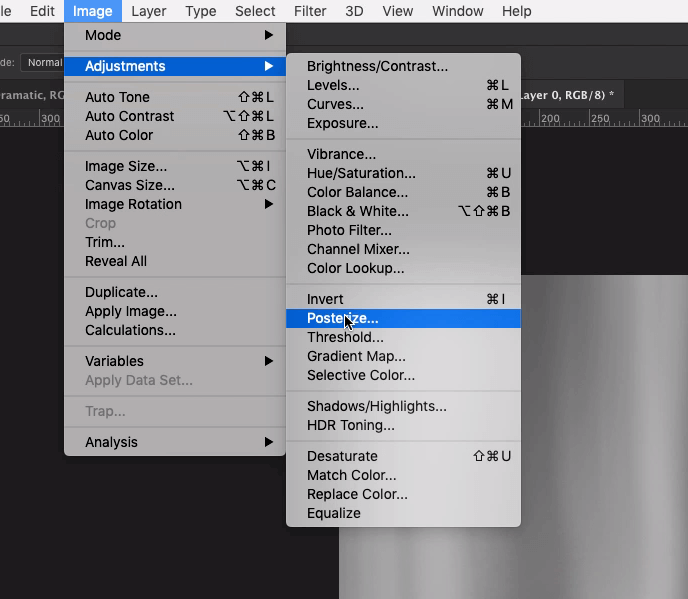
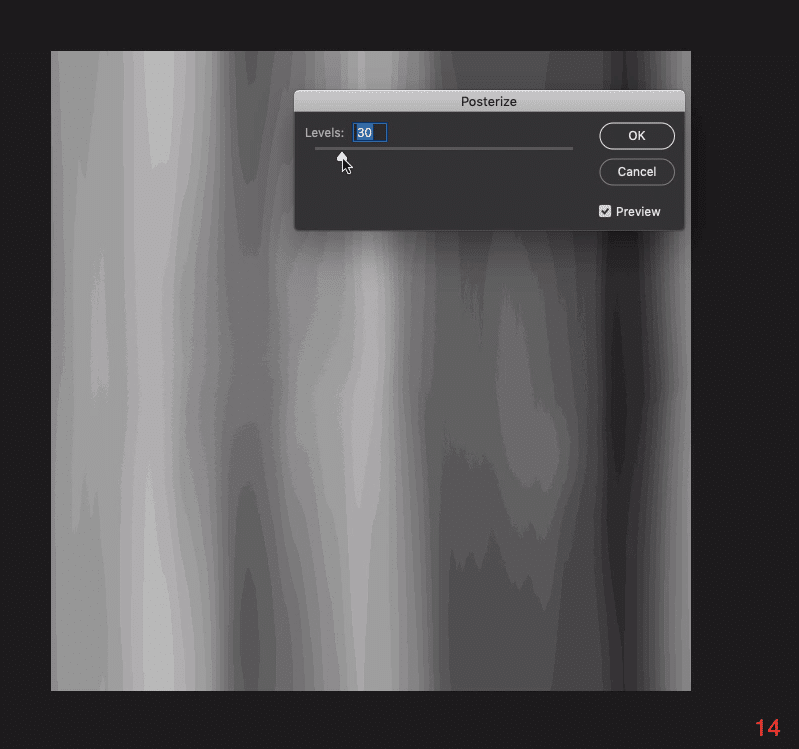
Go back to the Image menu at the top of the screen then to Adjustments then to Posterize (13)
When the dialogue box comes up,
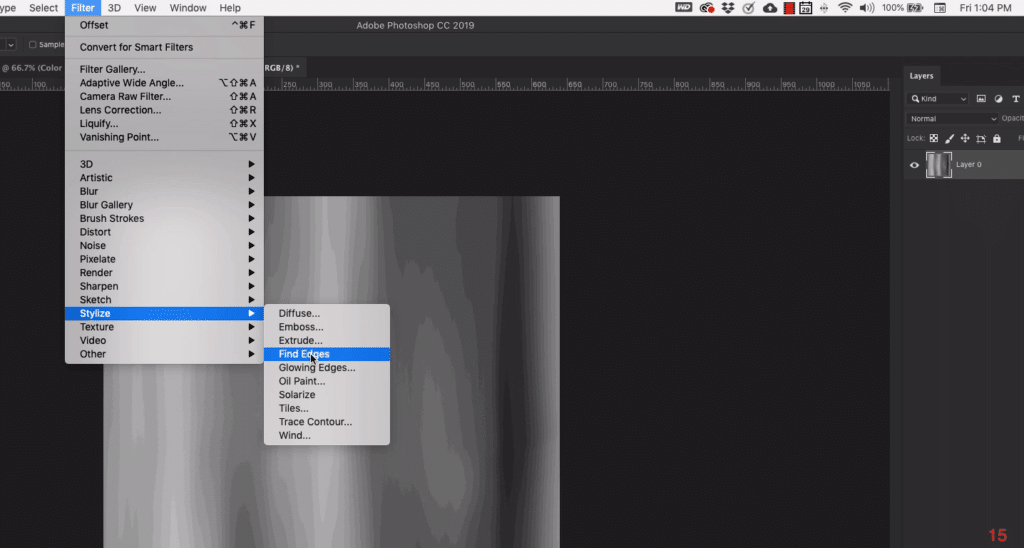
Go back to the filter menu at the top of the screen then to Stylize then to Find Edges (15)
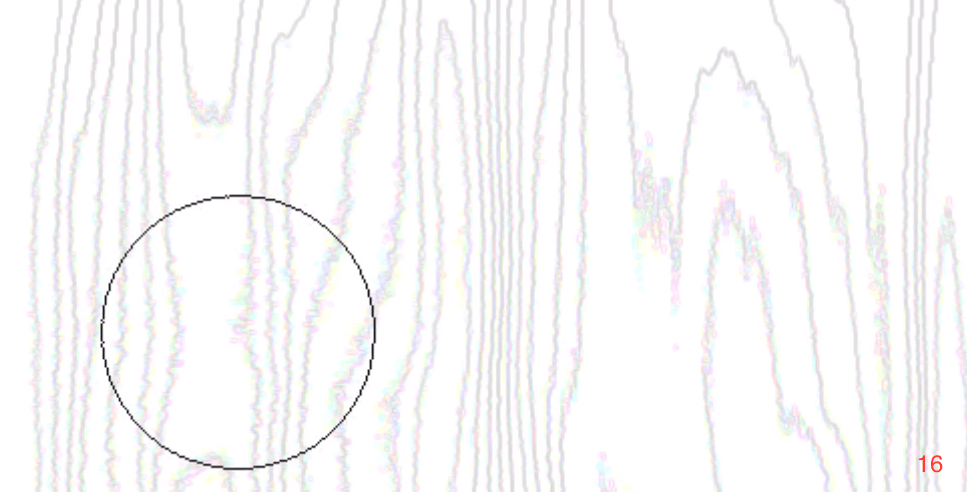
You should end up with something that looks like the photo below. You will notice the photo has some color. We want to remove the color from this image completely. (16)
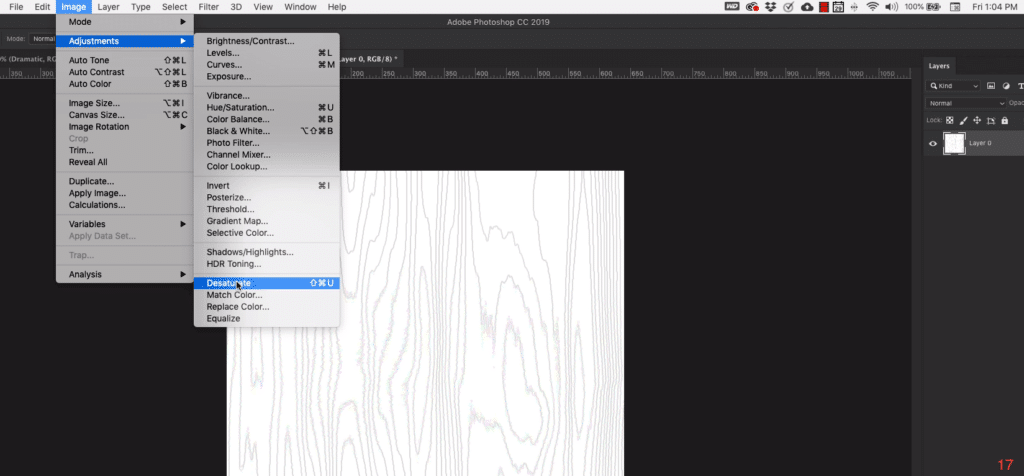
To remove the color take the following steps:
Go back to the Image menu at the top of the screen then Adjustments then Desaturate (17)
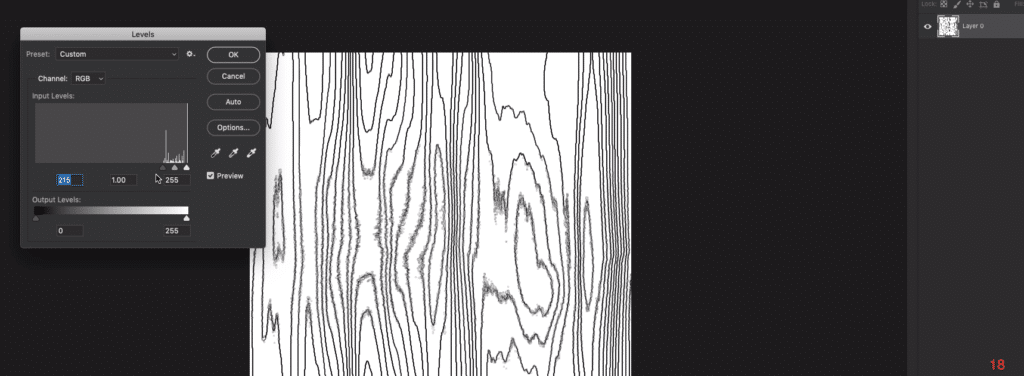
Next we will darken the lines created in the last step.
On the keyboard press command+L (Mac) or Ctrl+L (PC) to bring up the levels dialogue box. In the dialogue box set the black level to 215 or drag the black marker to where the white bars begin, then click OK. (18)
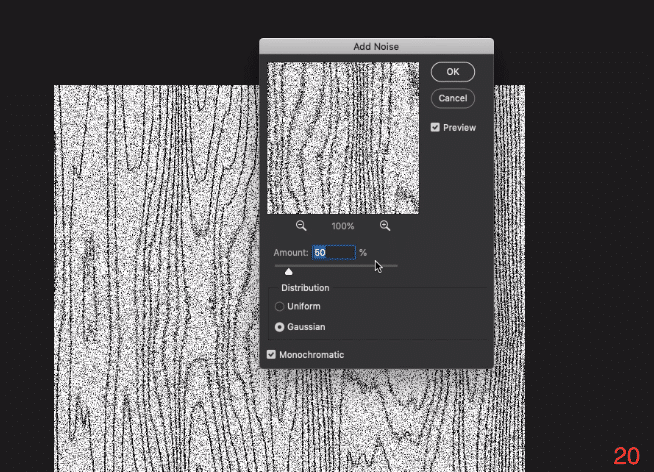
Go back to the filter menu at the top of the screen then Noise then Add Noise. (19)
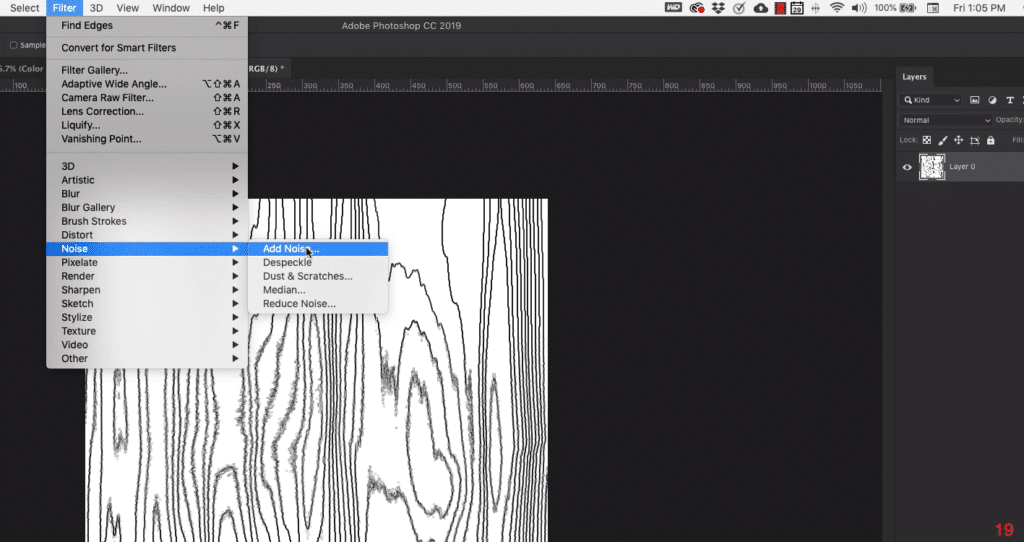
When the dialogue box comes up,
Amount to 50 percent
Distribution: Gaussian
Check off Monochromatic
Click OK
Duplicate the first layer by right-clicking and selecting Duplicate layer on the pop-up menu. (21)
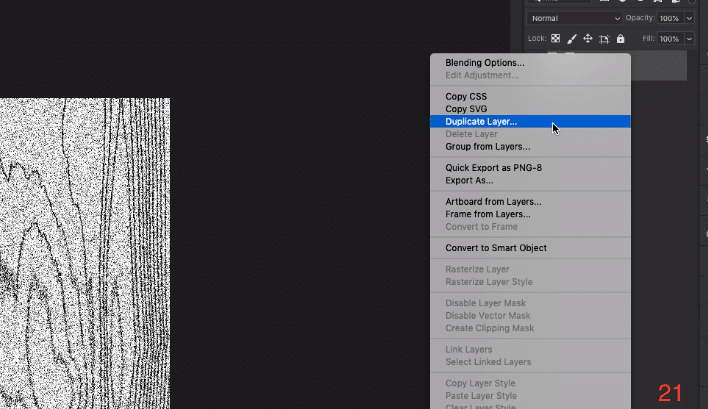
Organizing your Layers
To keep from getting confused by all the filters we are using, this would be a good time to name your layers in order to keep them organized.
Name the layer “1”
Name the bottom layer “2”
Working with Layer 1 – The Light Wood Texture
Select the top layer (“1”) and add the following effects
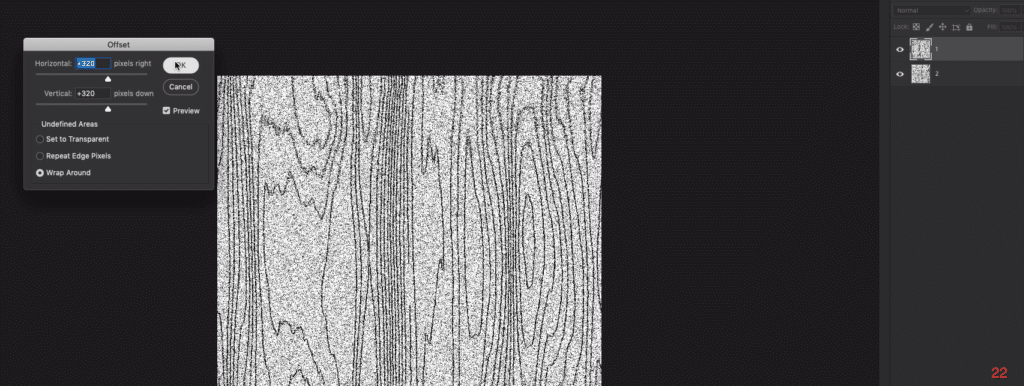
Go back to the filter menu at the top of the screen then Other thenOffset (21 this is the second 21, sorry)
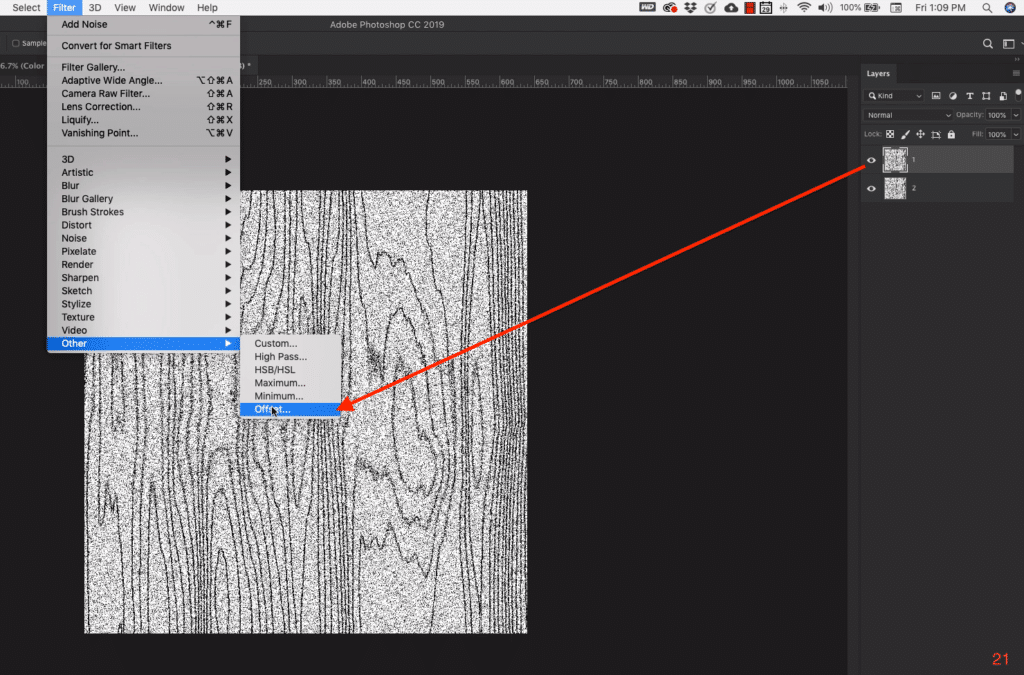
When the dialogue box comes up,
Horizontal 320 Pixels right
Vertical 320 Pixels down
Check off Wrap Around
Click OK
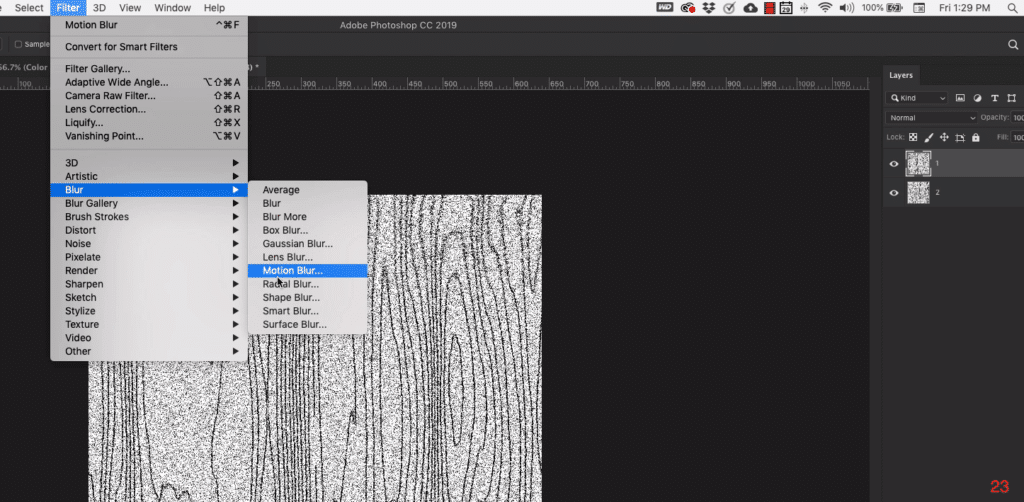
Go back to the filter menu at the top of the screen then Blur then Motion Blur (23)
When the dialogue box comes up,
Working with Layer 2 – The dark Wood Texture
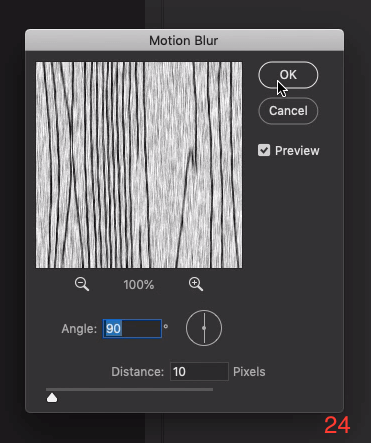
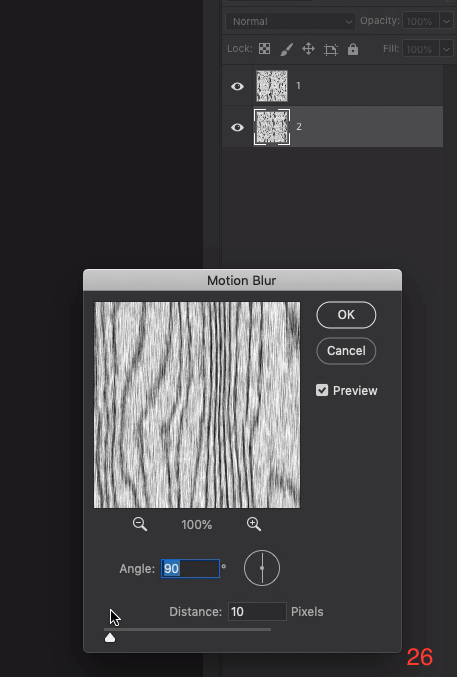
Go to the filter menu at the top of the screen then Blur then Motion Blur (25)
When the dialogue box comes up, set the Angle to 90 degrees and the Distance to 10 Pixels, Click OK. (26)
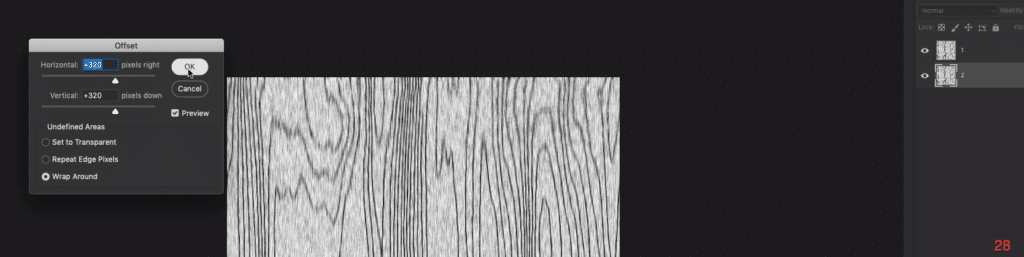
Go back to the filter menu at the top of the screen then Other then Offset (27)
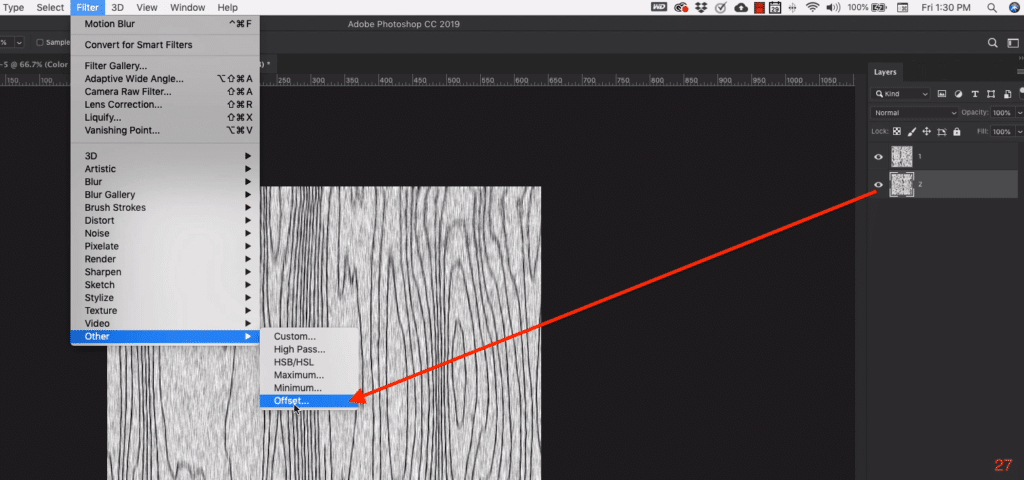
When the dialogue box comes up set the following settings(28):
Horizontal 320 Pixels right
Vertical 320 Pixels down
Check off Wrap Around
Click OK
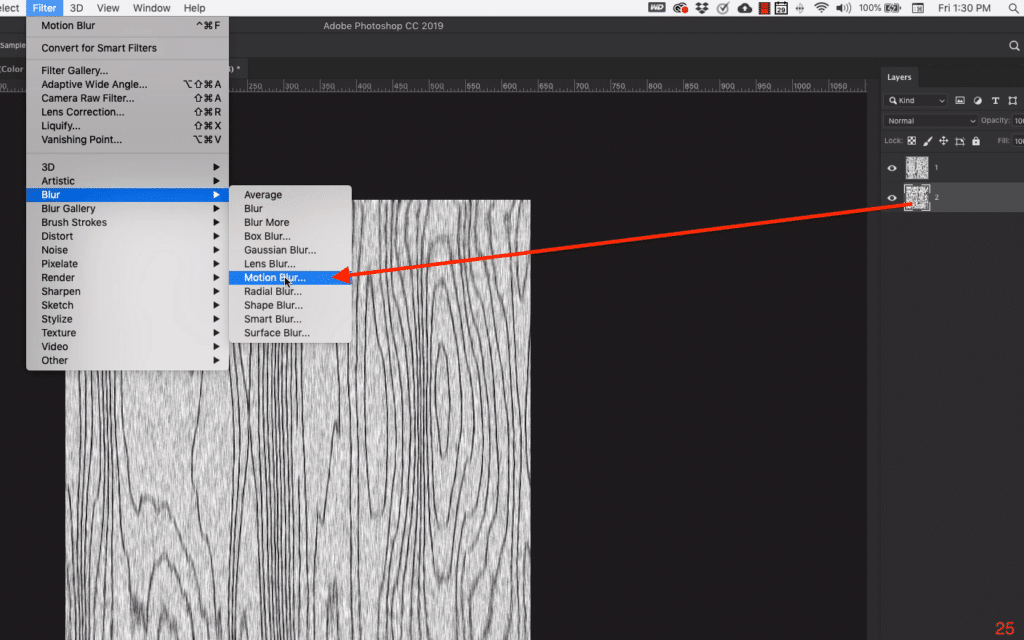
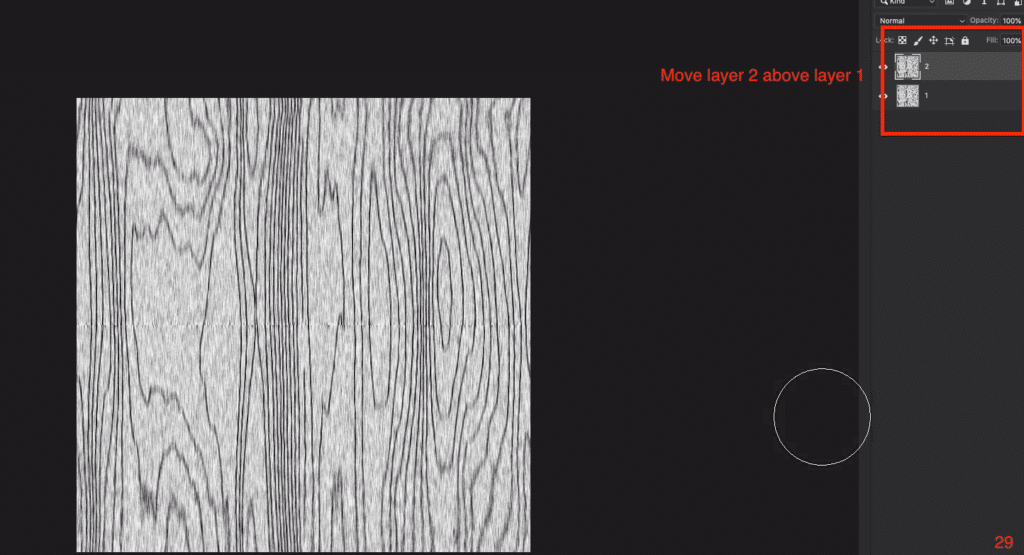
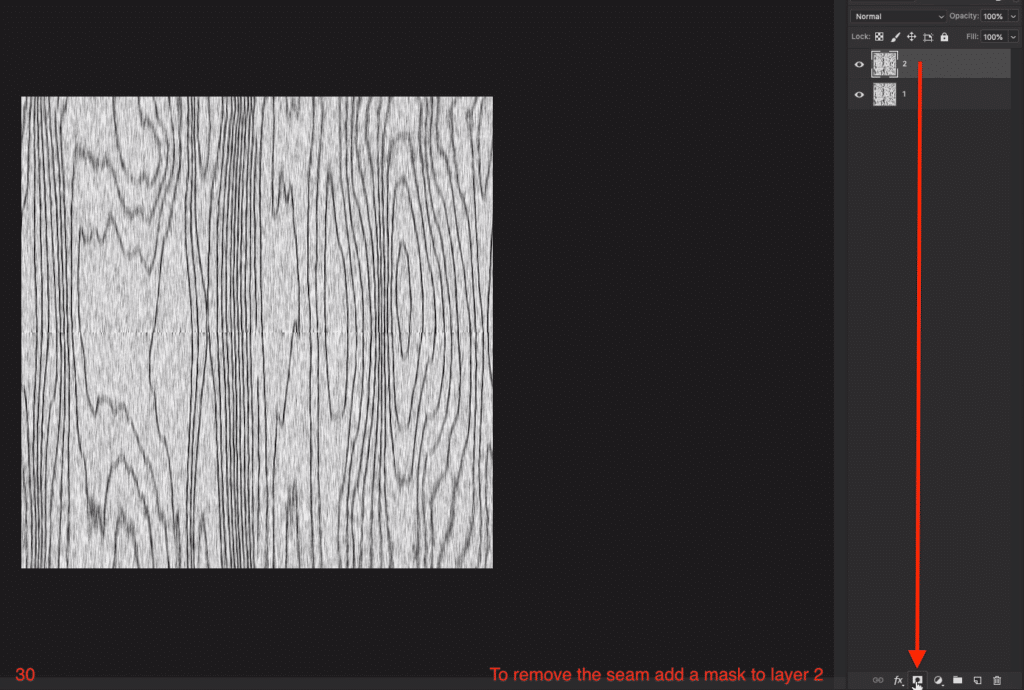
Use your mouse to click and drag layer 2 above layer one in the layers panel (see photo 29)
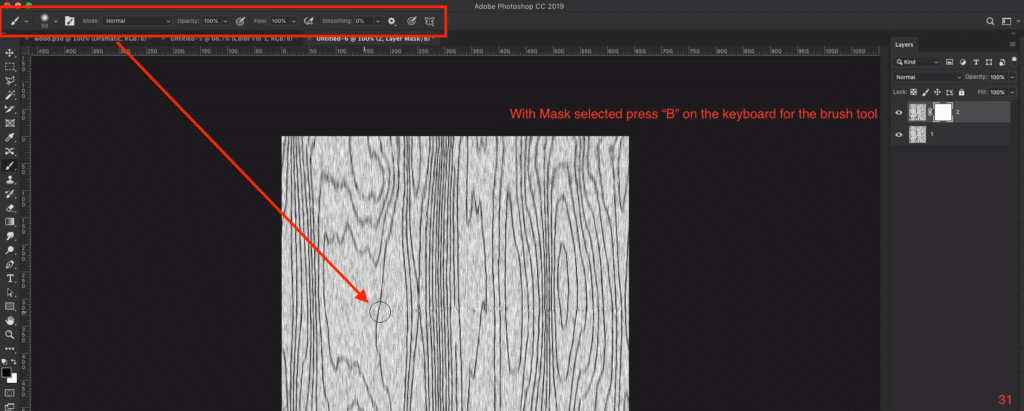
Add a mask to layer 2 (which should be on top at this point) (30)
Press the letter B on your keyboard to bring up your brush tool. Set the following settings on your brush:
Brush: Soft round (Photoshop default)
Mode: Normal
Opacity” 100 percent
Flow: 100 percent
With the mask selected, move the brush over the visible seam on the canvas to smooth it out. (31)
Select both layers (shift + mouse click on each layer to select them. (32)
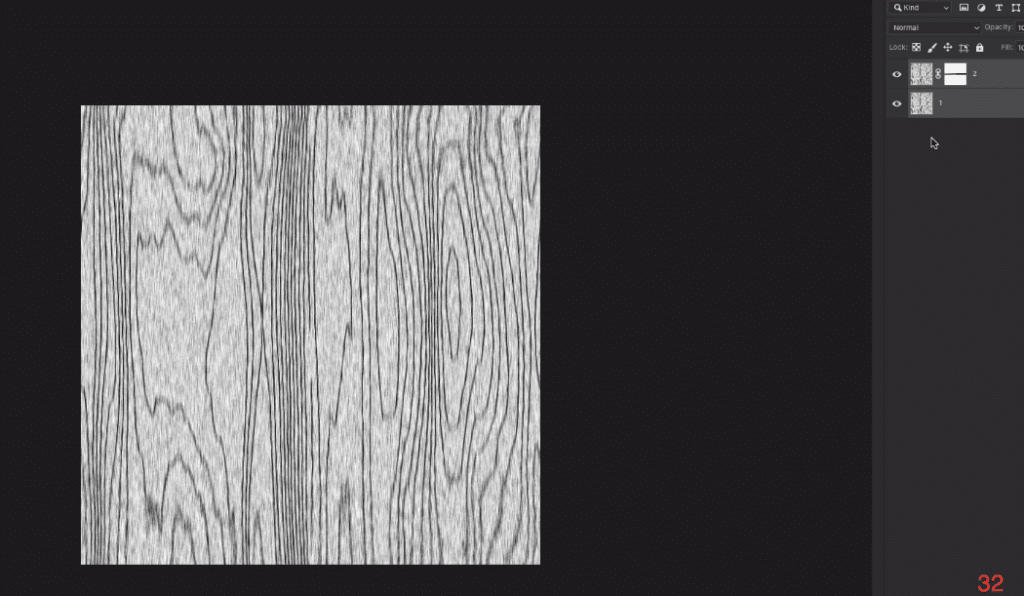
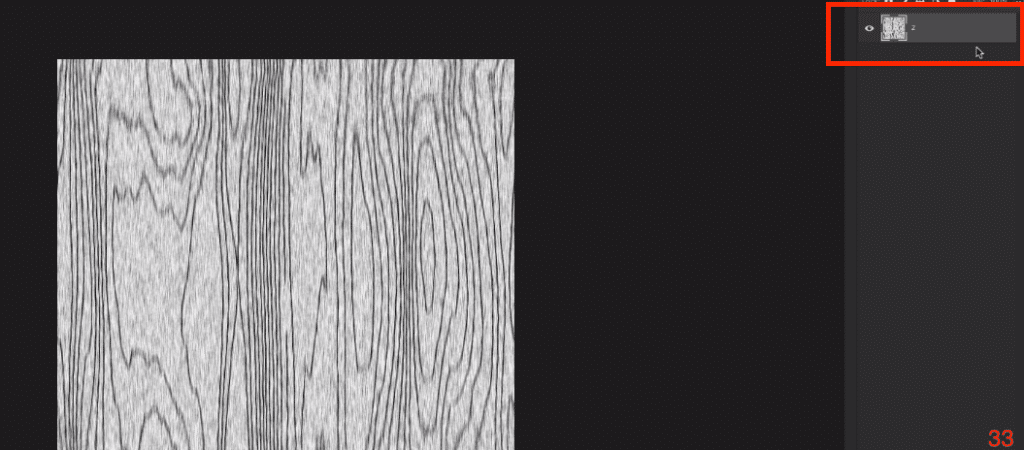
With both layers selected, on your keyboard press command + E (Mac) Ctrl + E (PC) to merge the layers into one (see image 33 for reference on what your layers panel should look like.)
Select the layer, right-click to bring up the pop up menu and select Duplicate Layer (35) Skipped a number, sorry.
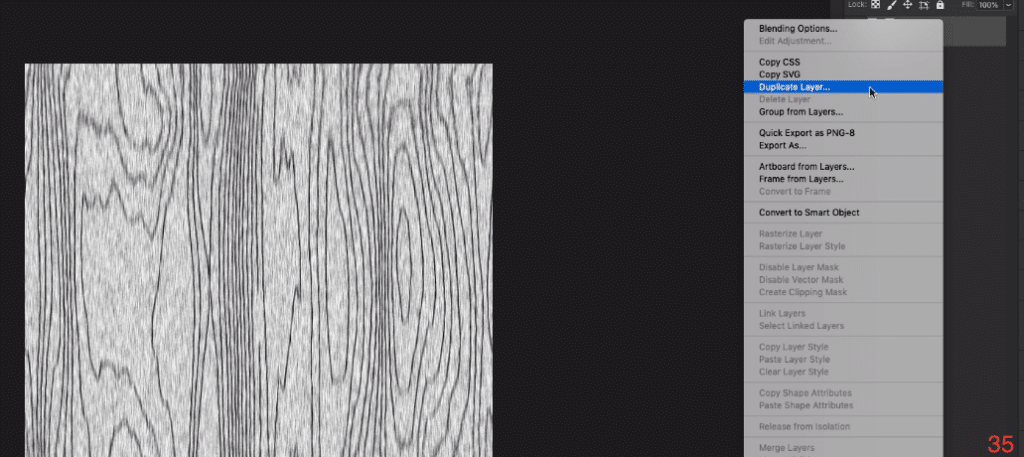
Name the layers 1 (top) 2 (bottom) then select layer 1 for editing. (36)

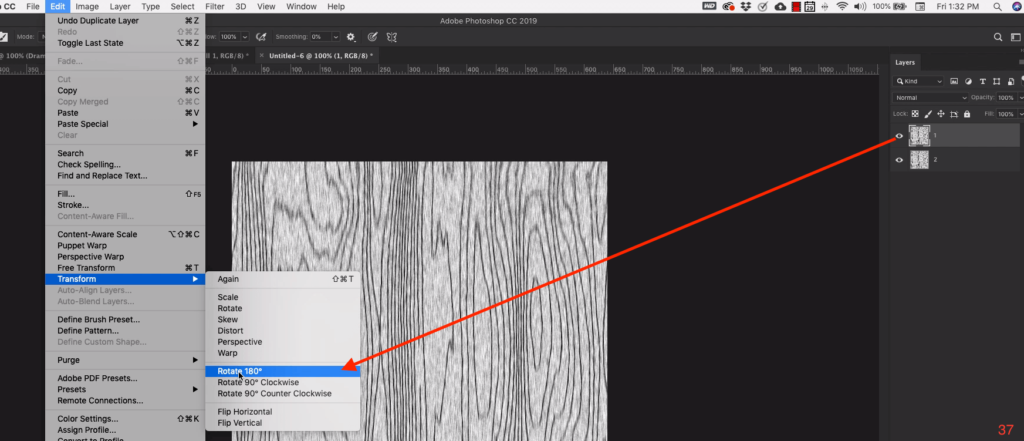
With layer 1 selected go up to the Edit menu at the top of the screen then Transform then Rotate 180 degrees. (37)
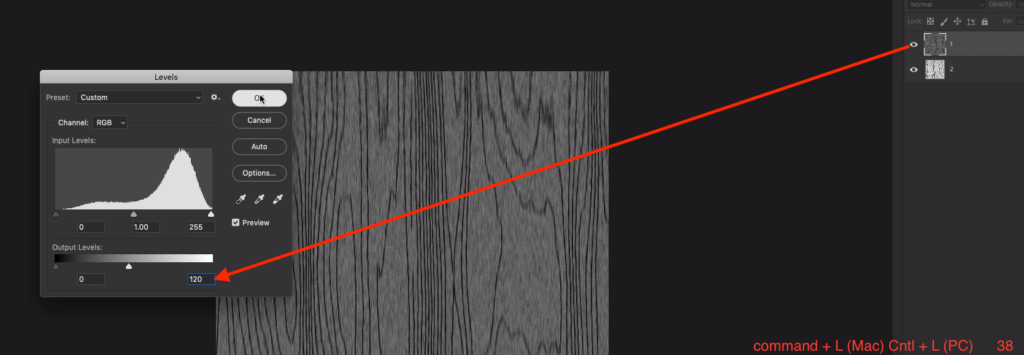
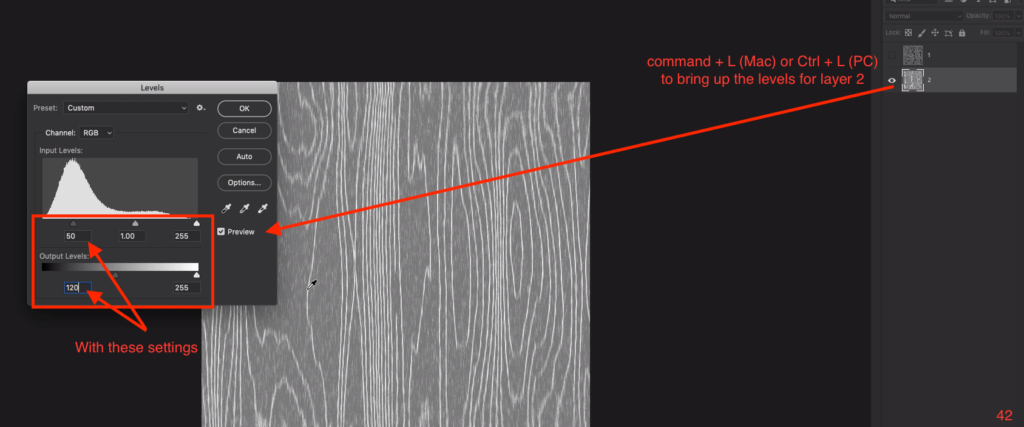
With layer 1 selected, on your keyboard press command + L (Mac) or Ctrl + L (PC) to bring up the levels dialogue box for that layer. Set the White Output Levels to 120 then click OK (38)
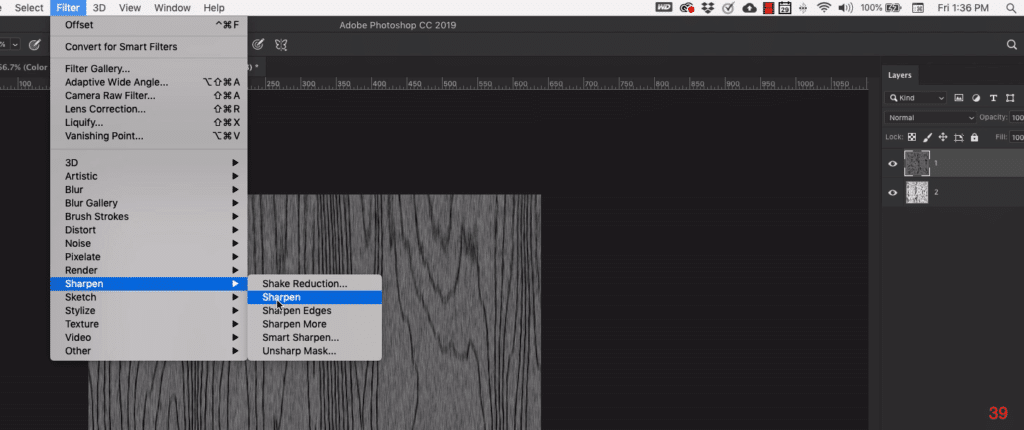
Make sure layer 1 is still selected. Go back up to the Filter menu at the top of the screen then Sharpen then, Sharpen again. (39)
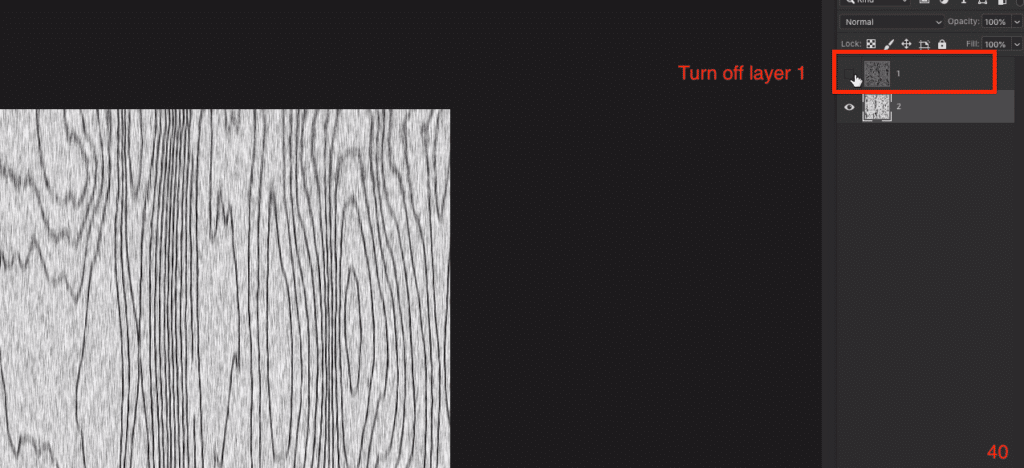
Turn off layer 1 so that you can see what you are doing with layer 2 (40)
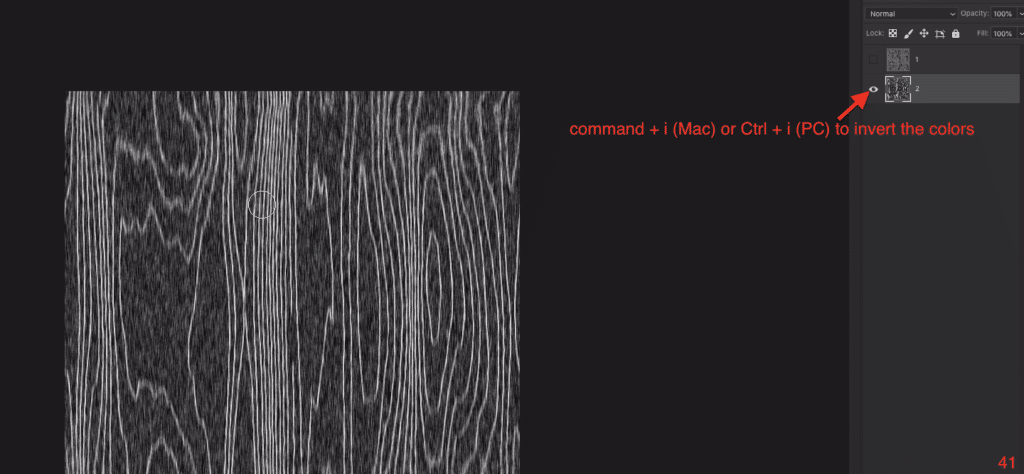
Select layer 2 then on your keyboard press command + i (Mac) or Ctrl + i (PC) to invert the colors in the layer. (See photo 41 to see what layer 2 should look like after inverting the color.)
With
Make sure layer 2 is still selected then go back up to the Filter menu at the top of the screen then Sharpen then Sharpen (43)
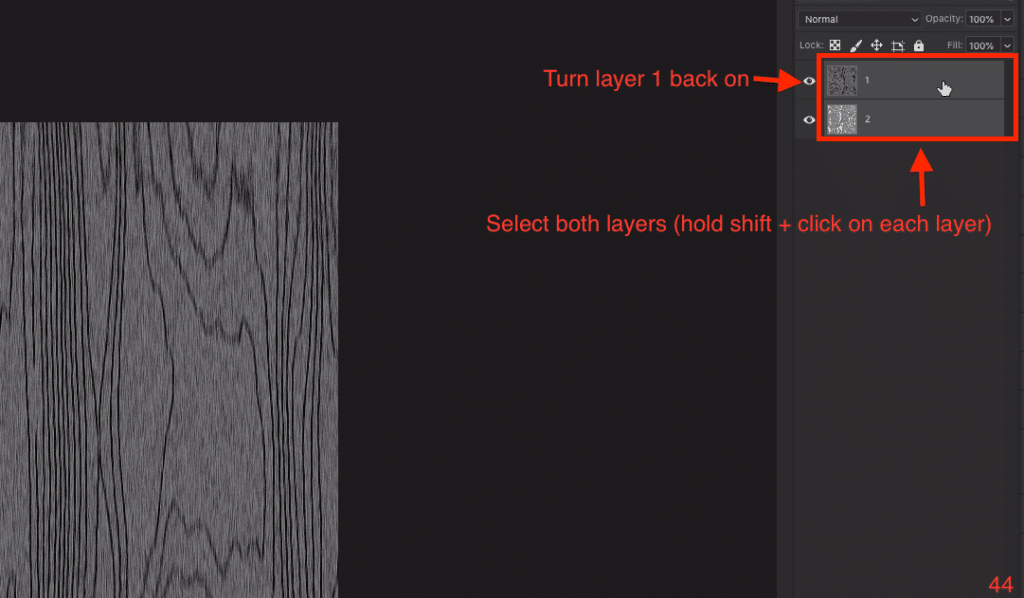
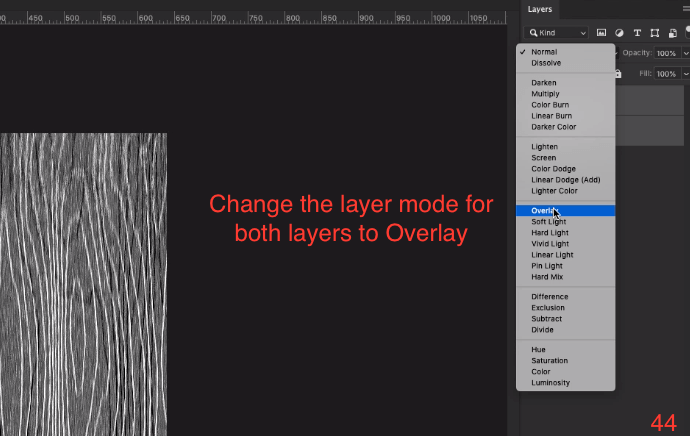
Turn layer 1 back on and select both layers by holding down the shift key and clicking on each layer with your mouse to highlight them. With both layers selected change the Layer Mode to Overlay (44- 2 images)
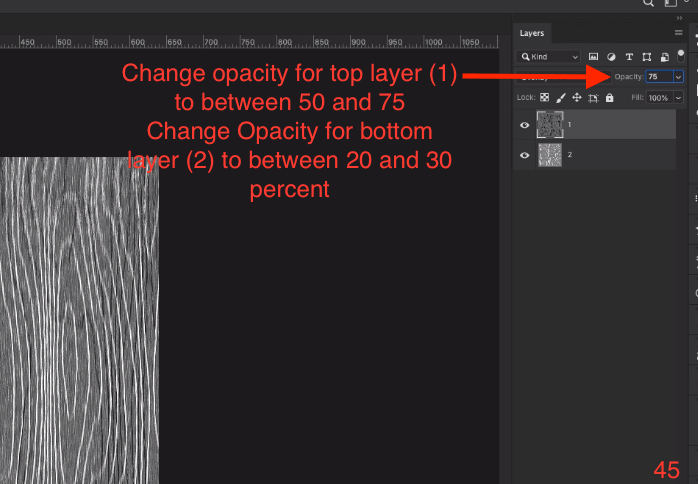
Change the Opacity of both layers. Select layer 1 and change the Opacity to 75 percent. Select layer 2 and change the opacity of this layer to 30 percent. (45)
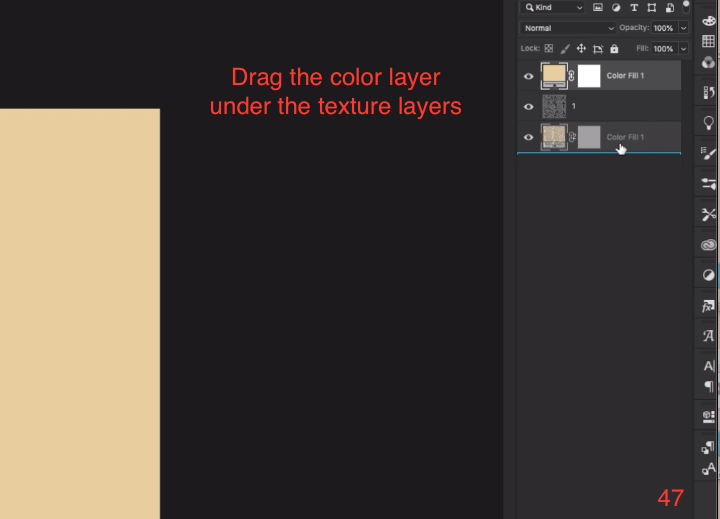
Adding a Color Layer
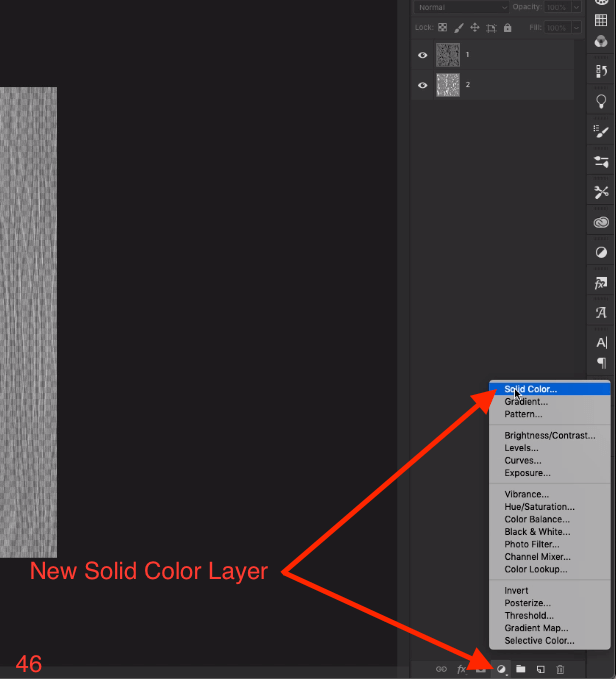
Add a new Solid Color Adjustment Layer by clicking on the black and white circle at the bottom of the layers panel. When the pop-up menu appears, choose Solid Color. (46)
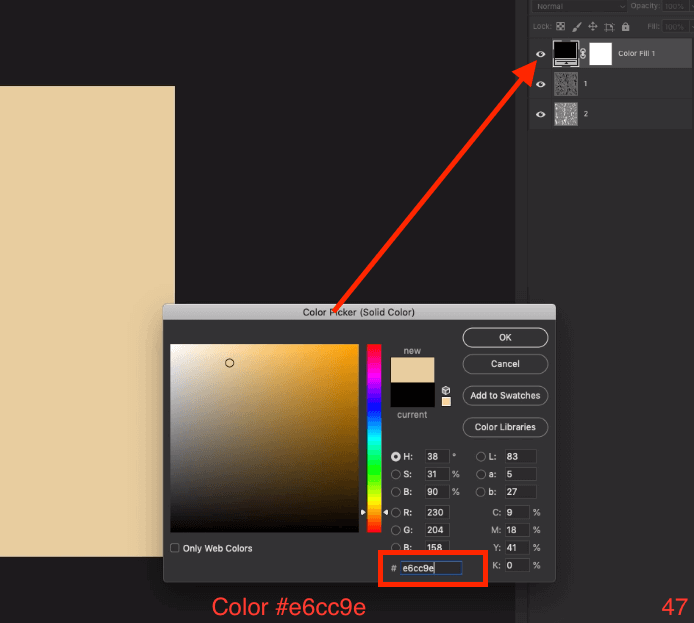
Set the color of the Solid Color Adjustment Layer to #e6cc9e which is a pastel yellow color. You can change this to any color you like to get different wood effects later on. With the color set, drag the color layer underneath both texture layers (layers 1 & 2) (47 – 2 images)
Wood Texture Photoshop Tutorial Notes:
Layer 1 controls dark grains on your texture and Layer 2 controls light grains. If one or the other is too strong or subtle for your liking you can take the Opacity of the layer up or down as you like.
Watch the end of the video above if you would like to see me demonstrate how to use these textures as patterns inside of Photoshop for use in larger files.
Other Posts You Might Like
Subscriber Freebies!
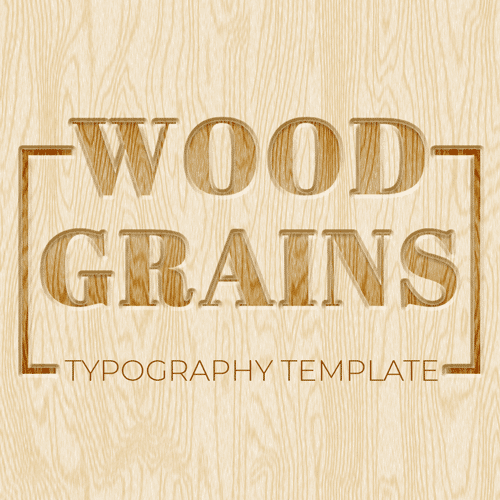
If you’re already on my email list then you know that I do my best to send you a little something extra with each tutorial to help you enhance the basic project. This week is no different. As a bonus for this wood texture photoshop tutorial, be on the lookout for an exclusive Wood Typography Template PSD file.
You can use this file to create any words in any size or font to enhance your message even further! Check out the end of the video for a demonstration of this freebie and keep an eye out in your inbox for the direct download of this file.
Not on my List?
Join my email list to get freebies and project enhancements that I only send via email. I would love for you to become part of the PrettyWebz family. Go to the footer of any page on this website to sign up!
Learning to use design tools can be fun and entertaining too. You also get the benefit of saving money on design services because you’re going to get really good at a host of amazing design tools just by following simple tutorials.
The process of designing does not have to be something that holds your business back. Conquer the tools, conquer the principles, win at design!
What’s Next?
All of these template and pattern files can help you build your design assets so that you can create stunning marketing design for your business. So don’t forget to sign up below in the footer to become part of the Prettywebz family.
Also join me on Youtube as well to check out the playlists I’ve set up for Photoshop, PowerPoint and other software you can use to design your online graphics.
Did you like this tutorial? Save it for later or share it with a friend! Pin this Image!