Turquoise Texture in Photoshop

Learn how to make a beautiful turquoise gemstone pattern from scratch using only Photoshop. In this step by step tutorial, I will take you through the process of creating the turquoise pattern and building a layer style to simulate a polished gemstone set in silver or gold.
This is a rough texture more like raw turquoise but still has a slight shine to it so you can use it to make digital jewelry designs. You can also use this beautiful abstract pattern for styling objects, text, and digital art pieces.
LEARN DESIGN TOOLS ONE STEP AT A TIME
Learn and master the most frustrating aspects of overwhelming programs like Photoshop and Illustrator in a fun and entertaining way with PrettyWebz design tutorials.
Tutorial projects like the ones we share here on the blog are meant to help you grasp the use of the most powerful aspects of design software one step at a time. In the process, you will build your design assets so that you can create a stunning marketing design for your business.
Don’t forget to sign up below in the footer to become part of the Prettywebz family and never miss another tutorial.
Also join me on YouTube as well to check out the playlists I’ve set up for Photoshop, PowerPoint and other software you can use to design your online graphics.
Resources for the Turquoise Texture Tutorial
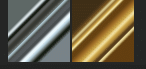
Highly reflective metallic gradients
Turquoise layer style created in the tutorial

Turquoise color swatch

More Posts on this Topic

Turquoise Texture Video Tutorial
Image References
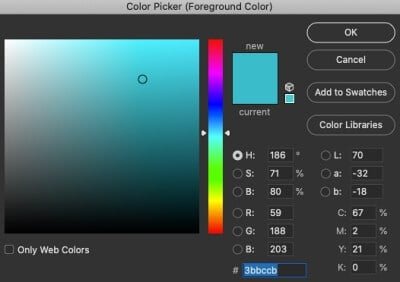
Step One – set foreground and background color for the turquoise texture

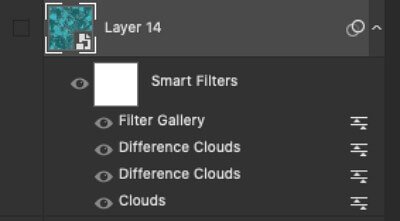
Step Two – Create a new layer and right-click then choose “Convert to Smart Object” this will allow you to use Smart filters. Smart filters are editable, this will be very helpful when working with random patterns such as natural stone. The image below shows all of the smart filters we will be using to create the turquoise texture.
Step Three – Go to Filter>>>Render>>>Clouds to create a cloud base for the texture
Step Four – Go to Filter>>>Render>>>Difference Clouds to add more definition to the pattern created.
Step Five – Go to Filter>>>Render>>>Difference Clouds this time the filter will invert the color back to the original but still give us the definition we need.
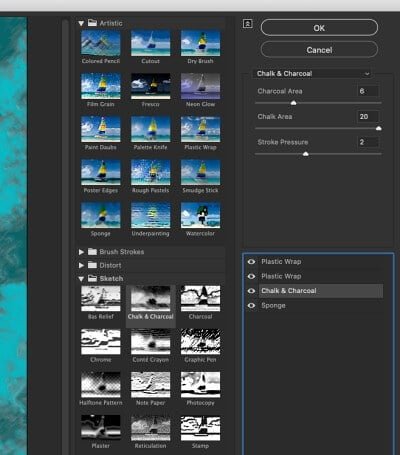
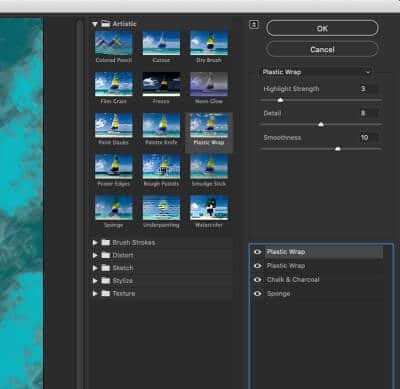
Step Six – Go to Filter>>>Filter Gallery and set the following filters and their respective settings:
Note: To add a new filter while in the Filter Gallery click on the plus icon at the bottom of the list of filters.


Step 7 – Create a pattern by going to Edit>>>Define Pattern>>>Name the pattern and it will be available in your patterns for the next steps or for use in your designs. If you do not want to make the layer style you can simply save the texture as a Jpg or PNG file for use in any graphics editor.
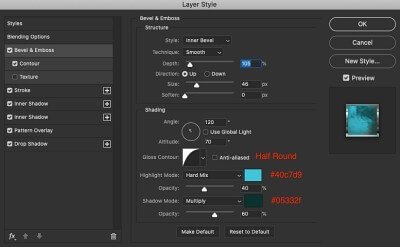
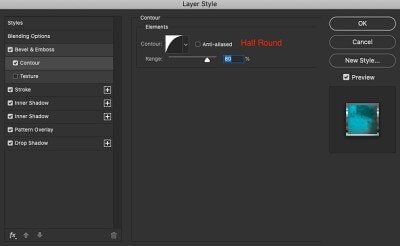
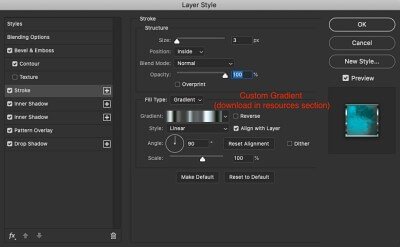
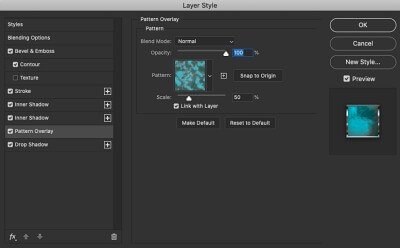
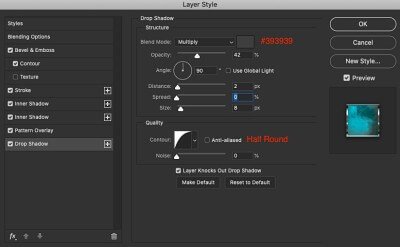
Step 8 – Creating the turquoise jewelry layer style
This section is optional, here we will be creating depth and lighting for small objects like jewels, buttons, and other design elements. Please see the sample photos at the end for some ideas on how to use this style in your designs.
Set the following settings to create this layer style:


Examples of the turquoise texture and layer style in use