

Photoshop Texture Tutorial: Jade Stone
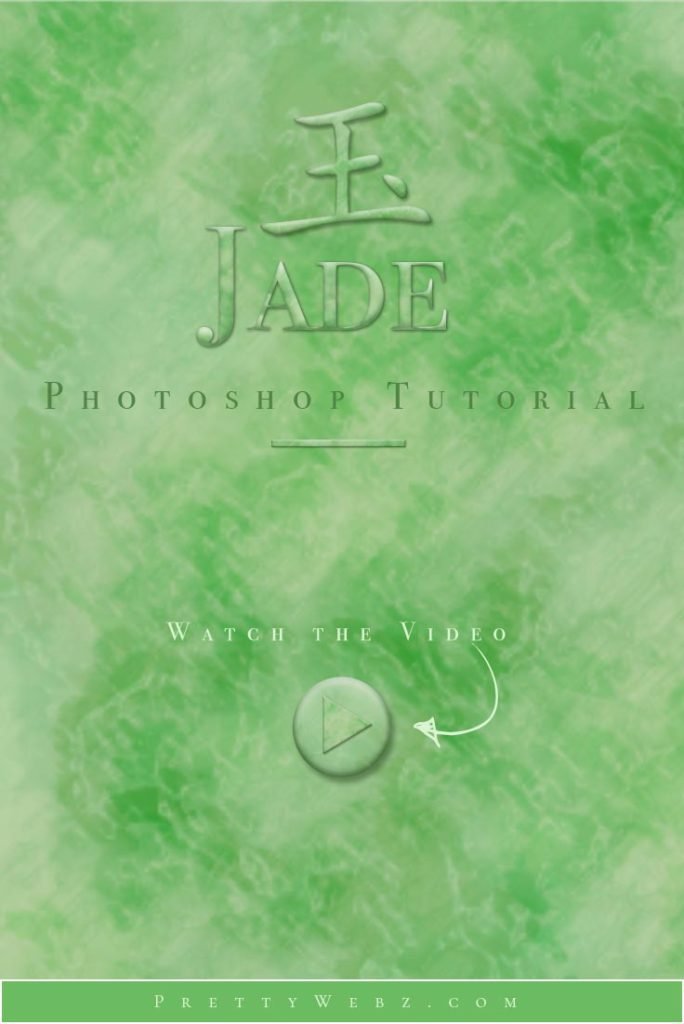
In this Photoshop texture tutorial, you’ll learn how to make a Jade background texture from scratch inside of Photoshop. I’ll walk you step by step through an easy process for creating a gorgeous Jade background texture. The secret to recreating translucent stones such as Jade is the use of multiple transparent layers of veining and texture along with a good distribution of color.
This elegant Photoshop texture can also be used for text effects, web design, advertising & marketing designs. For those of you working on digital art projects, this is also a perfect Photoshop texture tutorial for digital drawing, realistic mockups and so much more.
Please enjoy the Jade Photoshop Texture Tutorial.
LEARN DESIGN TOOLS ONE STEP AT A TIME
Learn and master the most frustrating aspects of overwhelming programs like Photoshop and Illustrator in a fun and entertaining way with PrettyWebz design tutorials.
Tutorial projects like the ones we share here on the blog are meant to help you grasp the use of the most powerful aspects of design software one step at a time. In the process, you will build your design assets so that you can create a stunning marketing design for your business.
Don’t forget to sign up below in the footer to become part of the Prettywebz family and never miss another tutorial.
Also join me on YouTube as well to check out the playlists I’ve set up for Photoshop, PowerPoint and other software you can use to design your online graphics.
Resources mentioned in the Jade Photoshop Texture Tutorial:
- Smooth stone layer style
- Color gradient pack– Jade
- Jade color swatch
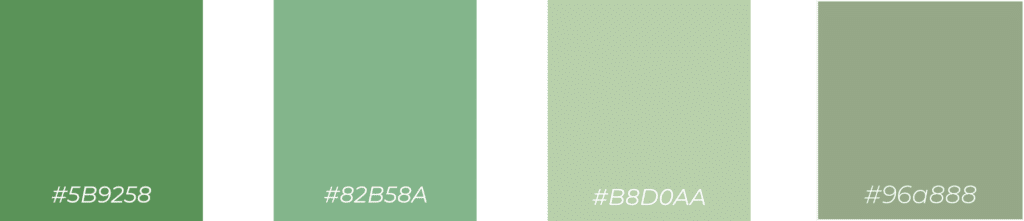
- Jade color palette hex codes: #5B9258 #82B58A #B8D0AA #96a888
Resources You May Find Helpful
Click for a direct download of the resources mentioned in the video. Resources are for reference, or in personal or client work. Tools can be used for creating your own resources but cannot be repackaged and sold on their own. Thank you!
More Posts on this Topic

Granite Texture and Text Effect 
Liquid Gold 
Rusty Texture
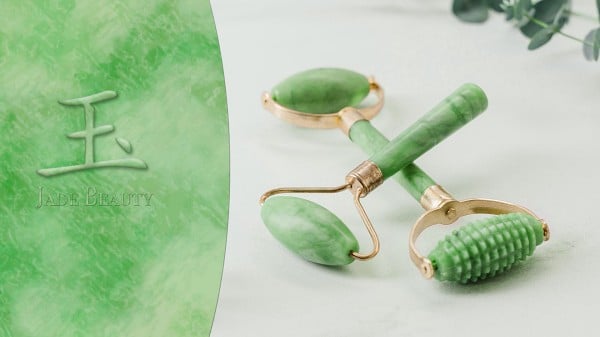
Photoshop Texture Tutorial Use Example
Jade Photoshop Texture Tutorial Video
Creating a Smart Object
Before beginning make sure to unlock your background layer by clicking on the lock icon to the far right of the layer in the layers panel. Next, right-click on the layer and choose “convert to smart object” this will help us keep the texture editable.
The Texture Base
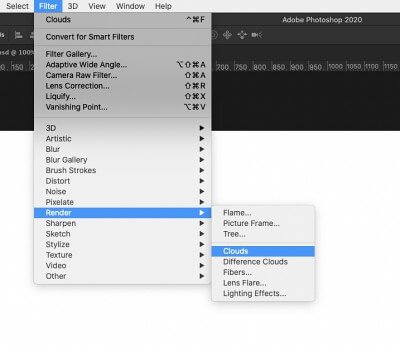
The Jade texture will begin with a base texture. To create the base we will use “clouds” and “difference clouds” respectively from the filters menu at the top of the screen.
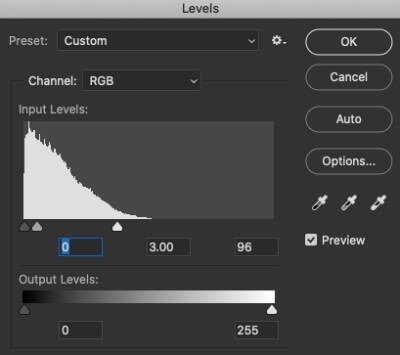
Extracting the Marbling (Levels)
Next, we want to bring out the marbling effect created with the difference clouds texture even further. Here we are going for a clear veining. Use the keyboard – command+L (Mac) Ctrl+L (PC) this will make the levels part of our editable filters for the layer. You can start with the settings below, I find that these settings typically get the desired look. Since we added the filter with the keyboard shortcut on a smart object, you can always go back and make adjustments as needed.
Adding Texture Definition (Filter Gallery)
Sponge Effect

Chalk and Charcoal Effect

Plastic Wrap
The plastic wrap filter has the effect of something being vacuum-sealed in plastic. The highlight strength creates a spotlight in the center of the canvas. Detail determines how broad the plastic wrap will be based on the difference in bright points in the image. Smoothness lets you determine how soft or harsh the effect will be. For the jade texture, we will apply two separate layers of the Plastic wrap filter to give the design a greater feeling of transparency.
Plastic Wrap #1 settings

Plastic Wrap #2 Settings

Adding Color Gradient to the base layer
When applying gradients to a texture like Jade or any transparent texture keep in mind how you use color in the underlying layers. For this project, we will be stacking color on color. These layers will be transparent so you will see the underlying color, likewise, the addition of color on the overlayers will change the base color. All of the color gradients will be visible in the final product.
Make highlights darker in the underlying layers so that they do not become overblown when color is applied to the subsequent layers. The darkest areas should be much brighter than the intended overall color to make the deeper areas of the texture appear more shallow.

Creating Dimension (Duplicating & Setting Blend Modes)
At this point, we will duplicate the base layer two more times. Right-click on the layer and choose “Duplicate layer” do this action twice. You will have a total of three layers. Rename the layers Bottom, Middle, and Top. Set the blend mode for the Middle and Top layer to “Soft Light”

Adjusting the pattern variation (Cloud & Difference Cloud)
for the Middle and Top layers double click on the cloud and difference cloud filters for both layers to change the pattern for each. Changing cloud patterns will give you a more complicated and realistic outcome. You can also adjust levels in this step if you want a more textured appearance.
Setting Color for Transparent layers

Premium Products You Might Like

Jade Photoshop Texture Tutorial Transcript
Hey there, Mercedes here from prettywebz.com, and today I’m going to show you how to make a jade texture inside of Photoshop.
Before we get started I want to show you the resources that I used to create this texture.
So right here I have just a couple of images. These two images I used as a reference for the actual texture.
And the veining that you see in Jade and I also use these images to sample colors.
So right here is the Jade color palette. This is what we’re going to be using to create our own texture.
And then I was using this one right here to kind of create a layer style. So I do have a layer style.
I’m not going to show you how to create this layer style in this video.
But I am going to leave a link down in the description so you can download it and use it.
Jade Photoshop texture tutorial examples
So these two are objects that I made using the Jade texture and then just a simple layer style.
So if I remove that you can see that it’s just a flat shape. The same thing with this one.
I’ll go ahead and leave you this layer style so that you can have it available if you’d like to use it.
And I’ll also leave you all of the colors that we’re going to be using in the description as well.
Preparing to make the Jade Texture Base
So let’s go ahead and get started. I’m going to come up here to file, new, and our document for this is going to be 1920 by 1080 resolution 96 RGB we’re at 8 bit.
Click create and unlock this layer, right-click and choose convert to smart object.
Now over here, make sure that you have your default foreground and background colors.
You can just click on that little icon right there to bring those back to default.
So black on top white on the bottom.
Filters and Settings
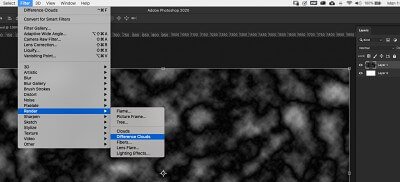
Now we’re going to come up to filter, render, clouds.
And then again filter, render, this time, difference clouds.
Now on your keyboard command and the letter L or ctrl and the letter L to bring up your levels.
Now, I’m doing it this way because I don’t want a separate layer for this. I want these all to be here in my smart filters.
So I used that shortcut in order to get there.
I pretty much know what I want this to look like so I’m gonna just go ahead and put in my values.
So this middle value is going to be three, this one is zero, and this one is going to be 96.
What we’re trying to do is just bring out some veining here. Typically these are the settings that will usually get me to this point.
So I usually use those settings. I’m going to click OK.
Filter Gallery Settings
Now I’m going to come back up to filter, this time filter gallery, and I already have these all set up right here.
These are the four filters that we’re going to be using. I’m going to walk through them with you really quickly.
Filter 1: Sponge
So the first one that we’re going to use is called Sponge.
That’s in the artistic folder right here, and the settings for the one that we’re creating is brush size 2.
Our definition is 25 and our smoothness is 2.
Filter 2: Chalk and Charcoal
The next filter is going to be this one, a chalk and charcoal filter.
This one is right here in the sketch folder and it’s the second one here.
I’m working in Photoshop 2020 so these might be in different places if you’re using an older version.
But they’re pretty much all going to be there.
The chalk and charcoal settings are going to be charcoal area 3, chalk area 8, stroke pressure is going to be 2.
Filter 3: 1st Plastic Wrap
And now we’re going to add a plastic wrap, and for a plastic wrap that’s going to be inside of artistic, then plastic wrap.
Our settings for this one are going to be highlight strength 6, detail 10 and our smoothness is 5.
Filter 4: 2nd Plastic Wrap
Now we’re going to add another plastic wrap.
If you don’t know how to add these, all you do is just come here and press that little plus icon and it’s going to add another one.
But for us, we’re going to use plastic wrap again so we have two of these.
For this top one, our highlight strength is going to be 15, our detail is going to be 15, and our smoothness is going to be 3.
So that’s going to be all of our settings for a filter gallery. I’m going to click OK.
Adding Color to the Jade Texture
And you’re now something that looks like this. It’s pretty rough at this point. We’re going to go ahead and add another filter.
But instead of coming down here, we’re gonna grab a gradient map.
But if we did it this way it’s just going to add it to the top and I want this to be part of our smart filter.
So I’m going to go ahead and delete that, and I’m going to come here to image adjustments and I’m going to grab the gradient map from there.
That way we can have that right here in our smart filters as well.
I’m going to add a specific gradient. Again, I’m going to leave you a link to these as well down in the description.
But I will quickly show you the settings for these. This first one, there’s going to be three.
This is the Jade bottom middle and top. We’re going to add a few other layers here in a minute.
But we’re going to be working with this one first.
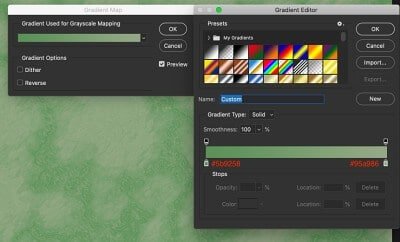
The settings for this are going to be location 0% and the color we’re using is 5 B 9 2 5 8 for that one.
And then we have this at location 100% and that color is going to be 9 6 8 8 8 8 and we’ll click OK.
Duplicating the layers for more dimension
This is going to be our very first layer, this is the bottom so I’m going to go ahead and right-click, duplicate this layer.
For the middle layer I’m going to right-click and duplicate that layer again.
This is going to be the top, so we’re gonna have three layers here. The bottom, middle, and the top layer.
So our goal with all of these layers is just to get a little bit of dimension.
When you look at something like Jade or any type of rock that’s somewhat transparent, most likely you can see veining in all of the texture that goes deep inside of the rock.
So that’s what we’re trying to get here, so we’re just going to use these.
I’m going to turn this one off, I’m going to come here to this middle and I’m going to change the blending mode to soft light.
Again, these two layers are just going veining and the texture that’s deeper inside of the rock.
Adjusting Color and Opacity for the middle layer
So for this one, I’m going to come back here to gradient map. Just double-click on that if you click here it’s just going to give you a percentage of your opacity.
We actually want to change the effect itself so we’re going to double-click on the name here.
And I’m going to click on that gradient and come back down here and I’m going to choose this one this is our Jade middle and let me quickly show you the settings here.
Location zero, it’s going to be 5B9258. Location 41 82b58a, and location 100 is c9e2b7. So that is going to be our middle gradient.
I’m going to click OK and ok again. Now for this, because we want our veining to be a little bit different than it is here at the bottom.
So right now we have, it’s exactly the same just in different colors.
So what we’re going to do is come over to the clouds and double click and just click OK.
And all that’s going to do is change that cloud render. Again, we’re going to do the same thing with the difference clouds.
And you can see how they’re veining of this one changed a little bit, so now they’re the veining is showing up in different areas.
So that’s our our middle layer and now we’re going to turn on the top layer.
Adjusting color and opacity for the top layer
This top layer will set to soft light. Now we’re going to double-click on the gradient.
And again, I’ve already set up this gradient so this is going to be the top.
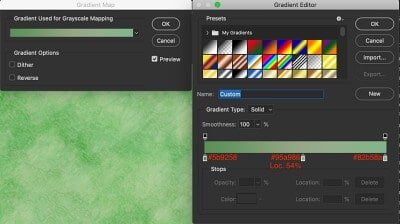
So this is Jade top let me give you the settings for these quickly. We have location 0 and that is 5 B 9 2 5 8.
Our center, this one is about 54 and the number there is 9 5 a 9 8 6 and location 100% 82b58a and we’ll click okay.
So there’s going to be a our top layer. Again, we’re going to come over to the clouds and difference clouds.
Double-click just to, you know, switch that veining around a little bit. The same thing for the difference clouds.
Defining the Pattern and Styling objects
Now that we have all of this we can come over here to edit, define pattern, we’re gonna call this Jade, click okay.
I’m going to add a new layer here and fill it with white and grab the ellipse tool and make a quick circle here.
Let’s fill that with, it doesn’t even matter with what it’s filled with because we’re just gonna add that layer style to that.
Okay, so with this ellipse selected I’m going to come over to my effects, this is going to be the effect that I just created.
As you can see, this image is smaller than the one I showed you previously with all the samples on it.
Adjusting the Scale of the Layer Style
So this is going to be pretty big, it looks like it’s just floating around there. So what I’m going to do is come over here to the FX, right-click and I’m going to click on scale effects.
Now when you, you can bring this down in size. The smaller you make it the flatter the design is going to look.
So if you’re looking to create buttons or, you know, bullets or something like that for maybe web design all you have to do is scale this down.
I just wanted to show you this to give you an idea of what that that texture is really going to look like.
Because when you look at it, you know, like this you’re not really seeing all of the detail and the dimension because this area is so big.
That’s why I wanted to show it to you here. You can see the difference between the two, it’s the exact same texture.
The only difference is that, this one, you’re seeing it a lot closer and then you can just come in, you know, move it around to get the texture that you want.
Conclusion
If you’re interested in creating textures from scratch inside of Photoshop I do have a full playlist that you can check out.
I’m going to leave a link up here at the top so you can go through the Photoshop texture tutorial playlist.
If you liked this video make sure to like, share, and subscribe to this channel and visit prettywebz.com for more design resources and tutorials.
Until next time thanks for watching this video.