Transparent Text Photoshop Tutorial
In this transparent text Photoshop tutorial, I will show you how to make clear text with images using smart objects. I’ll walk you through how smart objects work, how to add filters to smart objects and how to work with smart object layers to create the illusion of transparent text.
Resources used in this Transparent Text Tutorial
Font used in this tutorial:
Images used in this tutorial:
Final PSD
Click here to download the completed project, use it for your own designs or to dissect the individual parts of the design.
LEARN DESIGN TOOLS ONE STEP AT A TIME
Learn and master the most frustrating aspects of overwhelming programs like Photoshop and Illustrator in a fun and entertaining way with PrettyWebz design tutorials.
Tutorial projects like the ones we share here on the blog are meant to help you grasp the use of the most powerful aspects of design software one step at a time. In the process, you will build your design assets so that you can create a stunning marketing design for your business. So, don’t forget to sign up below in the footer to become part of the Prettywebz family and never miss another tutorial.
More Posts on this Topic

Also join me on YouTube as well to check out the playlists I’ve set up for Photoshop, PowerPoint and other software you can use to design your online graphics.
Transparent Text Tutorial
Setting up the Document
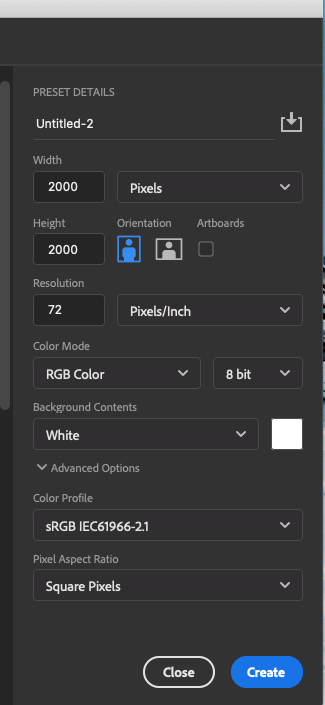
Today I’m bringing you a transparent text Photoshop tutorial, so let’s get started. We’re going to go ahead and create a new document. this one, in particular, is going to be a 2,000 x 2,000-pixel document at a 72 resolution, RGB with a white background. Click create. So, it’s going to just be a basic square.
Setting up the Background
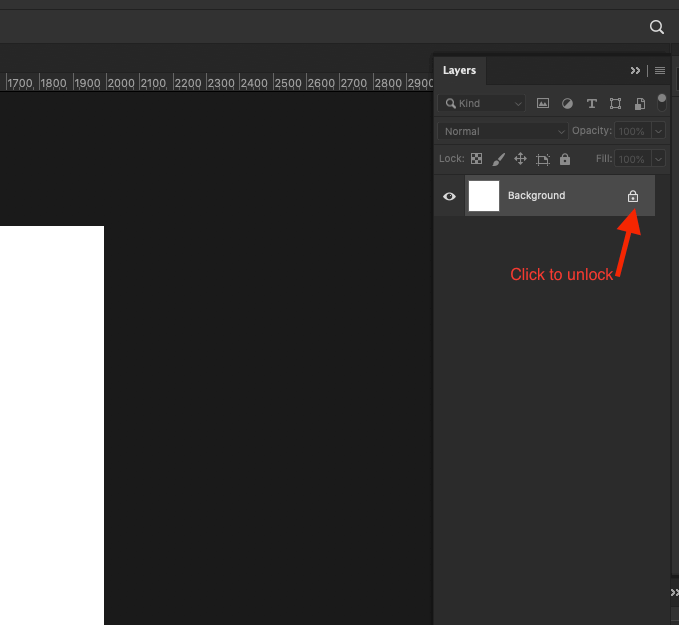
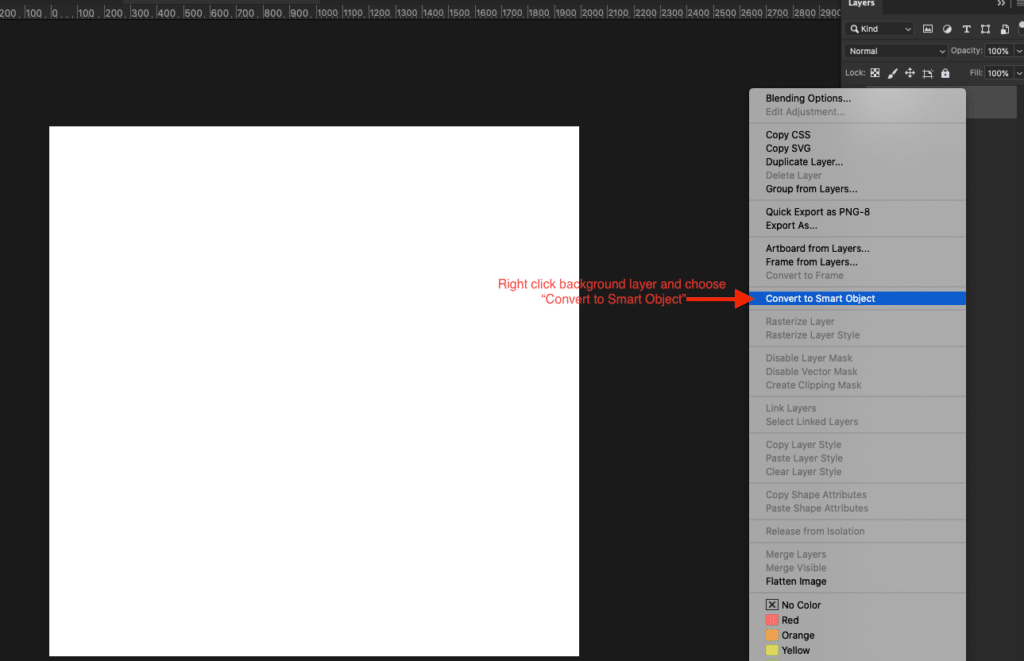
I’m going to go ahead and set up our background for the transparent text so I’m going to click on the lock icon of our background layer to unlock it. On the background layer right click and choose convert to smart object.
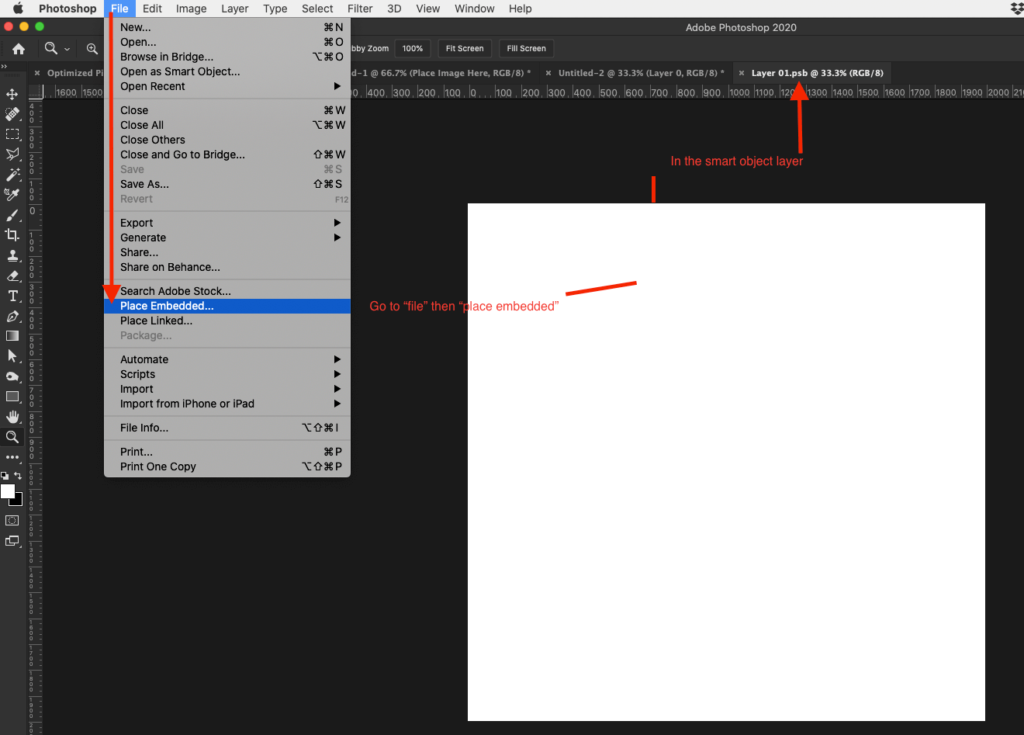
Adding Images to Smart Objects
Once you have that set up we can double click on the little smart object icon to open up the actual smart object. The PSB file extension means that you’re inside of a smart object.
Inside of the smart object, I’m going to go ahead and load a few images for our transparent text effect. I’m going to go to file >>>place embedded. When the dialog box comes up navigate to the location on your computer where the image you want to use is stored.

You can adjust the size of the image by holding the shift and option key and then adjust the anchors until it fits the canvas.
I’ve gone ahead and added three images inside of the smart object. I’ll show you why I did that in a little while. Hit command and the letter S to save this and close the smart object.
Duplicating Smart Objects
From the video: Explaining how duplicated smart objects work
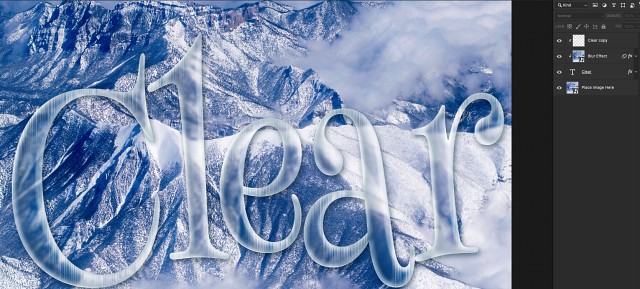
So, we’re back here in our original document. We have our untitled one, this is the original document. All of the other images are inside of this but I have them turned off. From here I’m going to duplicate this smart object. This is where our image is placed, in the original smart object so I will name it “Place image” before duplicating it.
I’m going to right-click on the smart object layer and select duplicate. I’ll call this “blur” at this point I’ve got a blur layer and I’ve got an image placement layer. The image placement layer is the background and the blur layer is the transparent part of our transparent text illusion. You can place anything you want inside of the smart object and because I’ve copied the original smart object everything that happens to the first smart object is also going to happen to the second one.
Working with Duplicated Smart Objects
From the video: Explaining open smart object layer side by side with the original document.
Let me give you an example of how duplicated smart objects function. I’m going to go back into the original smart object. I just want to show you what’s happening here. So, this is our original document this is our smart object here. You can tell with this PSB file extension here.
Now I’m going to turn this layer on. This is inside of the smart object, press command and the letter S and you’ll see that it’s going to change the original document place image and blur layers.
Adding Filters to a Duplicated Smart Object
Next, we will add a filter here to this Blur layer. Come up to filter >>> blur >>> Gaussian blur. When the dialogue box comes up, the blur for this one is going to be 10. This is all adjustable because we’re adding this filter to a smart object. You can always come back and change this so this is not a permanent change. We’ll click OK.
Because we didn’t make this change inside of the smart object it didn’t affect the other duplicate smart object. If we had made these blur effects inside of the smart object you would have seen that change in both of the images. Keep that in mind and make sure that you’re adding all of your filters in the original document and not the .psb document.
The Text Layer of the Transparent Text
To add a text layer I’m going to go over to my text tool located in the left toolbar. I’m going to type out the word “Clear” on the canvas.
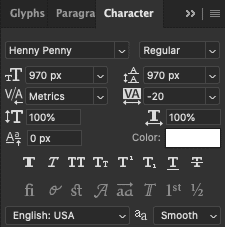
Open the Character panel, if it’s not in the right tools panel go to Window>>>Character to bring it up. We’re using a font called Henny-Penny. This is a free font, you can download from the link provided above.
Font Settings
We are going to make a few adjustments to the text inside of the Character panel. Our text is going to be 970 pixels with a tracking of -20. The color is white, the color for this doesn’t really matter but if you’re following along I’m using a white color.
Clip the Blur layer to the Text Layer
Move the text layer under the blur layer and above the “place image” layer. It should be sandwiched between the two smart objects.
Press and hold the Option key on the keyboard, hover your mouse between the blur layer and the text layer. Once you see that little down arrow with this white square you’ll just click it once to clip the blur layer into the text layer.
Styling the Text Layer
At this point you cannot see the text layer, you will see a subtle blur. In the next step we will enhance the text using layer styles.
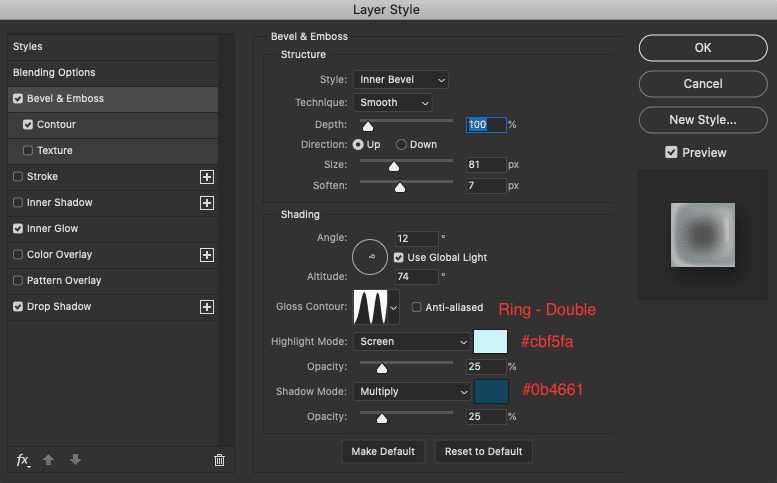
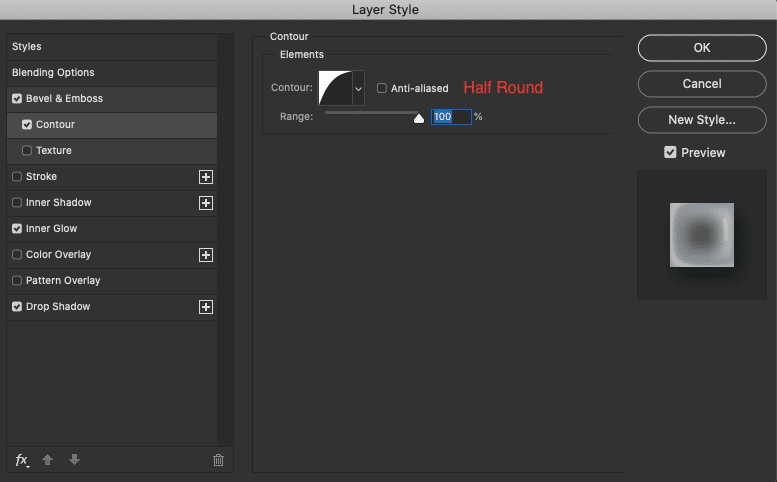
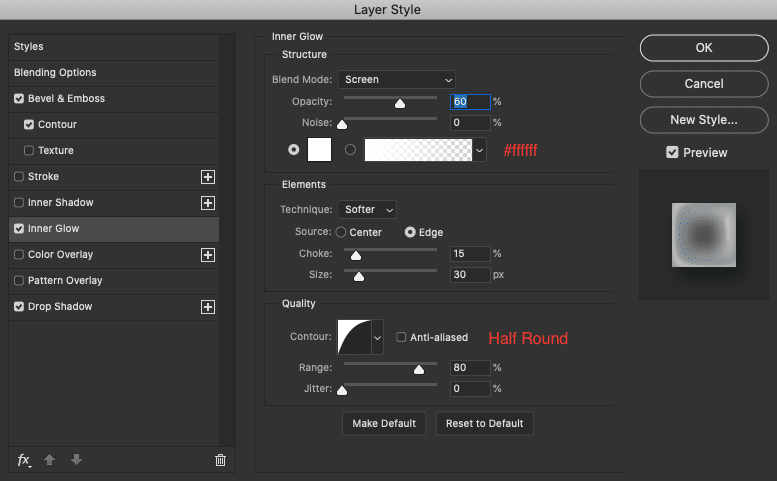
Select the text layer, then double click on the far-right side of the text layer to bring up the layer styles box Select Bevel and Emboss and add the following settings.
Bevel and Emboss
Inner Glow
Pattern Overlay

Drop Shadow

Loading Patterns in Photoshop 2020
In the latest Photoshop 2020 the pattern function has changed. In order to load patterns that come with Photoshop you will have to go up to Window>>>Patterns>>>when the dialogue box comes up click on the hamburger menu to the far right. From this menu select “Legacy Patterns & More” to load Photoshop patterns.
Loading Patterns in earlier Photoshop versions
For earlier Photoshop versions you can load the patterns that come with Photoshop using the Presets Manager or directly in the Patterns in the Layer options dialogue box.
Via Preset Manager
Edit>>>Presets>>>Preset Manager
In the dialogue box, in the dropdown menu choose “patterns” (this is not available in Photoshop 2020) click on the gear icon to choose the patterns you want to load. Use the “load” button to load your own patterns, not Photoshop patterns.
Via Layer options
In the layer options dialogue box, select Patterns from the list, click the pattern drop-down arrow, then click on the gear icon for a list of Photoshop patterns you can load (not available in Photoshop 2020).
Adding Icicles to the Text (Optional)
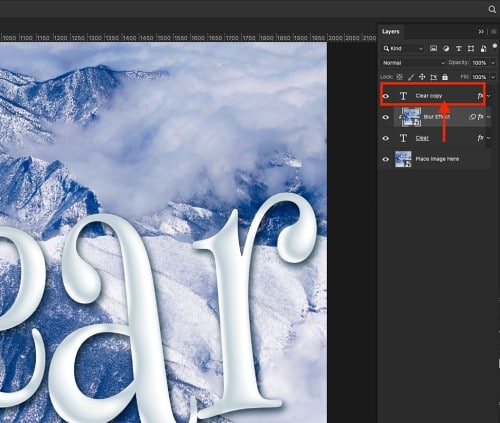
Select the text layer, right-click and duplicate this layer. Bring the copied text layer above everything else. I’m going to take this a little bit further on that clear look that we’re going for. We’re going to make it look more like a block of ice by adding a few icicles to this.
Icicles Layer Styles
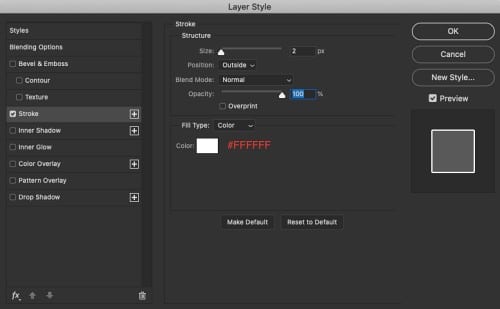
Take the copy of the text and go into the layer style by double-clicking on the far right side of the layer. When the layer options box comes up, remove all of the layer effects that are already set. Select “stroke” layer style with the following settings:
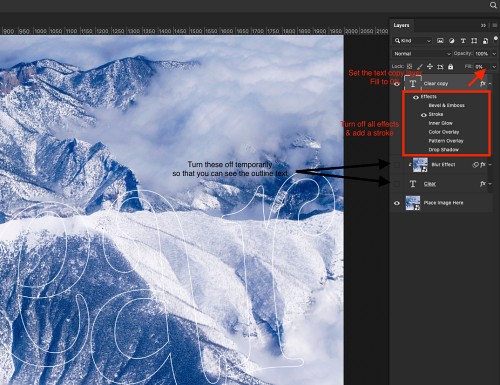
Take the layer fill down to zero percent. Turn off the original text layer and the blur layer by clicking on the eye icon on the left of the layers. At this point, you will only see an outline of the text as shown in the image above.
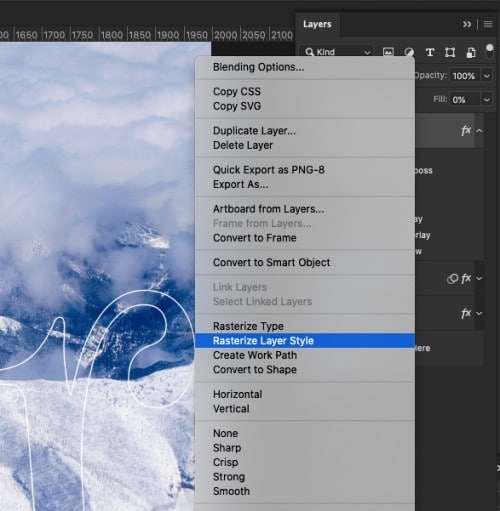
Rasterize the Layer
With the Text copy layer selected, right-click and choose rasterize layer style. This is to prepare the layer for the layer style that will be applied in the next step.
If I were to create a smart object and apply the filters to the smart object rather than a raster layer the effect will not be applied in the way we need so make sure that the layer is rasterized and not converted to a smart object.
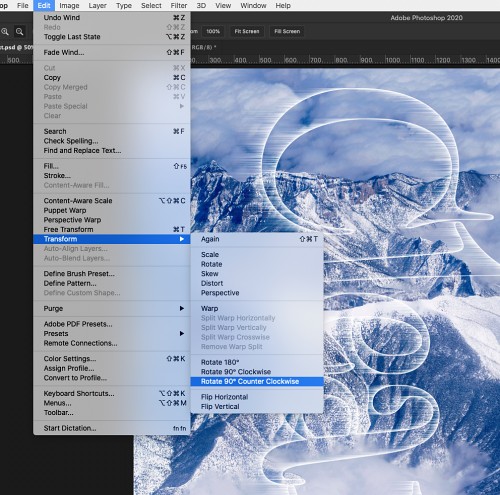
Rotate and Adding Wind Effect
With the rasterize layer we’re going to come up to edit>>> transform >>> rotate 90 degrees clockwise. Now go to filter>>> stylize>>>Wind inside of the wind dialog box our method is wind and our direction is from the right.
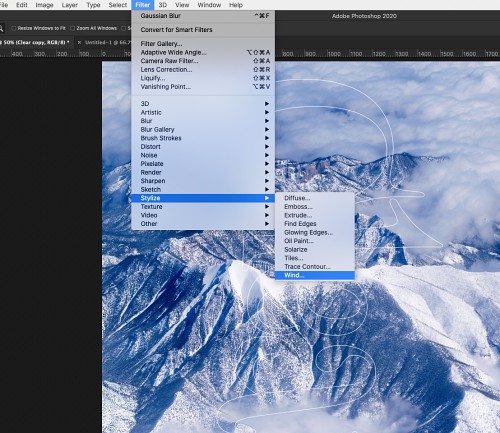
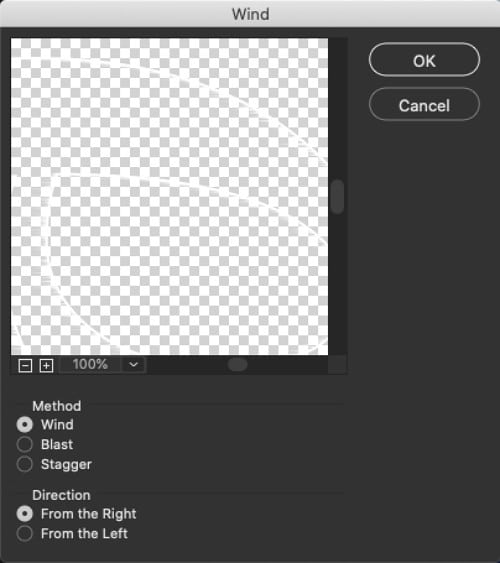
Now you can see that we only have options for direction from the right or left. We don’t have up-and-down which is why we rotated the layer so that we could get the wind blast from the top of the text to the bottom. So, we’re going to go ahead and leave it from the right which is going to take it from the top to the bottom, then click OK.
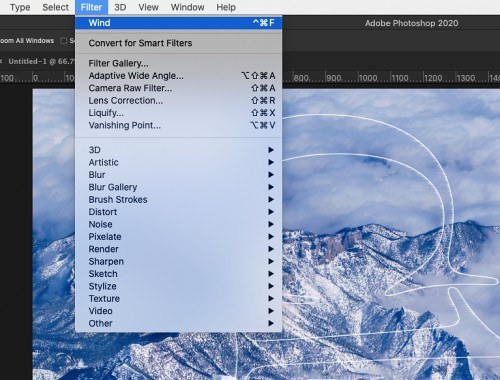
Reapply the Wind Filter
Come back up to filter and we’re going to use our last filter, this will be the first available option. The last used filter option is going to have exactly the same settings that we used previously. You can apply the filter once or twice and maybe even three times. It’s up to you. We’re going to go ahead and apply it twice.
Now I’m going to come back up to edit>>> transform >>> rotate 90 degrees counterclockwise. This transformation is basically going to take the text back to where we started.
Turn the original text layer back on and line the two text layers up as closely as possible using the directional arrows on your keyboard to nudge the layers in place.
Using Filters on Smart Object Vs. Rasterized Layer
If I had created a smart object from the copied text layer to add that filter, the wind effect would actually still be going from left to right or right to left and that’s not what I wanted. What I want it to do is go down so that it looks like icicles.
Clip the Wind text Layer to the Blur Layer
Next, click on that top layer (the wind layer) I’m going to press the option key on my keyboard and I’m going to hover between this layer and the layer below it. When I get that arrow and the square I’m just going to click to create a clipping mask.
Turn that blur layer back on by clicking on the eye icon for that layer. You can see that my icicles are now part of that text effect.