PhotoScape Tutorial, Photoscape X & 3.7 versions
In the first Photoscape tutorial, we will cover an in-depth review of Photoscape X, the newest version of the photo editing software. In the second PhotoScape X tutorial, I’ll go over how to set up, resize, crop and design images for social media. In this second video, we will make images for Instagram and for Pinterest using the basic editor and the batch editor.
In the remaining Photoscape tutorial videos, I’ll go over version 3.7 single image editing features, batch editing and the available filters in the older version of the program. PhotoScape has all the effects you find on the online graphics and image editors plus you can use your own fonts and even use it offline.
The best part? It’s free! PhotoScape is a powerful image editing tool and it also has so much more to offer for those who create graphics for social media, blogs, websites and product images. Today we’re going to go over all the ins and outs of image editing in PhotoScape.
There are some trade-offs for both versions of the program. Version 3.7 features more free filters, stickers, and frames than the newer Photoscape X. All the extras in the older program are great but you will be giving up a much better user interface you get with Photoscape X. Take a look at all of the videos before you choose, or download them both.
About PhotoScape
PhotoScape is free software that you can get at Photoscape.org. There are two versions available. Version 3.7 and PhotoScape X. I have been using version 3.7 for many years so I prefer this interface so we will be using v3.7 in this demonstration. I will be doing a PhotoScape tutorial on X in the future so if you’re interested in that check back for that.
Download This Software
To download PhotoScape either visit the Windows store if you’re on PC or go directly to the PhotoScape website.
Which One Should I Use
They’re both free so the choice depends on your interface preference. For the most part, the free versions can do the same work. PhotoScape V3.7 is a simplified version of X. The main difference between the two that I have noticed is that PhotoScape X has an option to add paid features that you can purchase within the software. Whereas v3.7 has a lot of internal features like stickers and filters with no upgrade options. The V3.7 interface is very simple and straightforward.
Visual Differences
The interface for X is darker and has a similar interface to Adobe Lightroom. If you’re comfortable with Lightroom then X is a good option. If you want no fuss simplicity stick with V3.7.
PhotoScape X Full In-Depth Tutorial
What you will learn in this PhotoScape Tutorial
Follow along as I walk you through all of the main features of PhotoScape X. This overview will include the viewer, editor, cut out feature, batch editor, collage maker, and the GIF maker and more. Get to know the software and where to find all of the essential features. I’ll also show you where to find PhotoScape tutorial videos for each individual tool.
PhotoScape X for Social Media Design
In this Photoscape X tutorial, I’ll walk you through the basics of cropping for your social media platform of choice. In the video, I use Instagram as an example but you can use these steps to crop for any platform. I’ll also show you how to add branding and watermark text.
In the second half of this social media image editing tutorial, I’ll show you how to batch design social media images for Pinterest. This will save you so much time! I’ll go over adding text, design elements, branding and calls to action, all of the most critical elements to gain traction on Pinterest.
PhotoScape V 3.7 The Filters
PhotoScape V 3.7 The Editor
What You Will Learn in PhotoScape Tutorial
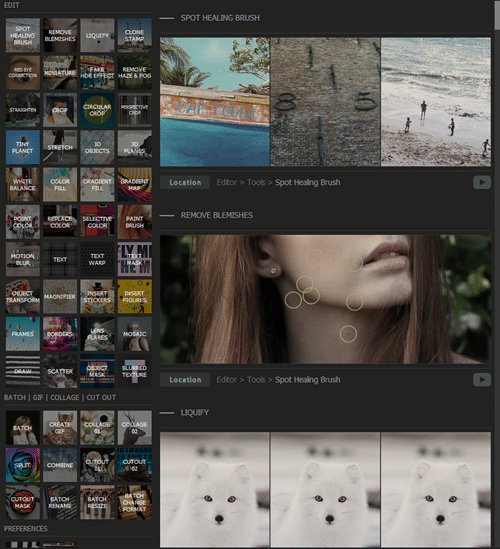
In this PhotoScape tutorial, you will learn the basics of editing single images. Plus adding overlays, creating and saving your own preset filters, text effects, painting on textures and standard photo corrections like red-eye removal and blemish removal and much more!
Note: Please watch the video version of this PhotoScape tutorial for visual reference. The following is a loose transcript of V3.7 Editor basics found in the video.
PhotoScape individual image editor feature
This is a beginner’s PhotoScape V3.7 tutorial but we will go over a lot of great features that are super easy to use and go far beyond basic editing.
Edit individual photos to make promotional materials and blog post graphics and a few tricks to crop your images for social media as well.
In other videos, I go over the PhotoScape batch editor for resizing batches of photos and also batch editing photos for social media. If you’re interested in learning how to use the bulk feature to save tons of time make sure to check out those Photoscape tutorial videos as well.
V3.7 Interface
When you Open PhotoScape this is the main interface that you’ll see this:
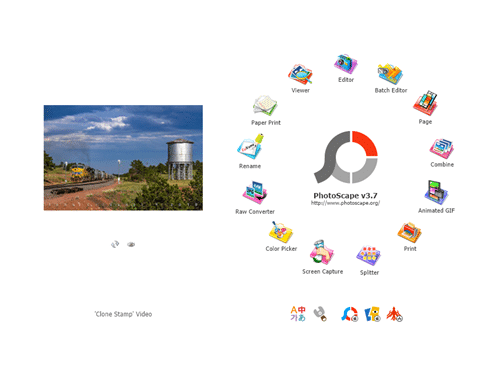
A Large PhotoScape logo and then all of the different areas of the website you can go to. Optionally, you can go up to the top left side and access all of the same options up there as well.
In the Editor
On the left-hand side, you’ll see a navigation pane for your computer. You’ll just navigate to where the photos are that you want to edit. When you choose your photo by clicking on it, it will show up here in this large display field:
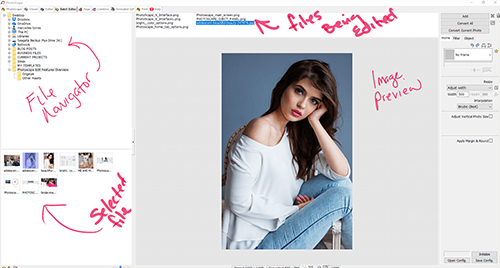
Once you have a photo in this display field, you’ll be able to see all of the information about the photo here:
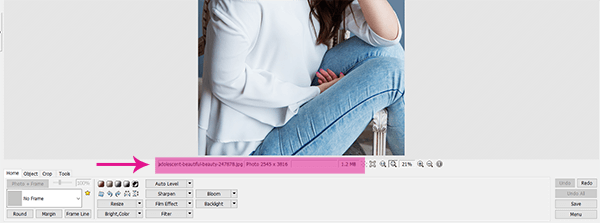
Size of the photo, the name of the photo, and the dimensions of the photo. Your zoom properties are here as well so you can zoom in closer or zoom out.
Here at the bottom is what we’re going to be going over today:

These are the four tabs that we will be reviewing in this PhotoScape tutorial: home, object, crop, and tools. I’ll show you how to use each one of these sections of the PhotoScape edit feature.
The Home Tab
First, we’ll go over the home tab. The home tab is home to all the frames and filters of the program. I did not review frames in the video version of this PhotoScape tutorial but there are quite a few available. It’s just a matter of clicking through them.
Resize Option
In the home tab, you have options to resize your photos by simply clicking. If you’re going to get this screen you can preserve the aspect ratio which means that if you change the width of the photo, it’s also going to change the height and vice versa. If you uncheck the aspect ratio tick box, you’re going to have completely custom dimensions. We’re going to go ahead and preserve the aspect ratio for ours. I’m going to make it 1000 pixels click OK and you’ll see now that the photo is now 1000 x 1499 pixels
Brightness and Color Options
Also, in the home tab, we have options to change brightness and color. These are all manual settings that you can work with yourself. Deepen in the color of the photo, brighten it, add some more exposure. Work with these options until you get the look that you’re happy with. Something very popular on Instagram is lowering the saturation of a photo so you can do that here as well. You still retain some color but it’s in muted tones which is a beautiful and understated look.
Once you have these color settings and you’re happy with them you can also save the settings. Click on “Save configuration” and then save it as a preset for next time so you can just come in and add your own presets by clicking on “load config.” and navigate to the folder where you saved your preset.
If you don’t need that much control over your photo settings there’s also a little drop-down menu here that will give you options based on what you’re trying to do. For example, if you want to add a contrast enhancement then you’ll click on it, you’ll get options for low, medium, or high contrast. The program will apply the internal preset and the photo will be enhanced automatically. You don’t have to worry about messing with manual settings at all. If you don’t like the look, simply undo it by clicking undo on the far-right hand side of the screen.
Quick Access Filters
In the home tab up toward the top, you have some settings that are extremely popular so these are almost like a quick access menu. Sepia, Bandicoot, grayscale, black and white and invert. Invert is not something I use a lot but that’s also an option if you want to have a negative image as well.
Film Effects Options
Another handy option for editing photos is the film effects filters. If you click on the film effects buttons, you’ll get a pop-up window. The pop up will give you some previews for film effects that you can use on your image. This is really handy because you get a quick preview. Run your mouse over the image icons and the edited image will show up in the preview screen so that you can see which one, if any, you like the best.
There are also options at the bottom of the pop up to increase the intensity of the effect or lower it as well. Of course, there’s also an option for effects in grayscale.
The film effects option also has a drop-down menu. If you already know exactly what you want you can apply that effect quickly. If you’re looking for super quick editing you can do that here.
Filters Options
In the filter section, there are tons of different options. There are so many things that you can do with your photos to make them completely unique. This is something that I’m going to go over in another PhotoScape tutorial video in a lot more detail. For now, play around with this to see what you come up with. There are a lot of awesome effects you can get from using filters as well.
The Objects Tab
The objects tab is a collection of photo overlays such as lines, shapes, stickers, clipart and other photos.
In the objects had you have options for having other photos of stickers quotes text at shapes outlines of shapes.
Photo Overlays
I use photo objects to insert PNG overlays on my photos. Just add the overlay to the folder project you’re working with. In the object tab, select the photo icon. A dialog box will come up. From here just select the photo you want to insert. You can change the opacity, size, and position of the photo overlay as well as the layer position.
Clipart
You can also add clipart. PhotoScape has a whole bunch of clipart available right inside the program. You can navigate through different types of clipart on the side panel.
Speech Bubbles
You can also add quotes and speech bubbles as photo overlays. Click on the speech bubble icon and a pop-up menu will come up. Choose a design from the drop-down menu. PhotoScape has tons of different designs that you can choose from. Once you have something selected you can position it however you want using the options on the right side of the panel.
Change the color of the bubble by selecting the color icon. Add your text and change the font, it’s color, size, and stroke. The “text” option is what I really love about PhotoScape versus any of the online editors. The program picks up all of the fonts that you have on your system. That means you don’t have to settle for whatever the software gives you which is great for branding.
Whatever font you are using for your branding you don’t have to pay extra to have branded fonts uploaded like you do in some other online photo editors. This program picks up everything that you have already paid for and you have installed on your system.
Text Overlays
If you’re creating promotional images and you don’t want the speech bubbles you can simply add text by clicking on the T icon. The pop-up menu is just like the speech bubble menu. Add your text up at the top. Change the font, color, size and maybe give it an outline or apply a shadow to the text.
There’s also an option to change the shadow color and opacity for added control. Once you’re happy with the text design just click OK and move your text wherever you want. Scale the text and position it as desired.
Lines and shapes
Also, in the object tab, we have lines and shapes you can create your own freestyle lines, straight lines, shape outlines.
If we click on any of the outlines, you’ll see the options for that option become available. Play with the opacity of the line, the line thickness and even the style of the line. Add an outline to your outline to give it an even more dramatic effect.
Now for the solid shapes. When you click on these shapes you have the option to change the color of the solid shape and you can use the little dropper to choose a color from the photo which is very convenient. Change the opacity of the shape to create color overlays or use as a decorative background to your text.
The options to the right are for selecting your object and repositioning layers. Move it, bring it to the front or move it to the back of another object. You can duplicate the object or you can trash it with these options as well. The large button below all of your editing features will combine the text and objects with the photo so be sure you want to keep it before you make that commitment.
The Crop Tab
Reminder: Please see the Photoscape tutorial video for visual reference.
The task of cropping photos is pretty straightforward but there are some options for cropping in PhotoScape v3.7 at you might find useful so we’ll go over some of these here.
Freestyle Cropping
The option to crop freestyle is the one I use most. This means that you can just hold down your left mouse button and then drag it over the image to crop the area that you want. There are no restrictions on ratio or shape. Once you have selected the area you want, just double click it and it will be cropped out for you.
Ratio Cropping
You also have the option for cropping by 1 to 1 or 1 to 2 etc. These aspect ratios I’m assuming are meant for print work but they also come in handy for social media image dimensions.
The way this works is you choose the dimensions that you want and the software will automatically adjust your crop field to match those dimensions. For example, if you select the US business card ratio you can hold down the left mouse button click and drag and it’s going to create that specific dimension for us. Then just double tap and it’ll crop the image and you will have cropped your photo into that specific size.
Round Cropping
You also have the option to crop photos into a circle. Doing this does not crop the image into a circle. Your image will have a square background and the image itself will be placed into a circular shape. You will need to choose the background color for the square portion of the image.
In this image I chose white and it’s going to crop it to the US business card ratio. The program is going to do it it’s going to give me around image crop that and so it has the dimension that I want but the crop the photos I am actually round it off.
The Tools Tab
In the tools tab, you have a lot of very practical use tools for basic blemish correction, red-eye, clone stamping and a basic brush.
Red-eye Correction
The red-eye correction tool makes it super easy to fix all you do is hold on your left mouse button and drag it over the area you want to fix. Just like that, red eye is removed.
Mole Removal
The mole removal tool works just like the red-eye correction tool. By rubber band selecting the area you want to fix the program will blend it with the surrounding area.
The mole removal tool can be used for blemish correction and to remove small imperfections in your image as well. You may have to go over the area several times to get the desired effect.
Mosaic Options
Also on the tools tab, we have the mosaic feature. The feature can be used to create pixelized areas of your photo for hiding information or parts of the photo that you don’t want to be seen.
I’m going to use the jitter option to blur out the brand name on the bag this will gives us more subtle masking of the image.
The Paint Brush
The tools tab also has other features like the paintbrush which has four sizes of a basic brush tip.
The Clone Stamp
The clone stamp is taking a specific portion of the photo and duplicating it. You can change the size of the clone stamp brush as well.
Effects Brush
The effects brushes are basically effects that you have much more control over via the brush tool. The effects will not be applied to the entire photo but rather just the area you brush over.
Flexibility and Consistent Branded Images
And that is it for this PhotoScape tutorial on the single image editor interface. PhotoScape is a free open source software that is more than adequate for any blogging or digital marketing image editing. The best part about PhotoScape is that you can use all of the fonts that you already have on your system. This program will help you stay consistent in your branding.
Another reason I love using this program is that I don’t have to be online to use it. Plus, it’s super convenient and easy to use.
Other Photoscape Tutorials
What’s Next?
I hope you’ve enjoyed this PhotoScape tutorial. If you’re interested in watching more Photoscape tutorial videos, check out my other videos in this PhotoScape playlist for bulk resizing and bulk editing photos for social media.
For more tips, tricks and resources for non-designers, we have tons of great resources for online business owners on the blog. From planners to graphic design assets, don’t forget to check out all the free downloadable resources available on the blog and our premium freebies in the PrettyWebz shop as well.
If you join the newsletter every resource we offer on the blog and in the shop is put together in a convenient package for you and delivered to your inbox every single month. You can sign up in the footer of this page.
Did you like this post and want to save it for later? Pin this image!