How to Make Easy Silver, Gold & Rose Gold Foil Textures
Learning Basic Silver, Gold & Rose Gold Foil Textures
Imagine having beautiful gold luxurious textures at your fingertips every single time you open Photoshop. In this post, I’m going to show you how to create your own gold foil textures from scratch using Photoshop filters to create three types of gold textures.
The best part is once you know how to create these gold foil textures it is very easy to manipulate the color and the size and even create new textures to get something that’s exactly what you’re looking. This will come in handy when you’re creating assets for your project.
You never have to look for something that’s just good enough because once you understand and learn how to use Photoshop filters it will inspire creativity and you can create luxurious metal and gold foil textures you never thought possible.
Download Gold Foil Textures, Gold Nugget and The Extreme Sparkle Textures Here
If you would like to download the textures we create inside this video you can download them right here. I’ve included these textures at 3600 x 30 600-8 72 PPI resolution. This is a typical digital paper size and will work comfortably inside of most graphics created for digital use.
Should You Buy Photoshop?
You can feel free to scroll right past this section because it has nothing to do with the tutorial itself but I want to address the issue of investing in Photoshop.
I do my best to keep my tutorials outside of Photoshop, but there are some things Photoshop has to offer that you just can’t get with any other program. Templates, screen mockups, smart objects, and complicated masking are all features of Photoshop that will make life so much easier. Is all of this necessary for someone who makes graphics for only their blog and social media? No.
For those of you who are on the fence about Photoshop, it is a very nice tool to have if you know how to use to save yourself time. It is true that you can do most editing needed for your blog and marketing outside of Photoshop. However, if you know how to use it Photoshop is still a very convenient tool that will save you a lot of time with templates and other features.
As a marketer or business owner. there are specific things that you just can’t do outside of the Photoshop and creating textures like gold and marble from scratch is one of those things.
Buy PhotoShop of You Do Any Print Design
If you are not doing print work I would say no don’t purchase the program. Additionally, if you find these basic tutorials over your head or you’re not going to be using any type of filters and the filter gallery is just way too much for you I would say to keep it simple. Save yourself the overwhelm, keep it simple, you don’t need Photoshop.
If you Use the Program Only Once in a While Don’t Buy It
If you’re a marketer that’s designing social media graphics or a blog feature graphic, maybe a video thumbnail on occasion. Those are not things that you need Photoshop for. I wouldn’t spend the money on Photoshop if that’s what you’d like to make with the program.
Using PhotoShop for Templates, Mockups and Creating Your Own Textures, Buy it
For me, because I do create all of my textures from scratch and I do a lot of masking and manipulation in creating my graphics, Photoshop is definitely a must-have for me. Still, if I were strictly a marketer or a blogger, I wouldn’t see the point in spending $240 (more if you get the entire creative suite) every single year on a design program.
OK so now that I’ve made my disclaimers and my should or shouldn’t list for purchasing Photoshop, let’s get into these Gold textures and how to create them Photoshop.
Create three Basic Gold Foil textures, nugget and high shine textures in Photoshop
In this post, I’m simply going over what I demonstrated in the video above. I will give you the settings you need to achieve the looks.
I’m going to show you how to create three distinct types of gold base textures that you can adapt to create your own unique silver, rose gold, and gold foil textures inside of Photoshop.
The first part of all three textures will begin with these instructions:
New doc transparent background
- Set colors for gold to f3d39c light aa8545 dark
- Under filter choose Render >>> clouds
I will add photos here of these instructions that you can refer back to if you need them.
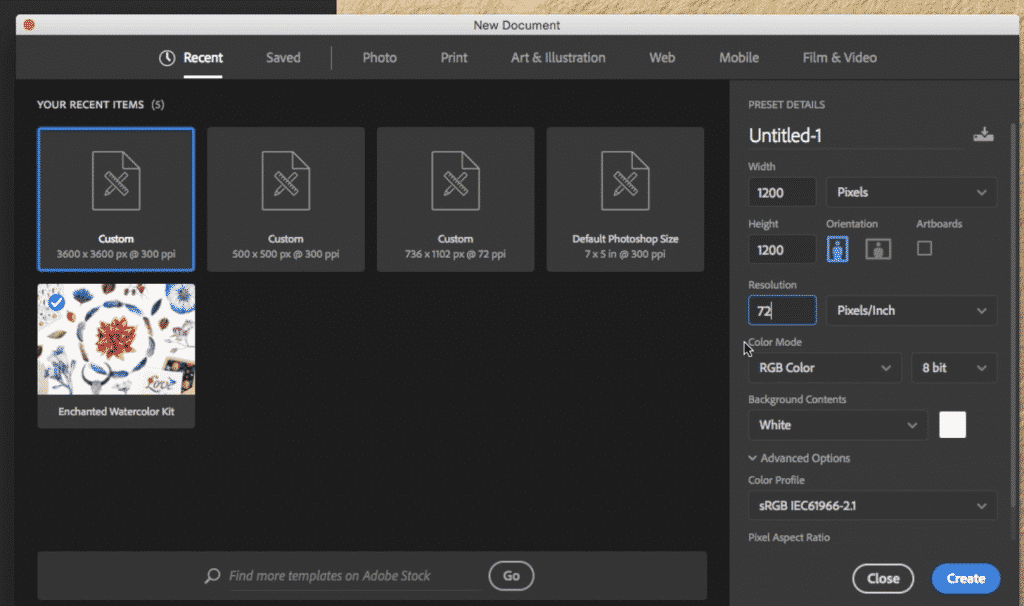
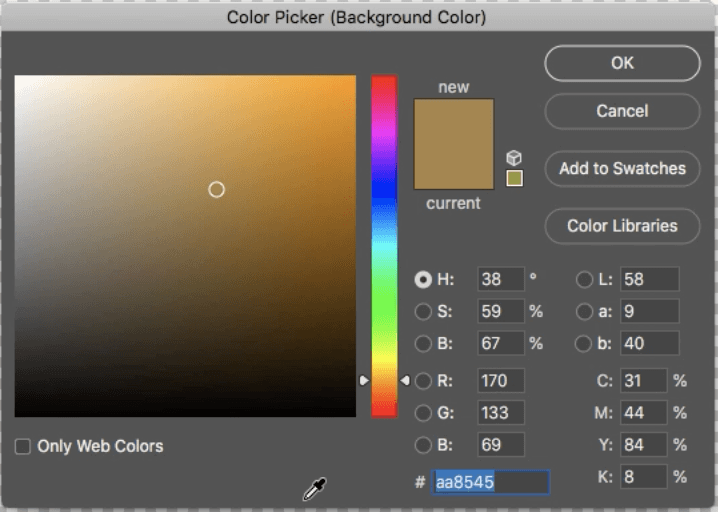
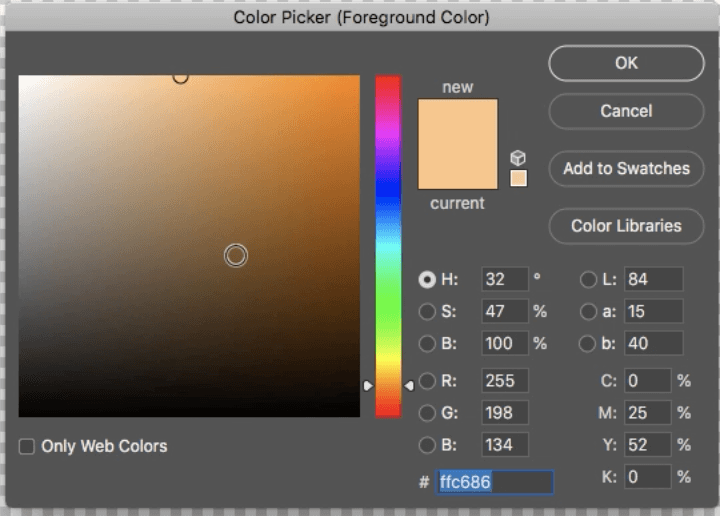
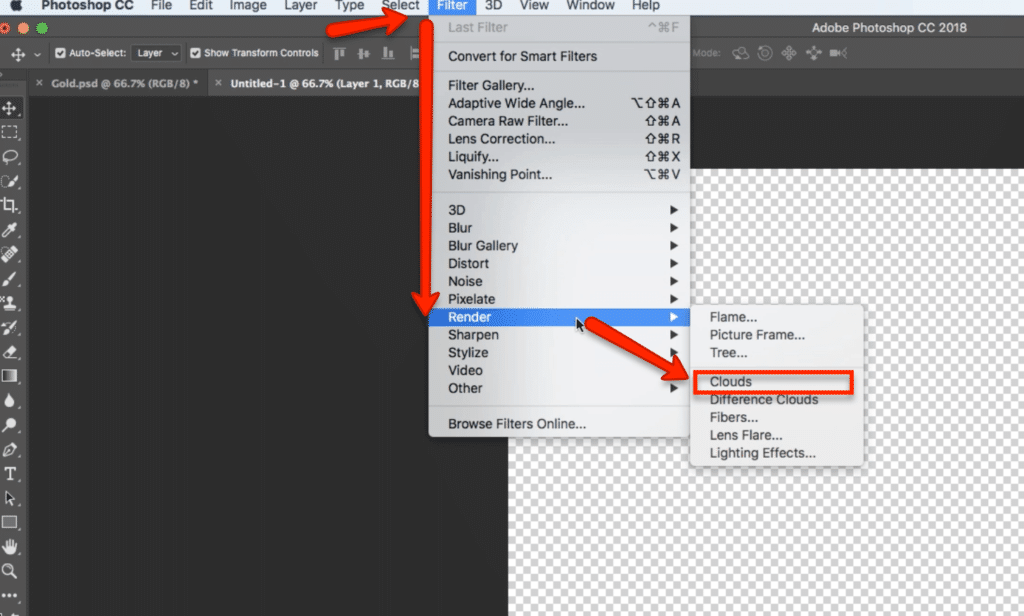
This is your base texture for all of the gold foil textures:
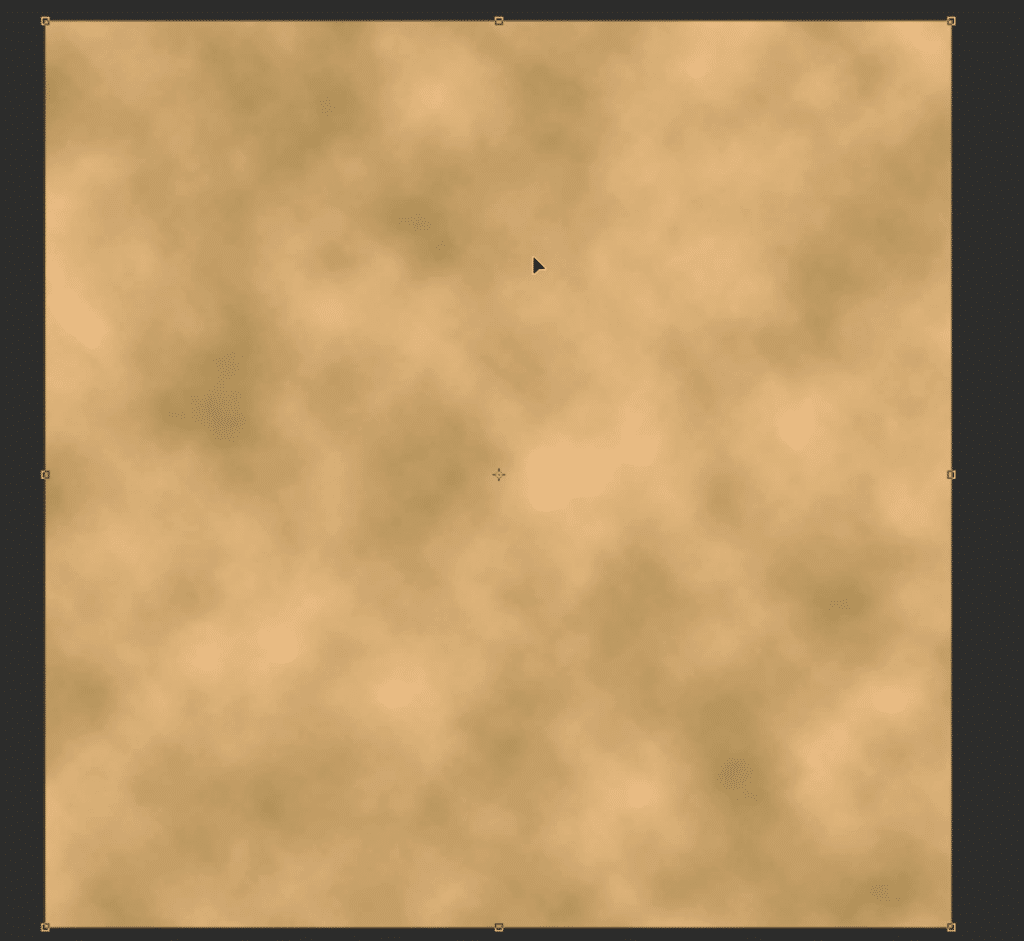
Raw Gold Texture (Nugget)
The first texture we’re going to learn to make is a gold nugget texture this is a more rugged look masculine style with the appearance of Raw gold.
Rough nugget gold Settings
1 New doc transparent background
- Set colors for gold to f3d39c light aa8545 dark
- Under filter choose Render >>> clouds
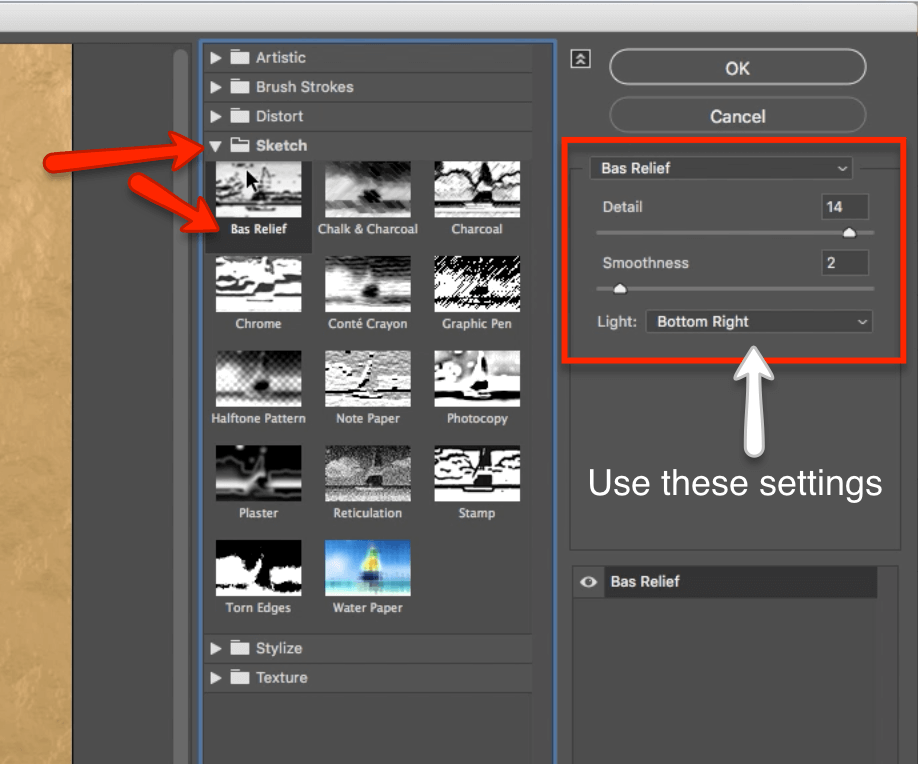
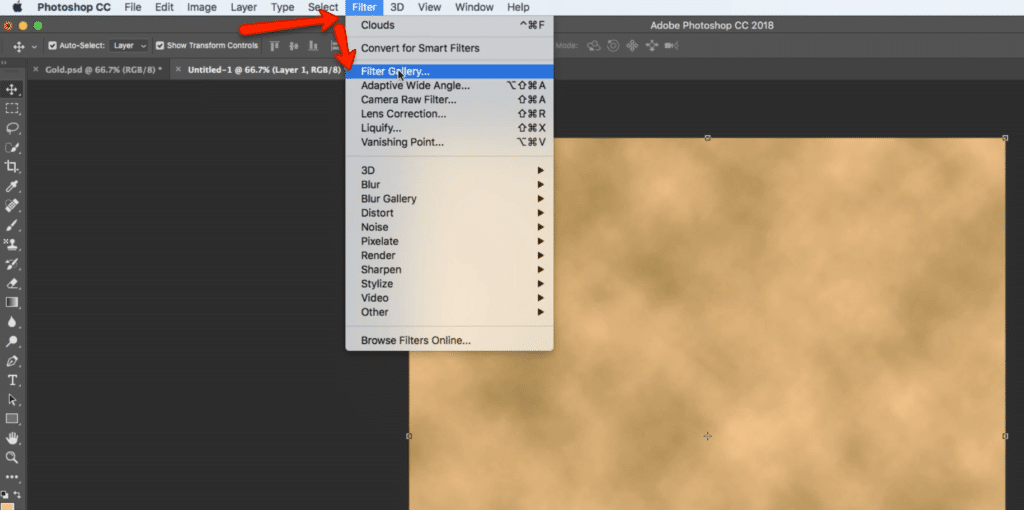
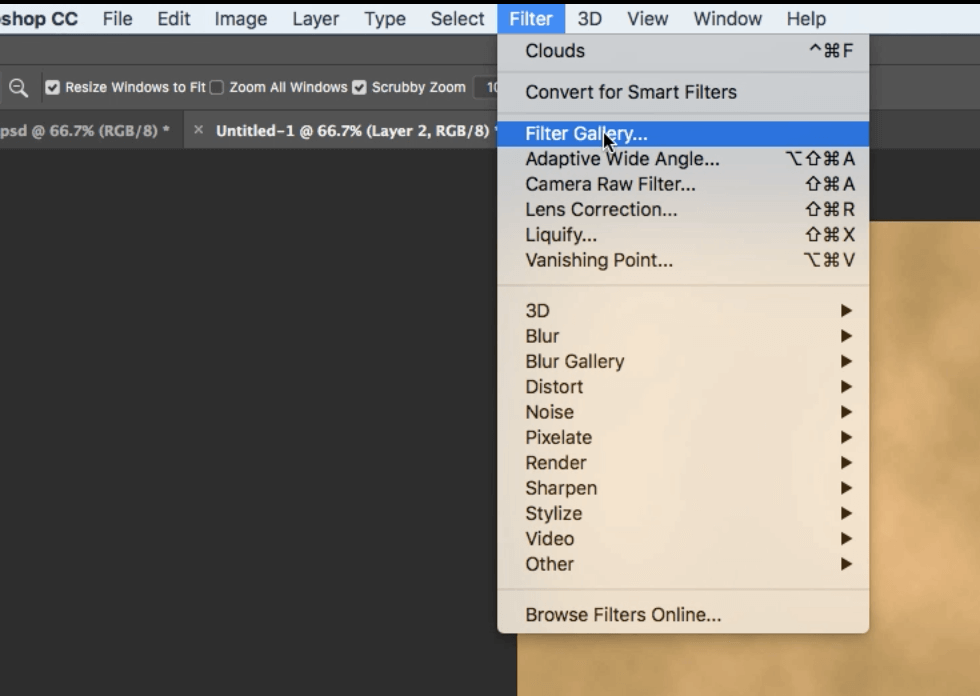
2. Filter, filter gallery, choose the sketch folder >>> base relief with the following settings:
- Detail 14
- Smoothness 2
- light: bottom right
With the same layer selected choose filter and filter gallery. The very first option at the top will give you the exact same settings you just applied to create a stronger effect.
Add a brightness and contrast adjustment layer to change the color and brightness of the gold to suit your liking.
Gold Foil Texture
The second texture we are going to learn is the gold foil texture. This texture is probably one of the most popular gold of textures and with good reason. The appearance of gold foil texture is stunning and it looks gorgeous inside of text, as an overlay, or just as a simple accent in a design.
The gold foil texture is one of the most versatile design assets you can learn. Learning how to create it yourself inside of Photoshop will also give you versatility on the roughness or smooth feel of your foil. That way you can make it look super smooth or give it a crumpled rough effect.
Gold Foil Texture Settings
- New file, transparent background
- Set colors for gold to f3d39c light aa8545 dark
- Under filter choose Render >>> clouds
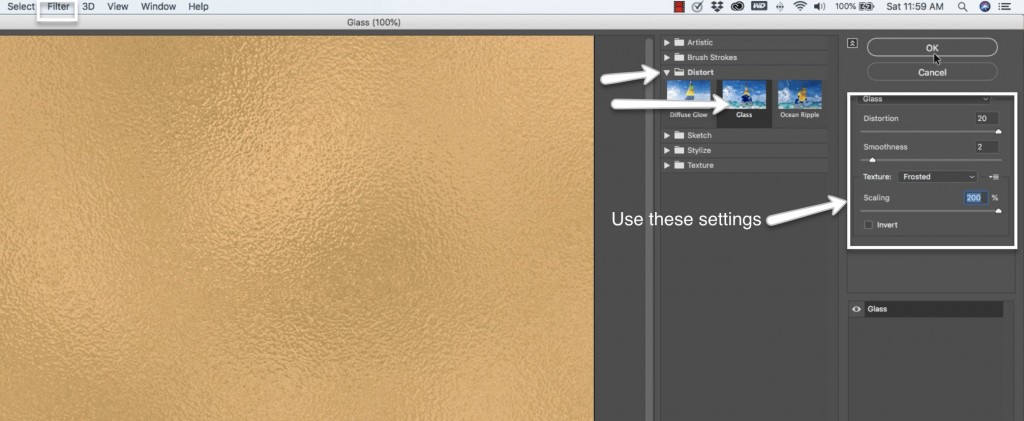
- Under Filter choose Filter gallery >>> Distort >>>glass with the following settings:
- Distortion 20
- Smoothness 2
- Scaling 200%
- Click okay
If the color feels too dark for you add an adjustment layer from the bottom of the layers panel for brightness and contrast adjust the brightness up or down as you like to get the effect that you want are the type of the color of gold that you want.
Speckled Glitter Gold Texture
The third gold texture that we are going to learn is the speckled glitter gold texture. I love this texture because it does have so much detail and so much definition in it.
On its own, it may be a little too much and a little jarring but added to find detail areas inside of find text and in moderation, this is one of my go-to textures, it is absolutely stunning.
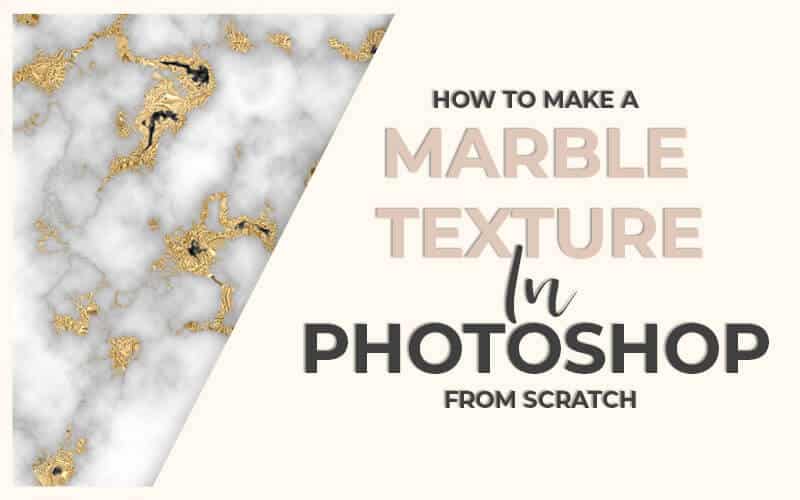
Be on the lookout for my next tutorial on creating marble textures in Photoshop. I’ll be featuring this texture because I want to give you a little demo on how beautiful this texture looks combined with other textures and as an accent. I can’t wait to share it with you!
Gold Speckles Settings
New file >>> transparent background
- Set colors for gold to f3d39c light aa8545 dark
- Under filter choose Render >>> clouds
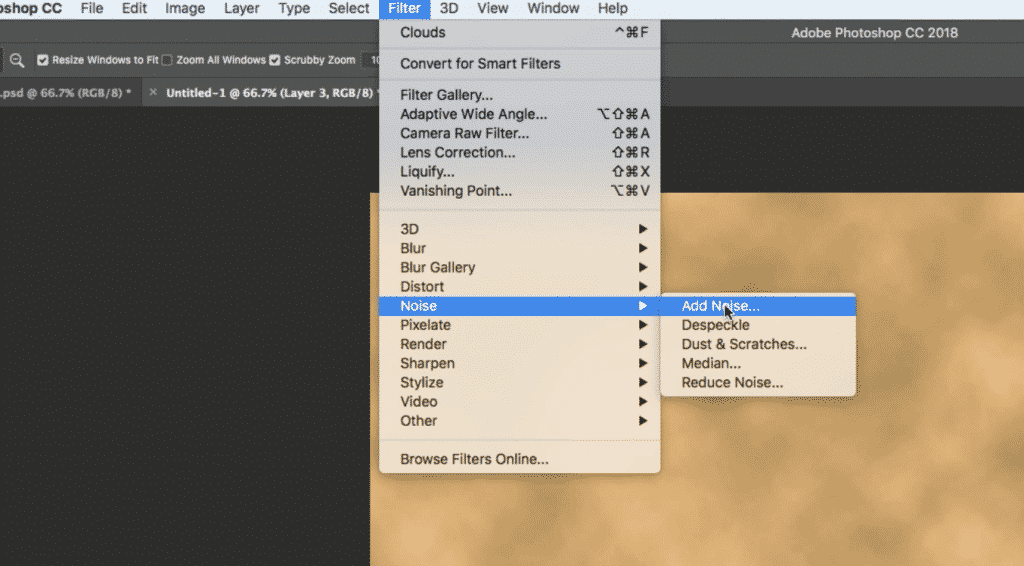
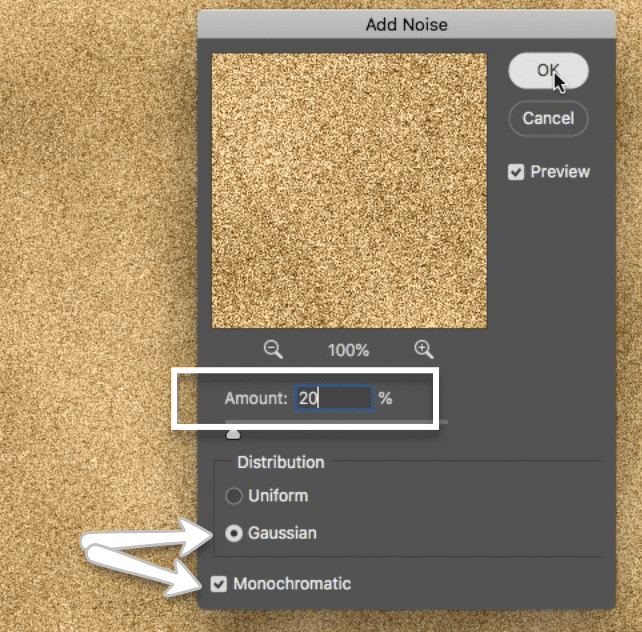
Filter >>> add noise with the following settings:
- 20% noise
- Set to Gaussian
- Check monochromatic
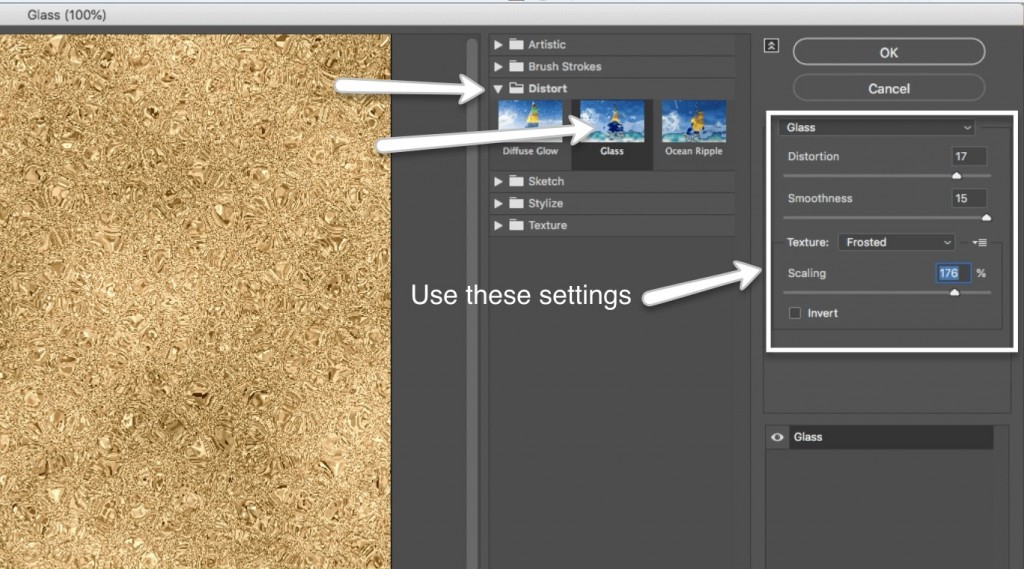
Filter >>> filter gallery >>> distort folder >>> glass with the following settings:
- Distortion 17
- Smoothness 15
- scaling 176
- Click okay
Add a brightness contrast adjustment layer to change the color and lighting to your liking.
Creating Silver, Rose Gold and Metallic Colors
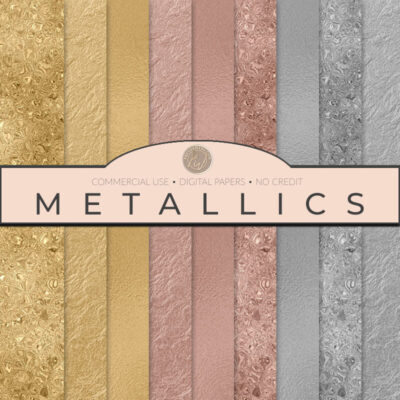
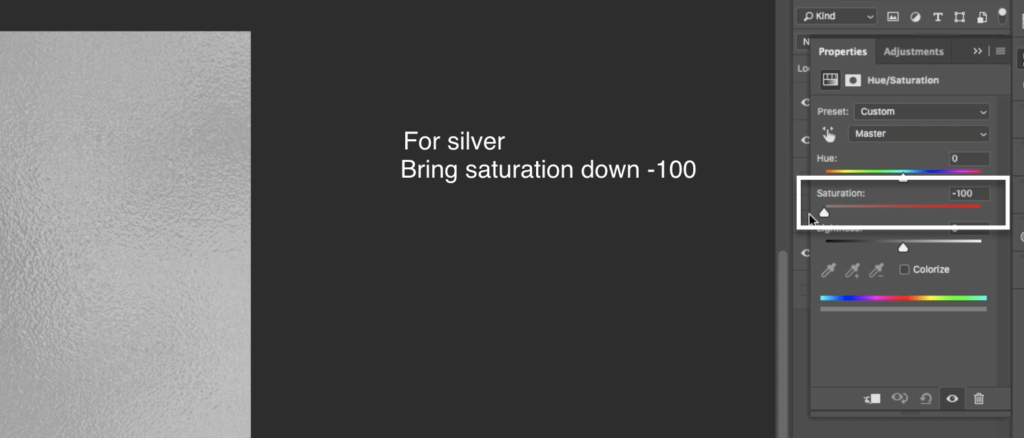
The following video is going to demonstrate how to create each one of these beautiful textures you will also learn how to change the color we are going to start with a golden base and then I’ll show you how to create a silver leaf effect and the ever-popular rose gold as well.
Changing colors
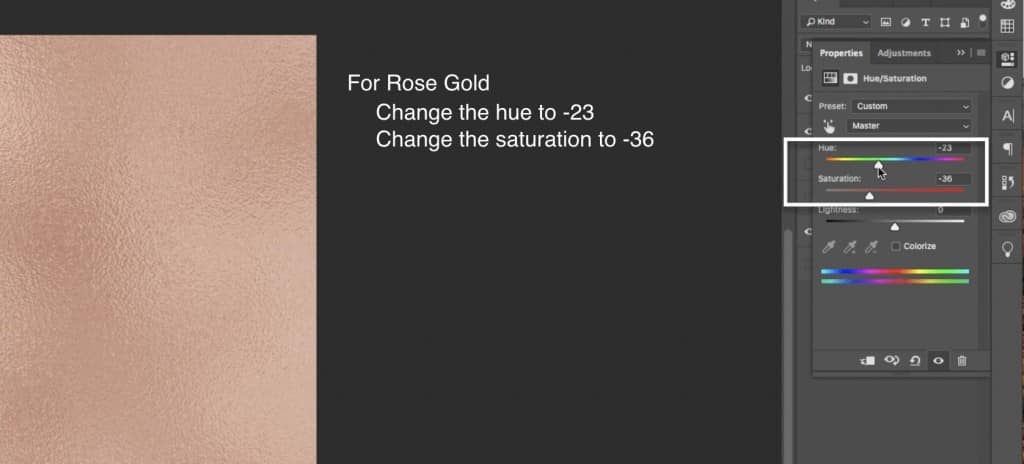
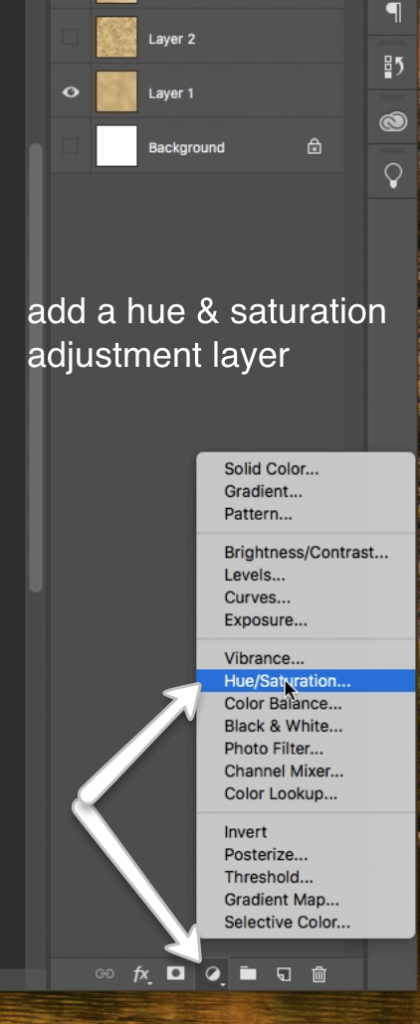
- Add a new hue and saturation adjustment layer change the saturation to the left to create silver
- And use the hue to change the color in order to get rose gold
Exporting Your Textures
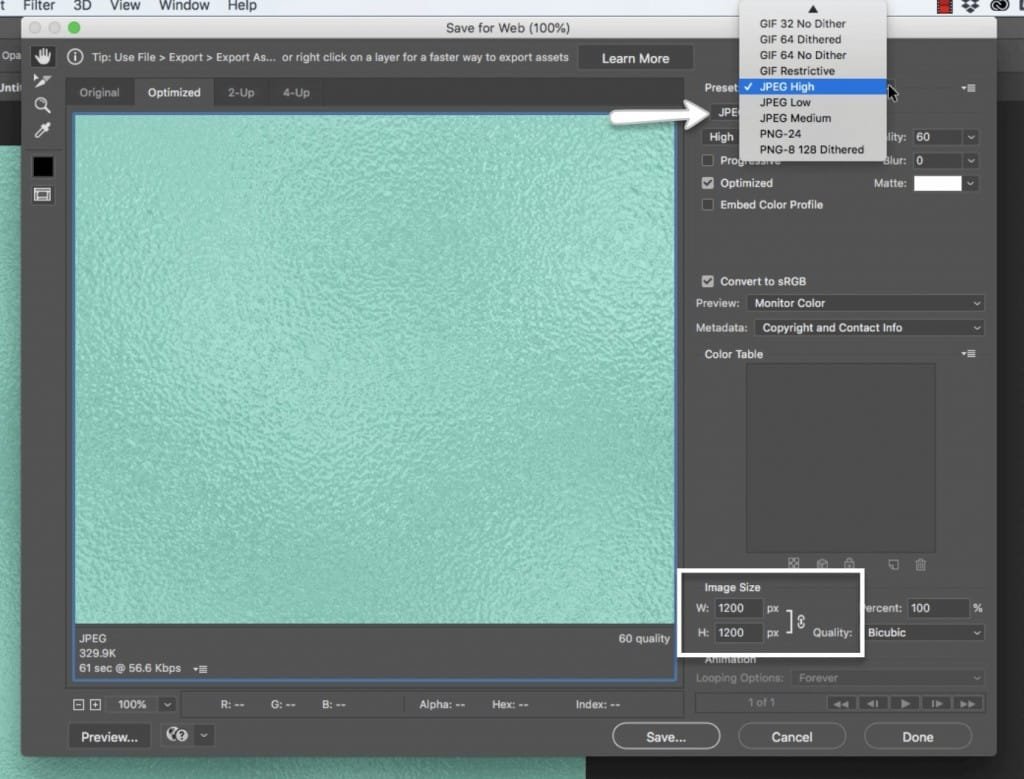
The last thing I’ll show you is how to export your images as high-resolution JPEG files in order to use them as backgrounds and in other projects. You can upload them onto online graphics editor such as Canva. Use them inside of PowerPoint or Keynote to create beautiful accents for your presentations. These graphics assets are versatile enough to use them in word documents and so much more.
Creating Digital Gold Foil Textures for Print
If you would like to create the same Gold texture of facts for print projects such as greeting cards workbooks and more you can follow all of the same directions on the video. The only thing that you will change is your document resolution which is typically a standard 300 PPI and your color mode will generally be CMYK as this is the type of ink used by most printers.
Most printers are perfectly capable of working in RGB however you should check with your printer beforehand so that you do not affect the quality of your image by using the wrong design settings.
Coming Soon!
More Natural Textures in Photoshop
In the coming weeks, I will be creating even more tutorials inside Photoshop. All of the tutorials will be focused on basic natural textures that are easy to simulate in Photoshop. You don’t have to be a Photoshop genius to learn how to create these textures for your own arsenal.
We’re starting this week with gold foil textures, plus a gold nugget and sparkle texture as well. Next week I will show you how to create super simple and luxurious marble Photoshop textures. Further down the road, I will also upload videos and blog posts on satin fabric textures and Agate and natural stone textures as well. All of these natural textures will be made from scratch inside of Photoshop.
Graphics for Non-Photoshop Readers
If you don’t have a copy of Photoshop don’t worry you’re not I’m going to be left out. I will be uploading all of the textures in a JPEG format so that you can use them outside of Photoshop as well.
I may also do a tutorial on how to color change images in Canva and other online editors. This is something that is super easy to do and you don’t need Photoshop for color changes. You will still need Photoshop to create these natural textures from scratch but as long as you have the image you can do all of the color editings on another editor.
Editing with online editors includes changing the colors of the texture, creating silver from gold, creating a rose gold effect and even creating all sorts of different metallic colored textures.
So if you’d like to see something like that you can comment here or send me an email and let me know and I will be glad to put up a video to demonstrate how to do that as well.
What’s Next?
I hope you enjoy this video and design guide and found them helpful. If you like this type of content check out other videos that cover design tips in a variety of different programs from PowerPoint to Photoshop.
More Pattern Tutorials
Subscribe to my Youtube channel where I share design tips for blogging and marketing design along with design tips and tricks on designing for business. I also share demos of products found in my shop. Subscribe to be notified every time I put out a new video!
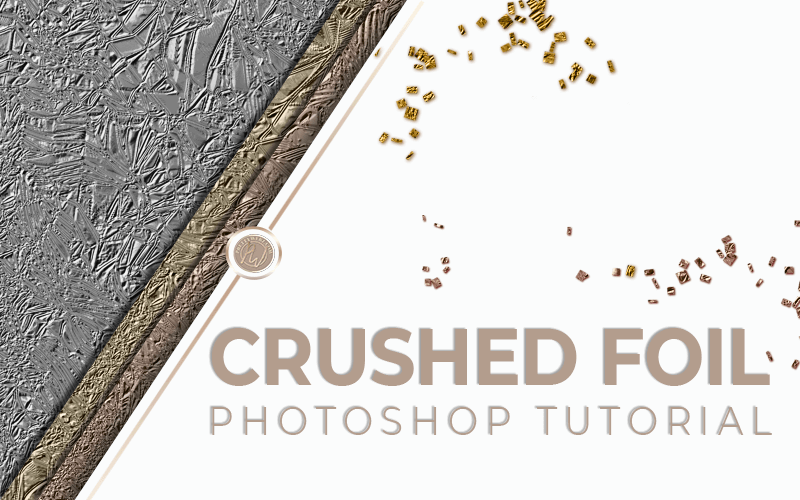
Don’t miss our growing collection of pattern tutorials on the blog. Most recently added are Crushed Foil, the Stripe tutorial and diamond plate seamless pattern tutorials and grab the all the freebies related to these tutorials in the PrettyWebz shop.
Other videos in this series
We have a few videos to teach you natural textures in Photoshop all lined up for the next month or so. We’ll cover marble textures. A beautiful agate texture that you can make with your own brand colors. Last but not least, I’ll show you a unique way to create a silk effect that will give you more control over the usually unpredictable gradient tool. Don’t miss out! Subscribe to get notified and to get all the freebies that are planned for this series as well.
Other Gold and Metallic tutorials
By the way, if you love these gold foil textures and want to learn more about rose gold and gold lettering check out this tutorial on how to make a rose gold font effect in PowerPoint and this tutorial on how to make gold font effects in Photoshop.
You can also join the PrettyWebz newsletter to get resources and freebies for your social media campaigns, marketing, and blog graphics sent straight to your inbox every single month. Just type in your name and email address in the form below in the footer of this page, and you’re in!
Want to save this post for later or let someone else know about it? Pin this image!
