Gold Color Code: How to Make Gold Font Photoshop Effects
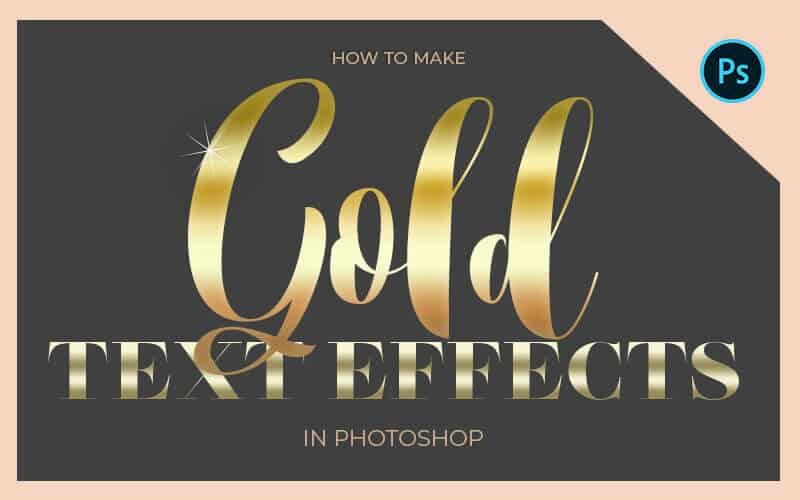
In this post, we’ll be using gold color code swatches and gold gradients for Photoshop to create stunning gold lettering effects. Learn how to make a gold font color in Photoshop and get everything you’ll need to do it, right here. No gold textures or clipping masks required for this easy to do Photoshop beginner tutorial.
Please note, this is a video tutorial, you can skip all of this and watch the video below. Also, make sure to grab the Photoshop gradient file below as well. These gold color code preset gradients will make it easy to create a gold font color for your text and gold tone for objects a breeze.
What Color Code Is Gold?
Gold is a mixture of at least two different color yellow tones that create highlights and shadows that mimic a metallic effect. To make a gold RGB color you will need to make color “recipes” then use these recipes to create gradients in Canva, PowerPoint, Word, Photoshop or any other program that supports this function. This is an example of a gold color code combination to create gold RGB color for digital design.
RGB Gold color code: Highlight: #FBF095 Base: #DDC774 Shadow: #BA9E5A
What is the color code of Gold in CMYK?
Just as with digital design, in gold in CMYK is a mixture of at least two different color yellow tones that create highlights and shadows that mimic a metallic effect.Here is an example of a CMYK gold color code recipe, used for a print design:
CMYK Gold color code: Highlight: C: 3 M: 1 Y: 52 K: 0 Base: C: 15 M: 17 Y: 66 K:0 Shadow: C: 28 M: 32 Y: 77 K: 2
The Rose Gold color codes
Previously in another tutorial, I showed you how to make a rose gold gradient font effect using PowerPoint and Word. I’ve got an all-new tutorial for you. In this one, we’ll use gold color code swatches to create a gold text photoshop gradient to use for your fonts and other objects.
I’ve also added a gold color code swatch panel in addition to the rose gold color code swatches I gave you in that post. If you’re interested in rose gold color codes, gradients and lettering effects using PowerPoint you can get the Photoshop gradients, color codes and watch the video here.
Here we’re going for the same effect, but this time we’re using Photoshop to achieve the same look.
Other Posts You Might Like
Using Gold Font Photoshop Effects
Gold fonts are always a great touch for achieving a luxurious style inside your designs. If you’re marketing your products, I know you need your text to stand out. Gold is a great way to make a statement and drive your message home. Nothing can say it better than gold.
Uploading, Saving and Creating Your Own Gradients
If you’re looking for something a little more advanced I’m also going to show you how to create, save and upload gradients in Photoshop to use whenever you need them.
No source images or outside textures required
This gold text effect does not use any textures, patterns, or images to create masks inside your text. We’re keeping it super simple for you. We’re only going to use color. Specifically, gold color code swatches to create the illusion of gold using the highlights and shadow reflective qualities found in metallics.
If you are working in Photoshop, there are ways that you can take this a little bit further. You can use Photoshop filters to create grain and texture that will complement the gold highlights and shadow effects created with the gradient overlay.
However, I promised simple, and that’s what we’re doing here. It’s my goal to help you achieve stunning looks without the frustration so we’re getting the basics down and you can get fancy with it later.
Photoshop Gold Color Code and Gradient Download
I mentioned earlier that I have a set of twenty-five rose gold color code swatches you can download for free. In this post, I’ve included a pack of 25 gold gradients for Photoshop and a sample set with all of the gold color codes in hex format. This little bundle is all you need to create a beautiful gold font effect for your designs.
Resources You May Find Helpful
Click for a direct download of the resources mentioned in the video. Resources are for reference, or in personal or client work. Tools can be used for creating your own resources but cannot be repackaged and sold on their own. Thank you!

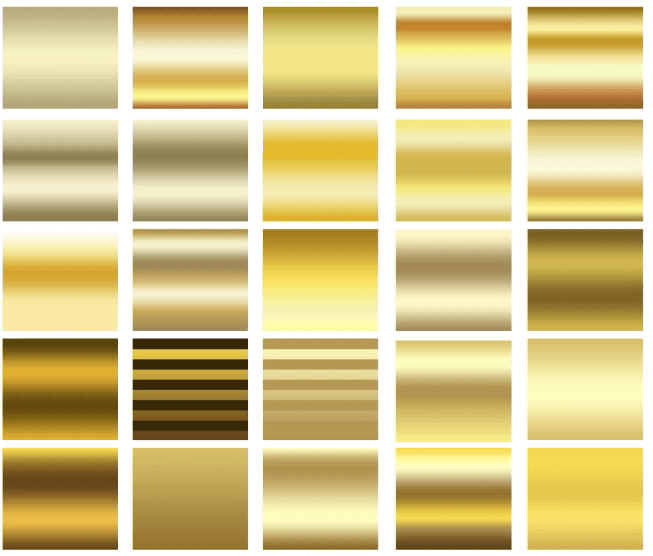
you can copy it from here, but if you want the most accurate color I recommend you download the PNG format, you can get it here.
I love to use these types of swatches in programs like Illustrator, PowerPoint, and Word because the eyedropper tool makes it very simple to select a color to use inside of your design. Almost like a real paint palette where you can dip your brush in to grab the perfect shade every time.
I know working this way is somewhat old-school but I have been using Photoshop for a long time. I haven’t quite yet adapted to the Creative Cloud library‘s. Although I do find them useful, I haven’t gotten into the habit of using this resource just yet.
However, you can create swatches based on these colors and store them in Creative Cloud very fast by eye dropping from this sample. This way you have them accessible all times. Some designers wonder how they got along without this, so I’m sure it’s beneficial to keep a gold palette if you use a lot of metallic gold in your designs.
Premium Gradients
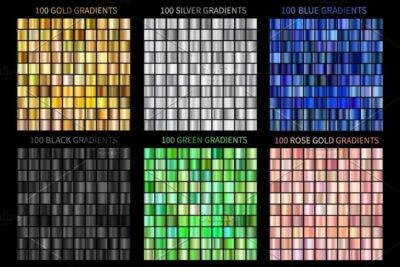
The free pack of gradients I’ve created for this tutorial is a great start for creating your gold lettering but if you want an expanded collection of beautiful metallic gradients including gold, rose gold and other popular colors here are a few I found on The Creative Market.
Gold Text Effects Video Tutorial
How to load gold font photoshop gradients
Okay, so these Photoshop gradients are not just for text. You can use them in any shape, outline, background and of course, text. To get started using them you have to load them into Photoshop. Here is one way you can load gradients into Photoshop, there are other ways to do this by going directly into the presets manager, but this is how I work so I’ll show you what I do.
Create a text layer by clicking on the <<<text>>> icon in the left panel as shown below and add your font.

With your text layer selected, double-click outside the layer title to bring up the blending options screen, see photo for example.
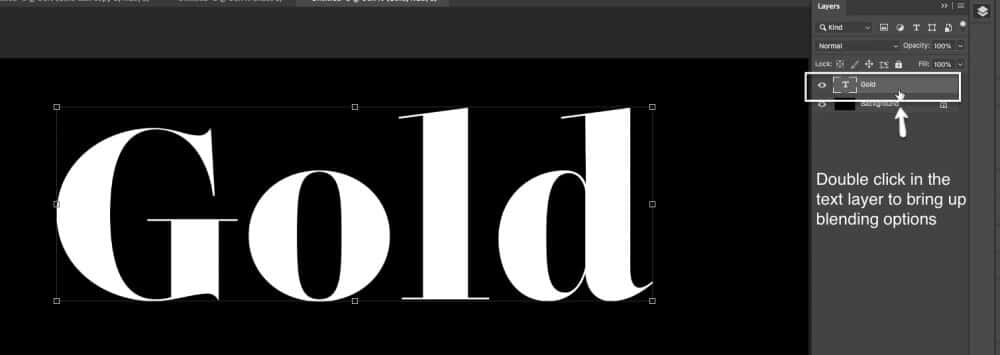
The Blending Options pop up will come up as shown below.
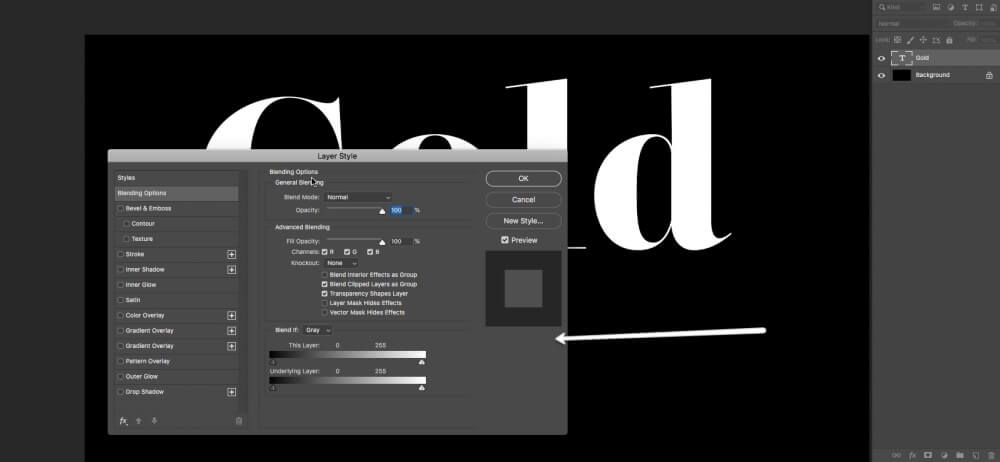
Click the <<<Gradient Overlay>>> tick box and select it to bring up the gradient controls.
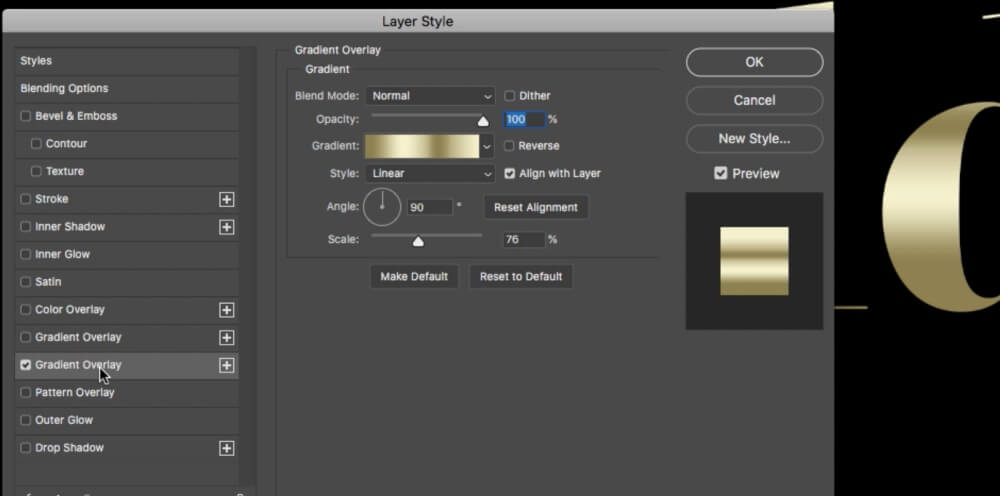
Click on the gradient preview as shown below to bring up the gradient editor pop up window.
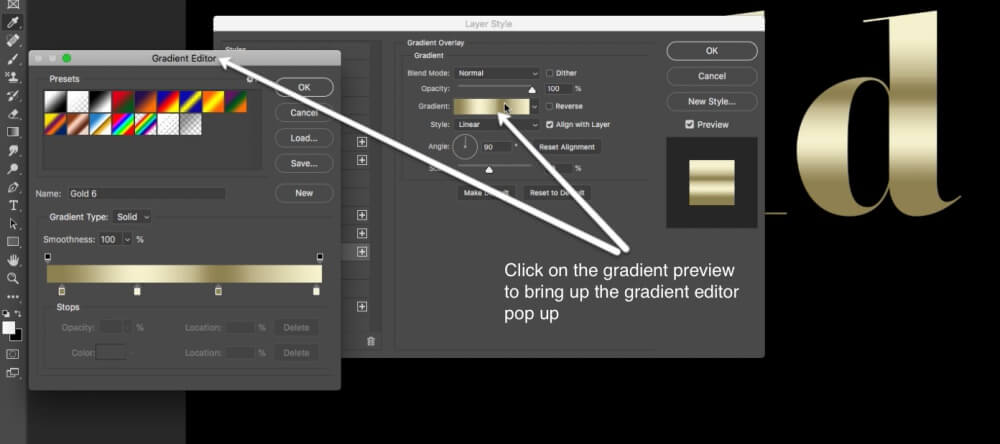
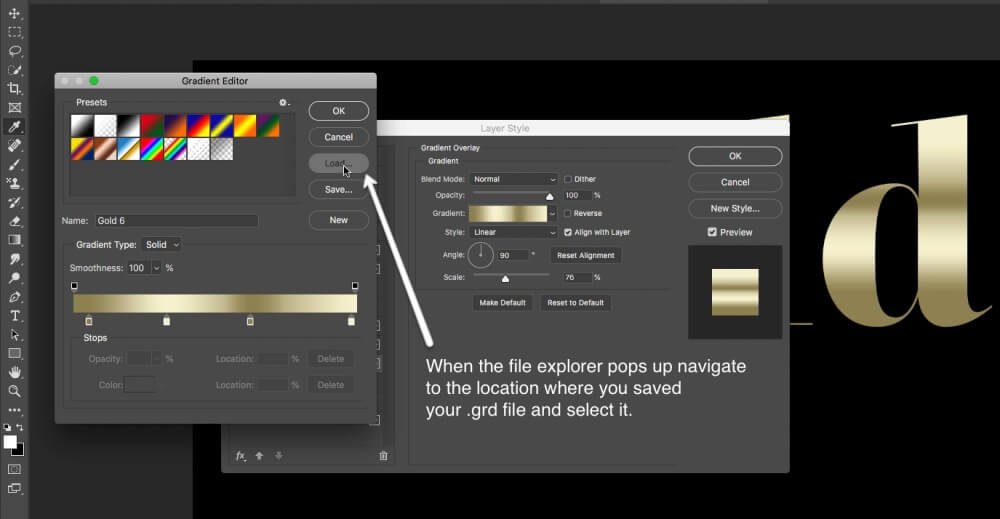
In the gradient editor, click on the <<<Load>>> button. When the file explorer pops up, navigate to the location where you saved your .grd file and select it.
How to Create Your Own Gold Text Effects with Gold Color Code Swatches
With your text layer selected open up the blending options pop up menu. Select <<<Layer>>> on the main top menu then <<<Layer Styles>>> then <<<Blending Options>>> See image below for example. Also, note that I’ve imported the gold color code swatches to use as a reference.
Tick the box <<<Gradient Overlay>>> and select to highlight and bring up the Gradient controls as we did in the previous steps.
Click on the gradient preview to open the Gradient Editor as shown below.
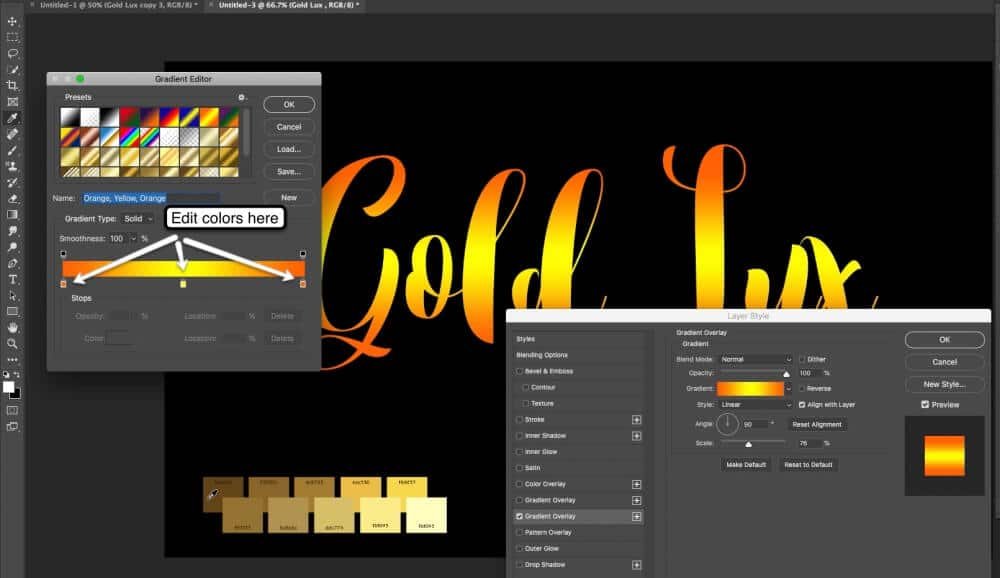
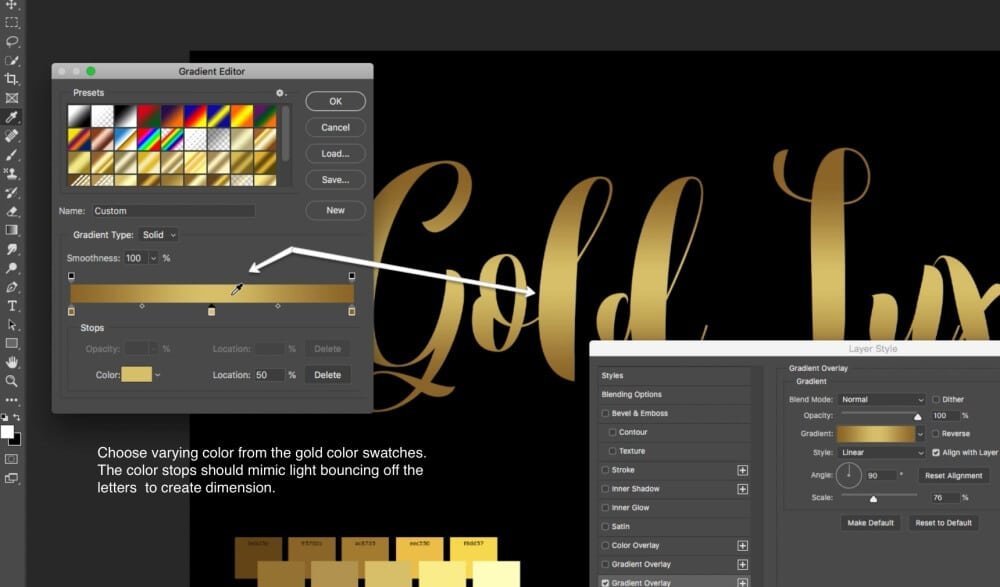
Use the gradient stops to change the color. Double click on the stop to open up the Color Picker (Stop Color) pop up. Your mouse cursor will turn from an arrow to an eye dropper. Use the eyedropper tool to select a color from the gold color code swatches you imported at the bottom of the screen.
Note: If you did not import the swatches type in the hex code for the color you want to use at the bottom of the Color Picker menu in the field beginning with #.
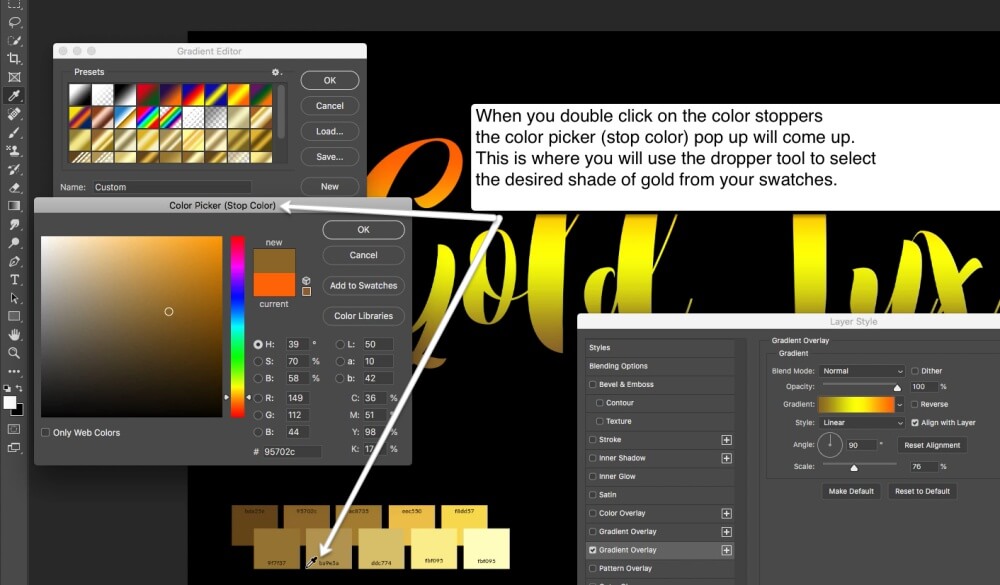
Choose colors from the gold color code swatches or add hex codes into the hex field.
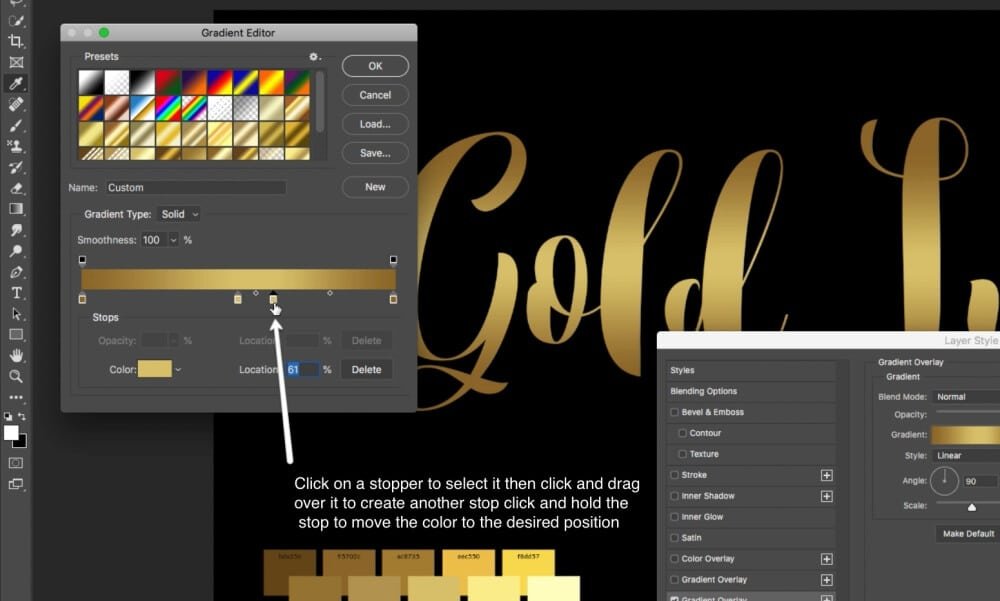
Add more stoppers to create gradient variations. You can do this by clicking on a stopper to select it, move your cursor over the stopper until it turns from an arrow to a pointing hand as you see in the example below.
Once the hand is visible on the screen, hold down your mouse button and slide across the color bar to create another stopper and move it to the desired position. Change the color as desired.
Using the Right Gradient for your font
Depending on the type of font you use, the attributes of the gradient will be different. Getting a gold font color for a thin font like modern sans-serif fonts and some script styles has a slightly different setup. It’s difficult to see the transition of light in a thin font. For a thin gold font color it requires the gradient to be a little bit more reflective. The gradient also needs to have a lot more variation between light and dark. All the variation in color is necessary to achieve good contrast for a beautiful shimmer. You can use a simple highlight in a thin font but it will be more subtle and may not look like a gold font color. The light reflection and transitions are much harder to see so this gold font color requires a little more drama.
For a gold font color using thick bold lettering, typically serif and sans serifs, the transitions can be more subtle. This type of font will look better with less contrast & less variation between light and dark. If you put too much variety in thick lettering, the gold reflection will become unrealistic. You won’t achieve a gold font color but rather, a yellow gradient.
The Key to Creating Gold Font Color Photoshop Gradients
- When making metallic gradients, you’re trying to bring out a reflection. You will have a base color, and when the “light” hits it, it makes the base color lighter and darker. The highlight and shadow colors come in at different points of the base color. Good use of highlights and shadows when creating a gold text effect will give your text dimension needed to create a realistic look.
- It’s best to use a variation, go from dark to light to dark to light in varying shades of the gold color palette provided for this tutorial, and you won’t go wrong. Creating this reflective pattern on your text will make all the difference in acheiving a realistic gold font color.
- You may have some areas of the gold text where the light hits a little bit differently. To achieve variations in highlights and shadow, you can use varying shades of highlight or shadow colors to get a more vibrant and exciting gold text effect.
- For example, if there is an imaginary something reflecting on your gold text causing a shadow color right in the center of the text. Play with the color sliders, move your stops, arrange them and add as many of these stops as you need to achieve the reflective quality that you’re looking for in your gold font effect.
Choosing Colors for Your Light and Dark Contrast
- You can pick colors from either one of the gold color code swatches. These colors are all variations of the reflection that you’ll see in gold. Therefore, anything in this set of colors is going to work to achieve a nice reflective gold font effect. Even very subtle variations in the gold color code will give you a realistic gold text effect.
- Choose a different color from the gold color code swatches. The color stops should mimic light bouncing off the letters to create dimension.
How to save your new custom gradient
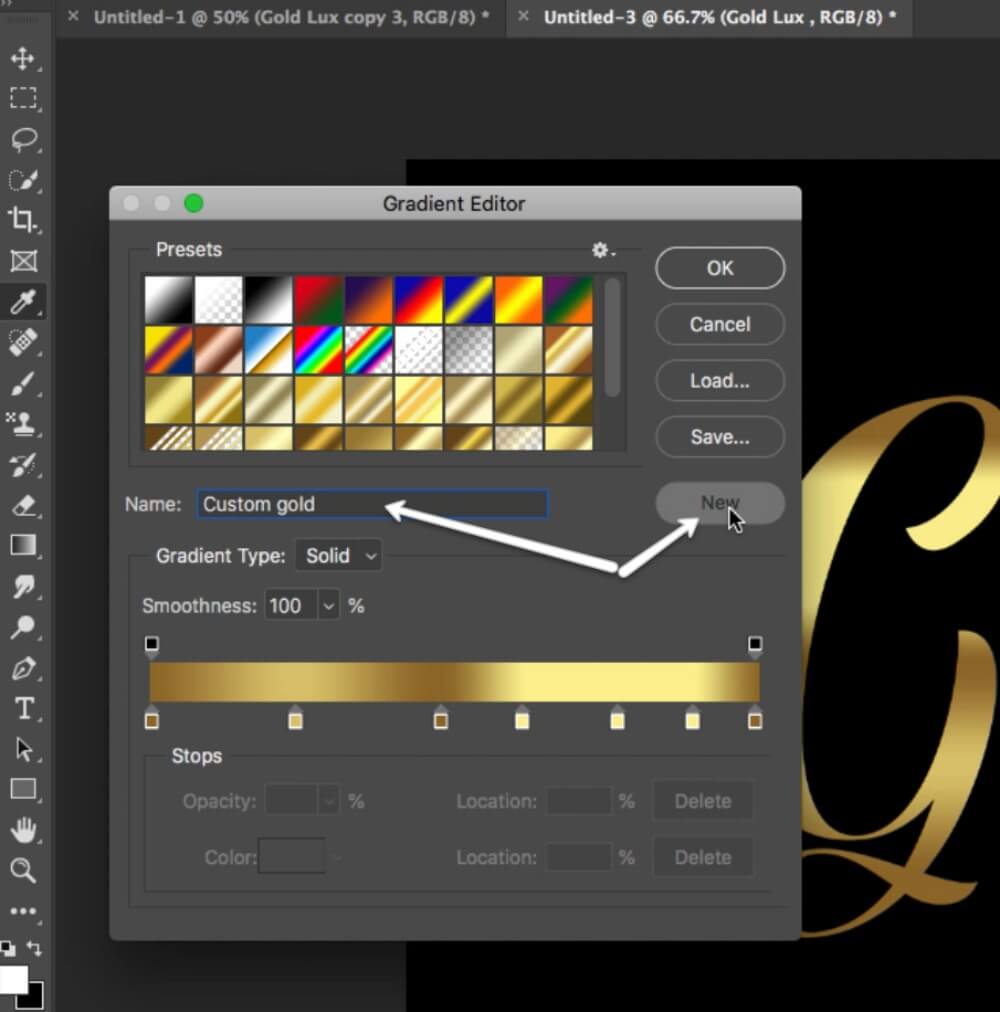
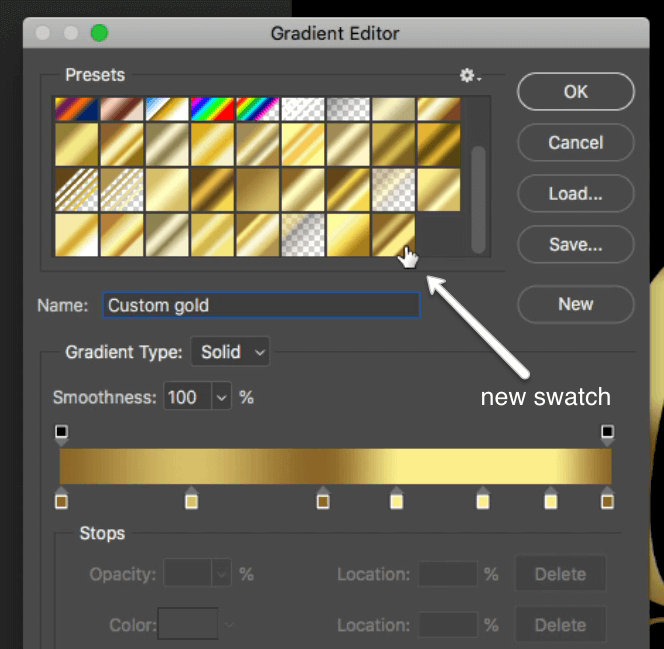
If you decide that you want to keep the gradient you created, you can save it temporarily right inside the Gradient Editor.
First, give the new gradient a name DO NOT click OK this will not save your gradient. Instead, click <<<NEW>>> Doing this will add the gradient to your gradient swatches, and you will be able to use it as long as the current gradient swatches are available. However, if you reset your gradients, you will lose it forever.
Saving your custom gradient permanently
As I said before, saving your gradient with the Gradient Editor will only keep it temporarily. To have it forever you will have to take one more step. Saving your gradients will make it possible to reload your custom gradients whenever you want. You won’t have to keep these gradients inside of Photoshop, and you can share them with others if you like.
And we’re gonna go to <<<Edit>>> at the top menu then down to <<<Preset>>> then <<<Preset Manager>>>
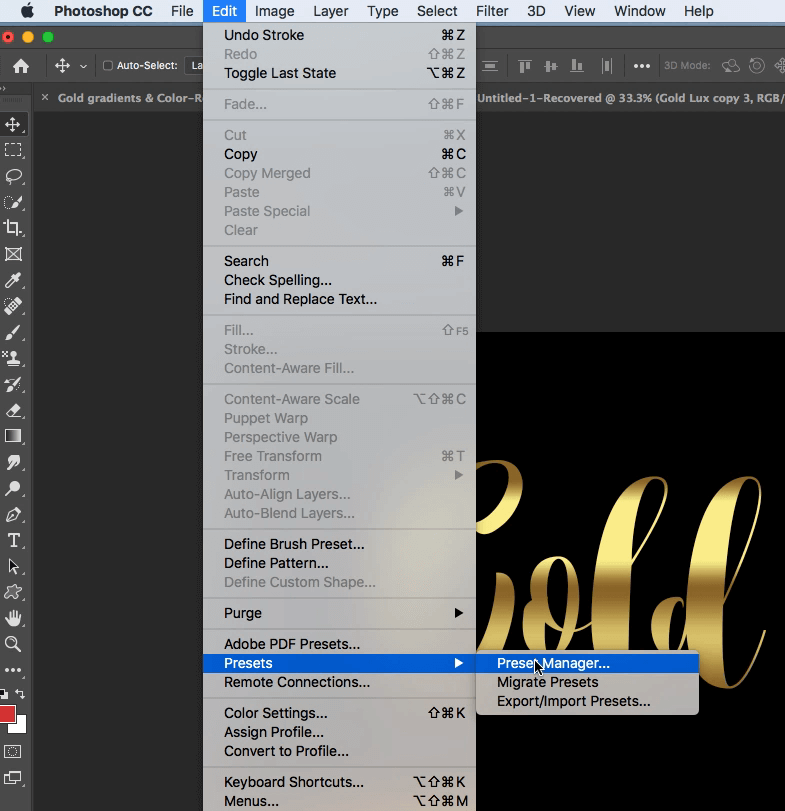
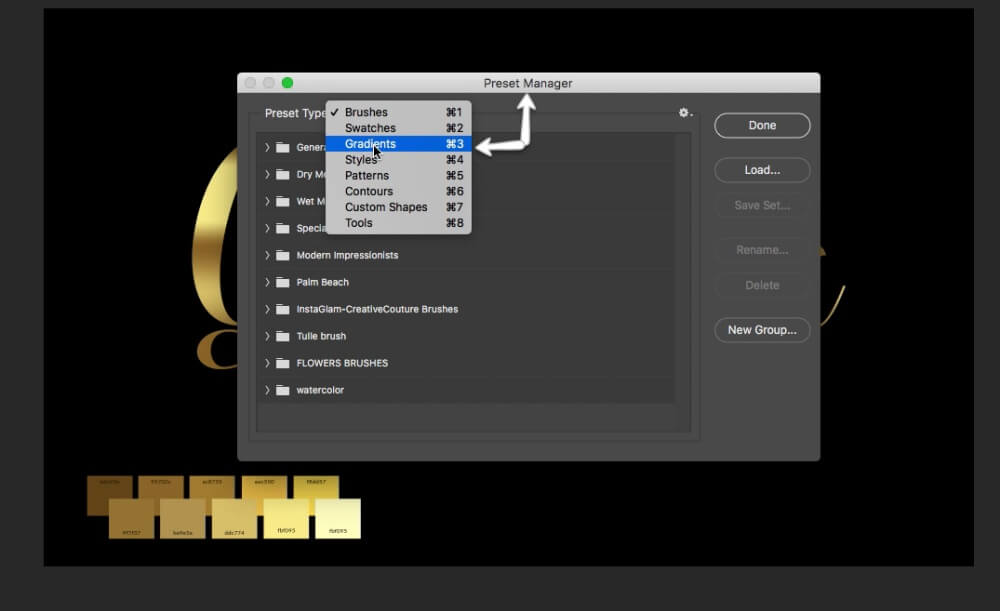
The Preset manager Popup will appear. In the drop-down menu choose the gradient preset that you want to save. In our case, we will select <<<Gradients>>>
In the Gradients preset manager, you will see everything that’s loaded into Photoshop right now, including the gradient you just saved. Click on the gradient you want to keep. If you want to save multiple gradients, hold down and then select the ones that want to save. Otherwise, choose the one and select <<<Save Set>>> The process is the same for multiples and single gradients.
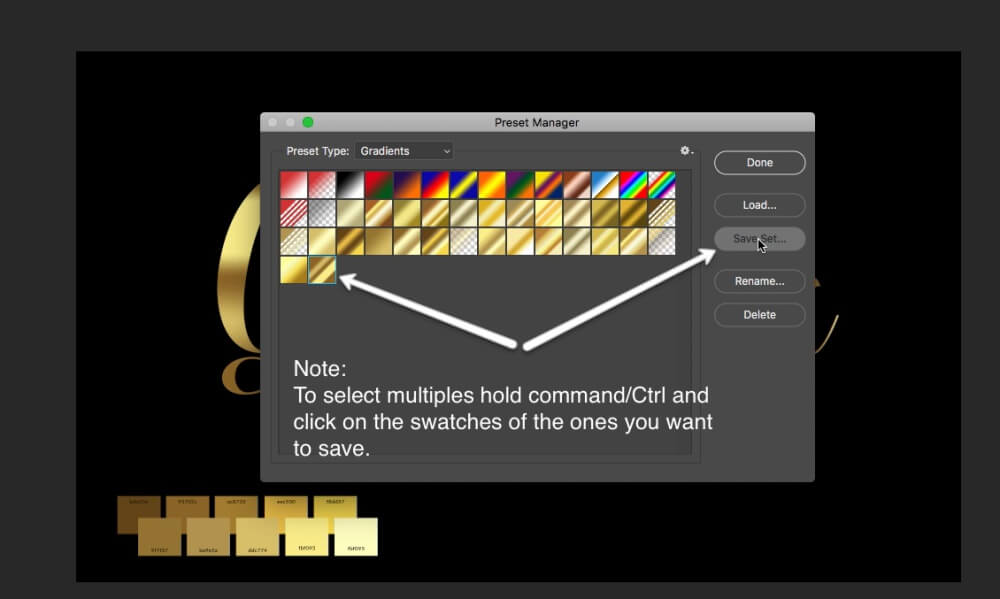
That’s all there is to it! You have officially learned how to load gradients in Photoshop. How to create your gold text photoshop gradients and how to save them permanently outside of Photoshop.
As a reminder, if you want to create this same style using PowerPoint or Word you can. Check out this tutorial on a rose gold font effect. Would you like to create this fun effect inside of Photoshop using rose gold? I have some rose gold Photoshop gradient that you can download. I also have a set of rose gold color codes that you can pick up in this post as well.
Also, take a look at this rose gold text effect in Photoshop for a ornate rose gold textured font.
What’s Next?
If you find these types of tutorials valuable, I would love it if you subscribe to the blog. When you subscribe you will be notified about all the new happenings on the blog. You will also get direct links to the latest freebies and promotions on other design resources available in the shop. You can expect to see design tutorials in Photoshop, online editors, the Microsoft office suite, keynote and many more.
This blog is not about Photoshop. This website and blog are all about helping marketers, bloggers and companies doing business online. We are here to give you resources for the design and marketing of your business. I understand that not all business owners want to learn Photoshop. Because of this, we try to keep it as well rounded as possible. While still giving you quick and easy methods for creating your marketing and blog assets.
You can subscribe on the footer of this page. You can also subscribe to my YouTube channel if you preferred to watch on YouTube.
Did you like this post and want to save it for later? Maybe share it with a friend? Pin this Image!
