

How to Convert Text to Images in PowerPoint
Converting Text to Images
Converting boring text to images in PowerPoint is easy. In fact, PowerPoint is one of the most convenient ways to create PNG, Vector, and video all in one program. Now that’s flexibility! Granted, PowerPoint doesn’t have the capabilities of Photoshop and Illustrator, but it will give any online editor some stiff competition.
One of the most popular and creative things Photoshop is known for is all the ways you can manipulate typography.
One of my favorite ways to work with typography in design is to add images and patterns to my type. I love taking boring text and creating eye-catching graphics that will grab attention.
Wouldn’t it be great to have an editor that can do this without having to get online or purchase additional software?
Today I’m going to demonstrate how to convert your text into images and create amazing visuals. The best part is, you can use the software you probably already have, and you don’t have to buy editing software or get online to do it!
The method for adding images to your text I explain in the video above is best for patterns and textures. If you’re using any of the digital papers from the PrettyWebz shop this method is super simple, easy and quick. There are no complicated steps, but it does lack some flexibility, primarily when you’re working with pictures where you need more control on where the focus should be.
Advanced Methods for converting text to images
There are so many different ways to save text to images in PowerPoint. The video above will show you the basics. Do you want to learn how to vectorize font lettering to turn text to images another way?
Check out more methods of doing it in this video and read the blog post here. Get all the templates I created in the demo and more in a PowerPoint template. So if you like any of those you can have them premade and ready to use!
This video goes into more detail on creating templates out of your vectorized fonts and explains the flexibility of converting text to images this way.
Products Used in this Demo
For this demonstration on converting text to images, I’m going to use digital papers from the PrettyWebz shop, here and here. You can download them for free if you’d like to use them but it’s not necessary.
What I’m showing you will work with any photo as long as the picture you’re using is big enough to fit the size of lettering you choose.
If you read my Valentines Day design resource post, I provided some resource links to a few background images that are great for typographic design elements as well as shapes and elements within your design, which is what inspired me to make this video.
Below are the steps to adding your images to text and I will also show you how to add an outline with gradient effects and how to save your image so that you can use it on your blog or for social media.
Font Inspiration
Need some fonts that would work great and are free to download and free for commercial use? Check out this roundup of new fonts.
Here are a few things to keep in mind:
- It’s best to use a thick or bold font so that the image can be seen clearly within the text.
- The more substantial your text is, the better. The finished design will look. Keep size in mind. Your font size will dictate the size of the finished image.
- You can change the slide size in the design tab the get the exact dimensions you want for your project.
Project Steps
Step One
Remove the bottom portion of the sections in your document that get created by default when you open the program. To do this all you have to do is click on it when you see the cross click delete on your keyboard.
Alternatively, get a completely clean canvas. Just rubber-band select everything and hit the delete key on your keyboard.
Step Two
In the Design tab, go to >>> “slide size” drop-down and >>> choose custom size and set to whatever dimensions you need for your project for our demo we will use 21×21 >>> select ensure fit.
Note:
The size you choose here will determine the size of your completed image. Make sure it’s not too small. If it’s too big, you can always resize down but resizing up can cause pixelation and make your image look terrible.

Step Three
>>> Select “insert text box” from the insert tab at the top of the page and click anywhere on the screen to begin typing out your letters.
Step Four
Type the word or words you want to use and >>>highlight all the lettering with your cursor.
Step Five
Choose the font and size from the home tab fonts section of the home tab ribbon, see the image below if this sounds a little confusing. The Options panels in Office products are not user-friendly, so this may seem confusing as I explain it. To help clear this up, I added photos with the areas you need to be in highlighted in pink.
The font and size we will be using for this demonstration are Broadway in size 250, all uppercase.

Step Six
Highlight the text with your cursor and>>> select the format tab, this will bring up the drawing tools.

Step Seven
>>>Select text fill drop down menu and >>>select picture
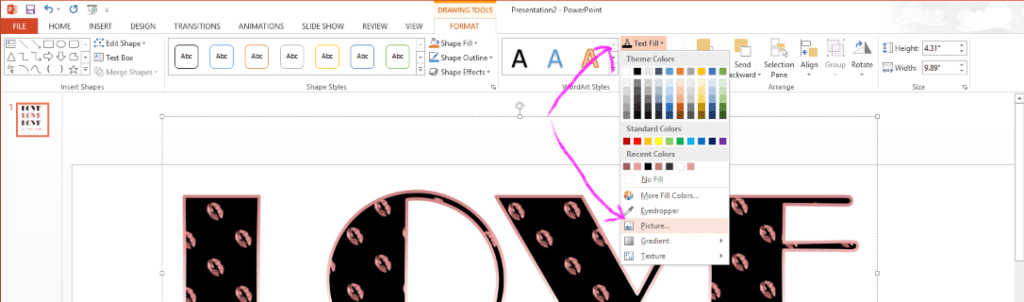
A dialog box will appear >>> select “from a file” browse button and navigate to the image you want to use to fill the text.
Important Note:
You can choose an image from your computer or grab one from the internet. You have options for both. However, if you are selecting images from the internet, you have to pay extra attention to licensing of the image. Many images found online are copyright protected, and you can’t use them without the owner’s permission.
Just be aware, the option is available to search online for photos, images, and clipart but that doesn’t mean you don’t have to be careful and be diligent of the licensing for elements used in your artwork.

Step Eight
The program will stretch the image inside the lettering. The program automatically expands your photo to fit the text. To fix any stretching or disproportion of your image inside the text click on the small square with the arrow in it at the bottom left corner of the WordArt Styles option box.

The “Format shape” pane will appear to the side of your design. This panel is where you can make all the adjustments to your image position and size.

Step Nine
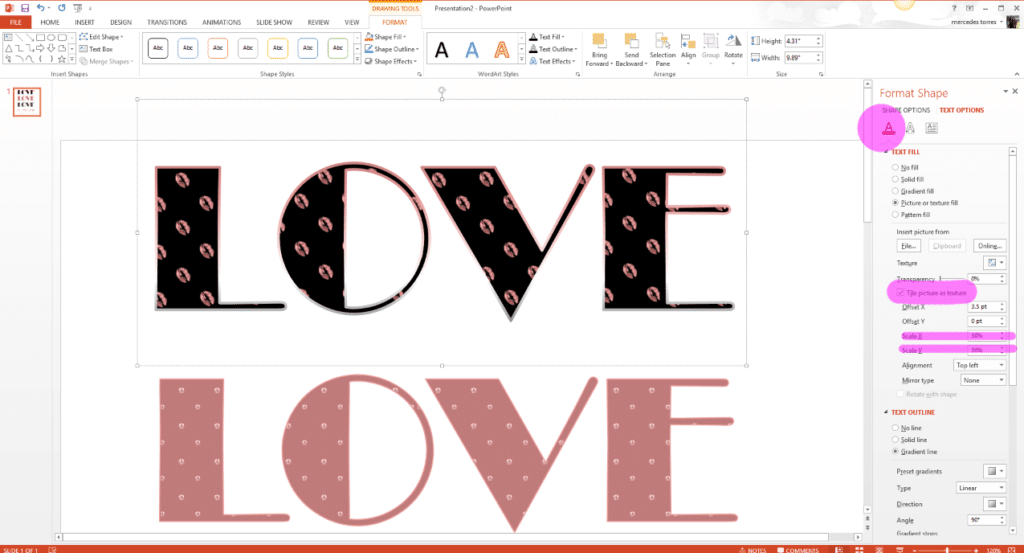
From the Format Shape pane >>>Select text options at the top >>>Then select the underlined letter A >>> select “tile picture as texture” it will scale the photo to fit the text.

You can change the scale of the photo to whatever you think looks best by changing the percent value in the scale “x” and scale “y” areas. For this design, we used 50% on both.
Outlines and Gradients
If you want to refine your text image even further, PowerPoint gives you options for outlining or adding a stroke to your text image. Not only can you add a stroke but you can add gradients to the stroke and change the color.
Adding Strokes and Gradients
If you go further down on the pane, you can add a stroke to your text. You can choose between solid or gradient. For this example, we’ll add a gradient outline to the design.
 1. Go down to “gradient stops,” define your color palette >>>select the paint bucket drop-down menu under the stops >>> select the eyedropper tool at the bottom.
With the eyedropper tool selected hover over your image to pick colors from the image to add to your color palette.
Alternatively, you can set predefined colors by inputting the RGB value in the “more colors” section of this dialog box.
2. With the text highlighted >>> Select the gradient stoppers one by one to define the color of each using the “color” drop-down menu (paint bucket) to choose your colors from the “recent colors” section.
The software will automatically save any colors you selected using the eyedropper here until you close the file.
3. Define the width of the outline stroke in the “Width” section (ours is 3pt.)
Watch the Video
If you would like to see a demonstration on how to do all of this, check out the video above. The video has a full overview of all the steps we used to convert text to images.
I hope this demo for designing in Powerpoint was useful. For those of you who don’t want to use Photoshop but still want the flexibility of working on or offline, we’ve got you covered.
PowerPoint is a fantastic design asset. There is so much you can do with this program. PowerPoint isn’t just for slide decks. You can create custom images and even full-length videos. We will be exploring that more in the future.
What’s Next?
I’m sure you will get tons of use from this tip for using PowerPoint to convert text to images. If you want more graphics resources to use inside your text you can get more themed design resources for Valentines Day, St. Patrick’s Day, Easter and more for free in the shop.
Check out the love and romance themed resource post we did for Valentines Day. The St. Patricks Day roundup and the Easter roundup as well for free for commercial use images, clip art, and fonts for all your projects.
You can also check out our free Valentine’s Day blog headers, and Rose Gold headers for your blog and get additional free and premium graphics visit the PrettyWebz shop.
Get more free graphics and graphics resource roundups by signing up for the PrettyWebz newsletter. Never miss out on a freebie in the shop or on the blog again!
Every resource we offer on the blog and in the shop is put together in a convenient package for you and deliver to your inbox every single month!
Learn more about graphic design tips and tricks outside of Photoshop, and Illustrator by getting on our list! Please subscribe to our newsletter for tons of resources and freebies and get notifications for all the latest resources on the site.
Until next time, happy designing!
