Social Media Content Creation the Quick & Easy Way
Social media content creation, faster & easier hacks to creating the best content possible in less time
Bulk editing social graphics with PhotoScape part 2:
Often the most time-consuming aspect of creating social media content is keeping up with putting together and composing your message. Batch resizing is a great way to shave some time off your social media content creation tasks. There is so much more that goes into editing images and preparing them for upload on Instagram, Facebook, Twitter, Pinterest and your blog.
Would you like to see how to shave tons of time off your social media image editing time? You can also resize images in batches with PhotoScape see part one of the image editing with PhotoScape series to find out how.
In this post, I’ll teach you how to go further with your visual content creation. I will walk you through batch editing inside the PhotoScape batch editor.
When batch editing makes sense
There are times when batch editing your social media content with PhotoScape won’t make sense. The editor makes changes to all images in the same way.
This feature is a problem for posts that need to have a variety of different messages, post titles or graphics. What PhotoScape does to one image, it does to all of them.
I want to give you an idea of how I use PhotoScape for batch editing. These are the best uses I’ve found for this tool, and I’m sure you’ll find more.
Campaigns & Event Reminders
Campaigns and event reminders are by far the best use of batch editing social media content. This type of content tends to have a consistent message.
If you want people to remember, you have to keep telling them. People have a lot going on in their lives. Most people don’t know what they had for breakfast yesterday, but a consistent message gets remembered if only from simple repetition.
If you’re running a campaign, using a specific hashtag, or you need to remind followers of something a few times, batch editing is perfect for that.
Examples:
- Sale starts Feb 1st
- Great event Nov 23rd 7 pm
- Art exhibit Thursday at 8 pm
A particular post that will be valuable in the coming weeks such as blog posts, promotions, sales graphics, etc., you can batch them all!
Blog Series and Challenges
Do you need to remind people of an event your hosting? What about a daily, weekly or monthly challenge post you send out? Images of these types of social media posts lend well to bulk designing. Ongoing messaging is also great when you have a series of blog posts.
Examples: February, PhotoScape editing series, catch them all here) (Keto mania, new series this month on the blog) with different photos showcasing food, tech, design theme, etc.)
Blog Feature Images
If you use the same idea for all your blog feature images with different images, you’re good. All you have to do is leave off the words and add blog titles and messages in later. You’ll get different images for all your features. You can also take out the extra steps of adding branding, overlays and other elements to your base feature. All that’s left to do is add your title.
How to create batched social media content in PhotoScape
Important:
You can download this software for free from PhotoScape.org. We are using v3.7 for this demonstration.
►Do you prefer to watch how batch editing with PhotoScape works? You can scroll down to the bottom of this page for the video version of the following steps.
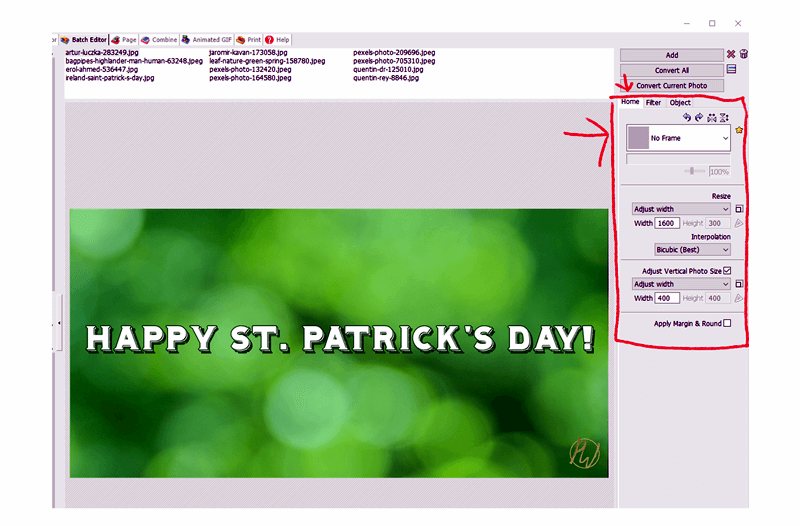
Once all images have been placed in the viewer you can select editing options as follows:
From the “Home” tab
Choose a frame. Try several options before deciding on your design.
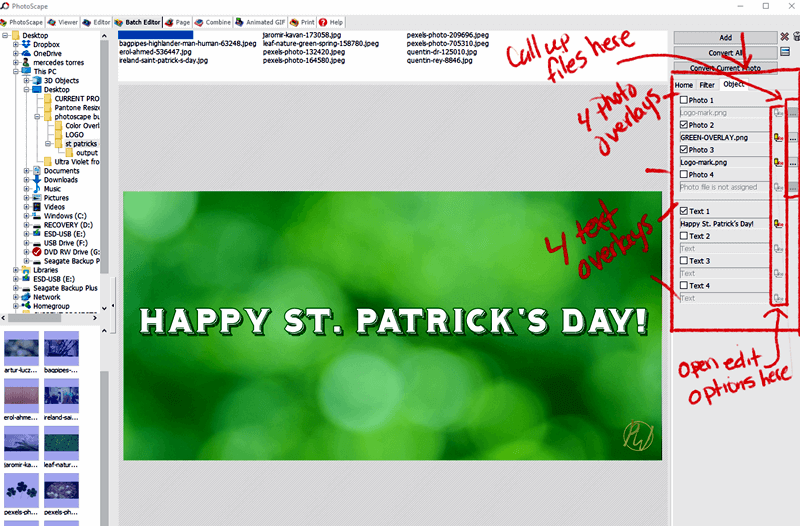
In the “Object” tab
- The objects tab is where you insert your text and image overlays to your background image. You can set up to four image overlays and four sections of text.
- You can use image overlays for PNG clip art, your logo or a particular background for your text area.
- Make several colored boxes to have ready for color overlays. You can do this in Canva or PowerPoint very easily. I have videos on how to create and export images in PowerPoint. If you want to know how to do that you can check that out as well.
- You can download the overlays I used here.
- The image dialog box has options for opacity
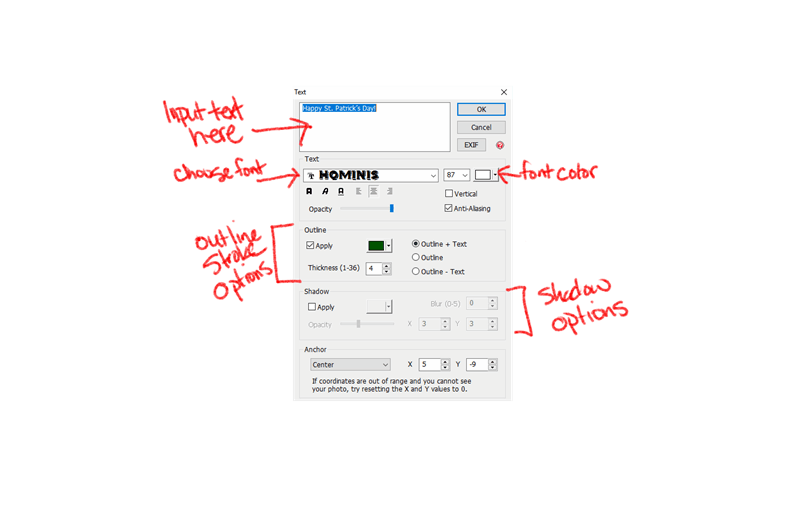
- You can have up to four sections for text if you want different sizes, colors, fonts or if you want more control of the leading (space between the lines of text) insert your message, e.g., your URL or hashtag. You can customize your text by double-clicking on it.
- The text dialog box has several options for opacity, outlines, colors, shadow and of course font selection and styling as well.
In the “Filter” tab
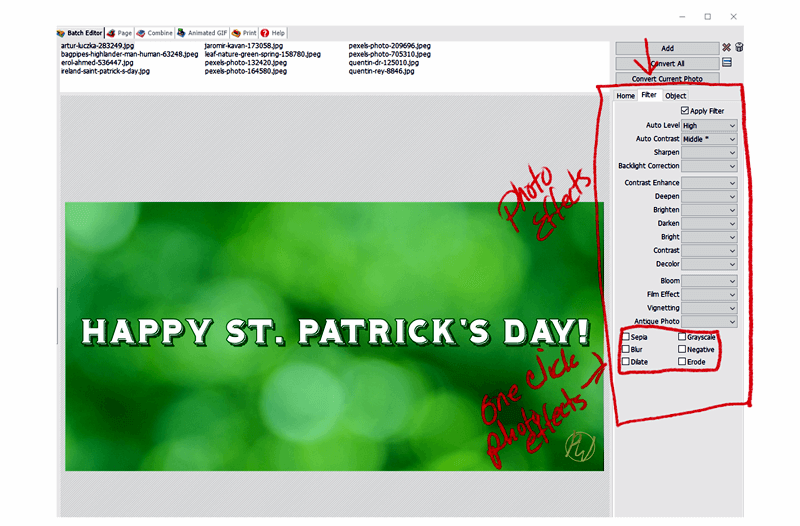
- Play around with color and contrast settings. I like to use “Backlight,” “Deepen” and “Decolor” to make text stand out even more but you can play with the setting to get the best image settings for your social media design.
- There are many filters and presets you can create just by experimenting with the settings. You won’t have the ability to generate hue filters, but there are ways around that if you want a specific hue on your photo, (please see color overlays above).
- There are also some presets for traditional photo editing like sepia, grayscale and blurring options that are all one click applications. These options make it even more convenient to create striking social media design that is well balanced and flows well from image to image.
- Also try out the “Film,” “Vignette” or “Antique Photo” for special effects that will give your images that extra drama if it’s appropriate for your social media content theme.
- I tend to stick to simplicity for social media and blog images because I want my pictures to enhance the message not steal its thunder. It’s important to watch for balance and make sure you’re not overwhelming your message with your social media design.
Reviewing Images
Review all of your photos to make sure the message is clear. Does your image makes sense and sit’s well behind your text? If you have a picture that just doesn’t work it’s easy to switch it out for another.
Saving Styles
You may have defined a style that you like and want to use again. Make sure to save it as a “configuration” at the bottom of your page. Doing this will save you even more time the next time you come back in to create that same style. I will go into this more in video three of this PhotoScape batch editor series.
Saving Your Edited Images
Click on “Convert” to convert your photos, select the relevant “Save” options from the pop-up window and save. (To see this demonstrated in-depth, please see part one of this video series.
What’s Next?
For more bulk editing tips in PhotoScape check out the first video in this series. Part one demonstrates how to resize your images in bulk in PhotoScape.
Also, look out for the third and final part in this PhotoScape bulk editing series. A step by step guide to creating templates for blog features. Also, how to add text after bulk editing and saving configurations for your work.
Do you want more tips and tricks for creating blog graphics, social media graphics and more without Photoshop? I have a few options for you.
Learn how I use PowerPoint as an image editor and more resources on image editing in my video libraries:
- Web Graphics – Creating and using website and blog graphics
- Mockups – How to use mockup kits for more faster designing.
- Graphic’s for Business Owners & Bloggers – Just like the name implies, general tips and tricks for online business owners and bloggers.
Get exclusive PrettyWebz family discounts by signing up for the mailing list! We offer a variety of web and social media graphic’s elements in our shop.
Not only will you get discounts but, you will also get a monthly roundup of free graphics and resources. All of this with direct links to everything.
You don’t have to go through the hassle of inputting your information again. Just click and download! Making life easier is how we take care of our family!

